1 - Dig a hole slightly larger than the size of the root; 2 - Place bokashi fertilizer at the bottom of the hole; 3 - Add mycelium of mycorrhizal fungi; 4 - Place the tree in the hole; 5 - Place vermicompost along with worms on top of the ground; 6 - A very important point when replanting a tree is to plant it exactly at the depth at which it grew, that is, up to the root collar!; 7 - Place cardboard or burlap on top; 8 - We lay the turf upside down on the cardboard along the outer edge, that is, so that the grass is at the bottom and the earth with roots is at the top; 9 - Cover the top of the upturned turf and cardboard and right up to the mesh with mulch; 10 - If possible, install tubes; 11 - Place the grid; 12 - Place two sticks on opposite sides of the net.
in autumn
Gardeners recommend replanting plum trees in the fall. The advantage of this method is that by spring the plant will finally take root and adapt to its new location. However, this method also has a number of disadvantages. One of the main disadvantages of autumn replanting is that the gardener will not be able to monitor the condition of the plant. For example, if the rhizome freezes or rots, this will become known only by mid-spring. Unstable temperatures can also interfere.
Important!
Carry the plant on a plywood sheet or by wrapping the rhizome in plastic.
This way you will save the earthen lump while moving the plum to a new place. Frosts may occur earlier than expected in a particular climate zone. The temperature will drop below zero earlier than a month after planting, and there is a high probability that the root system will freeze. A mandatory aspect of replanting a plum tree in the fall is mulching. Mulch the tree trunk circle with sawdust or peat-based mulch. This treatment will protect the plant root from severe frosts and help retain more heat. Mulching the tree trunk circle.
in spring
When planning to replant a plum tree in the spring, gardeners prepare a planting hole in the fall. When fertilizing a hole for planting, add to the fertile soil mixture, in addition to humus and peat, 300 g of superphosphate, 50 g of potassium salt and 350 g of ash. Otherwise, the process is exactly the same as when performing the procedure in October.
Features of transplantation taking into account age
Weather conditions are not the only factor that determines when to replant a dormant apple tree in spring or fall. The differences lie in the agricultural techniques used.
| Up to 1 year | 2-3 years | 4-5 years | 6+ years |
| The operation is performed extremely rarely, because there is a high chance of damaging the root system | The root system is formed, the likelihood of damaging the tree is minimal | The procedure is not carried out in the spring, because a new home will not come to the tree’s yard. | The survival rate of transplanted old Malus is higher if the work was done in early spring |
| The root system is carefully branched by hand | Only use the “with a lump of earth” method | The root ball is quite powerful and heavy, so you can’t do without special equipment | The complexity of the situation lies in the fact that aged trees regenerate at different rates, so it is impossible to choose the optimal period |
| If the work is done correctly, several new roots will appear on each branch, which accelerate the absorption of nutrients from the ground | They dig the apple tree out of the ground and carefully move it to a new place along with a lump of earth. | 48 hours before digging, water the apple tree generously, remember the location of the branches relative to the cardinal directions. | They work with old green spaces, taking into account personal experience and an objective assessment of the health status of a representative of the plant kingdom |
| Young seedlings initially grown in a container are practically not injured | The hole is dug and filled with 2.5 kg of complex fertilizers 2 weeks before the expected date of work | The planting is dug up at an angle, lifting levers are placed at an angle, the Malus is removed from the ground and transferred to dense material | Remove damaged and weak leaves on the crown, tie up spreading crowns so as not to damage the trunk |
| The main root is picked at a distance of about 20 cm from the root collar | For each Malus transferred, 200 g of superphosphate is used | Transfer to a new place, bury, water abundantly | The further procedure is similar to the technique described for the age group 4-5 years |
| Dig up a seedling at the end of September, remove the leaves | After transplantation, the green space is watered abundantly | – | – |
| The root is cut to 1/3 of its length | – | – | – |
If you decide to replant a dwarf apple tree in the fall or early spring, then adhere to the above recommendations. Emphasis is placed on the age of the tree and weather conditions. Botanists say that spring is a comfortable time to move a dwarf tree.
Note! In spring or autumn, only those who grow planting material for personal use need to replant a young apple tree.
Questions and answers
What to do if a plum planted in autumn dries out?
There are many reasons for drying out. If at least a few buds have opened, the tree should not be completely cut down, but rather a side shoot should be allowed to develop, and then the dried branches should be trimmed.
Is it possible to replant a plum tree in the fall?
The transplanted plum tree takes root well in both spring and summer. The main thing is to follow the rules of transplantation and further care.
Is it possible to grow a plum from a seed?
A tree grown from a seed will be wild, without retaining its varietal maternal qualities. He needs a vaccination.
How long should I bury the seedlings?
The root collar should be at soil level. Burying it deeply leads to rotting and death of the plant.
Do I need to prune seedlings after planting?
After planting the seedling, it is pruned the following year.
Plum is considered a capricious fruit tree, but if the rules of planting and care are followed, it grows and bears fruit for many years, and summer residents everywhere plant plum trees in their garden plots.
Source
Possible mistakes when planting plums
Even in such a simple matter as planting a plum tree, novice gardeners manage to make several mistakes. Here are the most common ones:
- Plums are planted at an angle.
- Trying to create comfortable conditions for growth, they add excessive amounts of water and fertilizers.
- They do not take into account the growing strength of the selected variety and plant low-growing and vigorous plants at the same distance.
All that is needed to properly plant a plum is a little time to study the technology and bring it to life. After just a few years, the plum will certainly fully thank the owner for the care provided with a bountiful harvest of sweet fruits.
Video: how to grow plums
In a large garden or cottage there will probably be a tree that produces a harvest of sweet and aromatic fruits -. If plum trees do not grow on your site, it’s time to plant them. By the way, this is usually done in spring or autumn. Well, in our article we will talk about how to plant plums in the fall.
Autumn planting of plums - choosing a place and time
Since plum is a light and heat-loving crop, the best site for it will be small hills or hillsides that receive sunlight. At the same time, the site must be protected from strong winds. Fertile, but at the same time loose soil suits the tree. Wetlands and lands with groundwater above 1.5 m are not suitable for this purpose.
If we talk about when you can replant a plum in the fall, then it is best to choose a day at the end of September, when there are no frosts yet
It is important that the tree’s sap flow slows down, but at the same time it has time to get used to the new place
How to plant a plum seedling in the fall?
Two weeks before planting, you need to dig a hole up to 60 cm deep, about 80 cm in diameter. Fertilizers mixed with the excavated soil are placed at the bottom (a bucket of rotted manure, potassium salt 65 g, superphosphate 350 g). If the soil is dense, it can be mixed with sand to improve drainage properties.
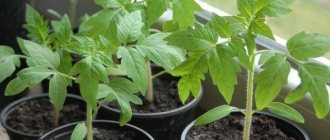
When choosing a seedling, make sure that the plum seedling has a strong root system. For planting, it is optimal to use a one- or two-year-old seedling
It is lowered into the planting hole, the roots are carefully straightened and the soil is covered, periodically trampling it down.
It is important that the root collar was located at a height of 3-4 cm from the ground level. If necessary, stick a stick into the hole for the tree, which will become a support for the unstable plum
Then the tree is watered and mulched with peat or.
If, due to circumstances, you have to plant a seedling late in the fall, then for better wintering, the plum needs to be buried in a small ditch at an angle and almost completely covered with earth, peat, and in winter also with snow. And already in April the young tree can be transplanted to a permanent place.
How to properly replant a plum tree in the fall?
It happens that a gardener needs to transplant an adult plum to another place, for example, more lit or closer to plums of other varieties, which will help improve the yield. Keep in mind that “relocation” is tolerated well only by young trees under 5 years of age. Two weeks before replanting the plum tree in the fall, dig a hole in a new place and put fertilizer on its bottom. The tree is dug up along with a lump of earth. It is recommended to wrap the earthen lump tightly in damp burlap. Then the plum is carefully placed in the prepared hole along with burlap, covered with earth, trampled down, watered with 1-2 buckets of water and mulched.
In central Russia it is almost impossible to find a summer cottage where plum trees are not grown. It has long won the love of gardeners due to its unpretentious character, good frost resistance and abundant harvest.
If you follow the simplest rules for growing fruit trees, plum trees do not require any special attention: they rarely get sick, are practically not affected by pests, and are undemanding in terms of fertilizing and soil composition. Questions arise only when there is an urgent need to move an adult plant to another place in the garden. In such a situation, you must strictly follow all the advice and transplantation technology shared by experienced gardeners.
The best varieties of plums
As a rule, all nurseries in the Moscow region are happy to offer a huge variety of varieties of this crop. In order not to completely get confused in the varietal diversity, you need to know that plums are divided into three main groups:
- early;
- mid-season;
- late.
Prominent representatives of early varieties that have proven themselves in growing in the Moscow region are “Iyulskaya”, “Golden Ball”, “Zarechnaya”, “Krasny Shar”, “Record”.
Popular mid-season varieties include “Mashenka”, “Romen”, “Souvenir of the East”, “Memory of Babylon”. Late representatives of juicy fruits are “Svetlana”, “Zhiguli”, “Bogatyrskaya”, “President”.
Tree transplantation: how to help a seedling
There are very specific conditions under which a transplanted tree has the opportunity to completely restore the root system and begin the growing season in a timely manner.
This is the optimal soil humidity and temperature, taking into account the age of the tree, with a minimum time between digging and planting, and necessarily during the period of biological dormancy of the tree, winter sleep.
Wet soil
Scientifically speaking, the soil moisture around the roots of the seedling should be 70-80%. This means that 70-80% of the air pores will be occupied by water. Soil moisture can be assessed using a special device - a moisture meter. Or if there is no device, then using the old-fashioned method.
To do this, you need to take a lump of earth in your palm, lightly squeeze it and release it. If after this the lump easily crumbles, then the humidity is insufficient and ranges from 20% to 50%. If the lump does not crumble even when tossed, the humidity reaches 70-80%. At 100% humidity, wet soil sticks to your fingers in small lumps.
Soil temperature
Tree root growth occurs at soil temperatures from +4°C to +30°C. At these temperatures, new root hairs grow, roots branch, and juices are absorbed from the soil. In this case, the best and fastest root growth occurs in the range from +10 to +20°C.
Biological dormancy of a seedling
The biological dormancy of a tree begins with the fall of leaves and lasts until the buds swell. At this time, there is no sap flow in the seedlings, no evaporation. Therefore, their wood does not lose moisture during transportation and does not lose its supply of nutrients.
Sap flow also explains why a seedling dug up with leaves quickly dries out - it loses moisture through evaporation. Its supply of nutrients is also depleted.
As long as there are leaves on the branches, the movement of juices and vegetation continues, the shoots “ripen”. That is why seedlings dug up before leaf fall have many “immature” shoots that are sure to freeze in winter.
Time between digging and planting
Minimum replanting time increases the tree’s chances of quickly and painlessly settling down in a new location. This is due to the peculiarities of sap flow. The liquid inside the tree trunk moves from the bottom up - from the ground (where the salt concentration is lower) into the tree (where the salt concentration is higher).
During transportation and long-term storage, wood cells lose moisture and salts. The movement of juices in such seedlings does not occur even when planted in very moist soil. The seedling dries up.
Tree age
The age indicator affects the speed and ease of survival of a seedling and an adult tree. When replanting, some of the roots are lost. A young tree restores its root system faster than an old one. Therefore, transplanting young seedlings up to 3 years old is preferable to older trees.
This means that for their successful establishment, you will need to work hard, dig up a tree with a large lump, transport it by transport, and then spend more time on watering and subsequent care of the transplanted tree.
We determine the timing depending on the region of growth.
It is necessary to replant to a new location before frosts arrive in the fall, and after the cold weather leaves in the spring.
The exact timing of plum transplantation is determined by the climatic conditions in the region where the garden plot is located.
In the middle zone and Moscow region
The optimal period for transplantation in the Middle Zone and the Moscow region is April - spring, mid-September, end of October - autumn. During these periods, there is no freezing of the soil; autumn frosts are still a month away.
In Siberia and the Urals
In these regions, frosts are expected to arrive earlier, so autumn plum transplanting is carried out in August-early September. Spring transplantation is carried out in May, after stable warm weather has established.
If you choose a winter-hardy plum variety, you can replant it earlier in the spring, immediately after the snow melts.
In the Volga region
Winter conditions in this area are not harsh, so plum trees are replanted in the spring, at the end of March-April, and in the fall - in September.
And yet, when is it better: autumn or spring?
According to experienced gardeners, autumn replanting of plums is preferable. The procedure carried out in the fall has the following advantages:
- the tree calmly adapts to the new place until spring, due to which growth processes are activated faster and full development is noted;
- Before the beginning of the growing season in the next season, the plum tree receives double feeding - autumn and spring;
- In the fall, it is easier for the gardener to choose the day of replanting, but in the spring, he has to take into account the period before the start of sap flow, the establishment of a positive soil temperature, and the absence of night frosts.
Description and technology of growing plum variety Red Ball
But autumn transplantation also has disadvantages:
- a gardener cannot control the health of a crop that has gone into winter dormancy; to assess the condition of the plum, you will have to wait for its spring awakening;
- in temperate climates, winter can be unpredictable, frosty or with many thaws, snowless or with a lot of snow, which negatively affects the condition of the transplanted plant, and it is impossible to predict winter temperature fluctuations.
Growth and reasons for its appearance
The shoots often appear in the root zone. It is rare to find a plum without shoots. The reasons for its appearance include the following factors:
- the plant is planted too high;
- during grafting, an excess number of branches was removed;
- mechanical damage to the trunk;
- lack of preparation before wintering.
Sprouts appear more often when the plant is not planted correctly. If the seedling is planted high, the roots are exposed and the trunk is damaged. To eliminate this, sprinkle the rhizome with soil.
A large number of sprouts appear when re-grafting in the spring. This provokes an imbalance in the development of the plant. The rhizome does not have enough nutrients for full growth.
Mechanical damage to the trunk can provoke a violation. To avoid this, you need to monitor the plantings, correct any violations in a timely manner, and seal the wounds with garden varnish. There is a high probability of sprouts appearing when the tag was not removed from the seedling after purchasing it. The tree grows, and the label digs into the bark and injures it.
Please note! Not all sprouts are used for plant propagation. Some branches do not bear fruit.
When to replant a plum and which one
The best time for transplantation is spring, before buds open, or autumn, from about mid-September to mid-October. Timing may vary depending on the region where the tree grows.
Note! If absolutely necessary, you can carry out the procedure later, in late spring, in May, or even in summer, but you won’t have to hope for a harvest this year. And the tree may not tolerate transplantation. If the roots have been damaged, the plum will spend more than one year in dormant mode until it is completely restored.
Rules for planting in a pit
After purchasing a seedling, you should not delay replanting. In most regions, planting in a previously prepared hole is practiced. The scheme is not difficult:
It is necessary to dig a shallow hole no more than 0.7 m in diameter. It is better to replace part of the soil with a nutrient mixture based on black soil, turf, sawdust, and wood ash. Thoroughly loosen the bottom of the hole to stimulate root growth. Make a drainage layer from expanded clay, pieces of sea pebbles or clay bricks. In a wetland it should reach 10–20 cm. Fill the dug hole with nutrient soil by 50–60%
Carefully place the seedling, straighten the thin roots with your hands, trying not to break the fragile shoots. Sprinkle the plum with soil up to the root collar, compact it loosely with your palms
Form a hole around the trunk for watering with water and nutrients. For an annual seedling, you need a support in the form of a wooden peg 0.5–0.8 m high.
After transplanting, the plum should be watered with water at room temperature. The liquid is poured in small portions throughout the day so that it is completely absorbed by the root system.
Important! The method of planting “in a hole” allows you to assess the condition of the soil, the level of looseness, and swampiness.
Errors during landing
Inexperienced gardeners may do the work incorrectly, which leads to poor growth or even death of the plum tree. The easiest way is to study them, this will help you not make mistakes and ensure good survival of the tree:
- Shading or planting in an area with high groundwater levels.
- Deepening the root collar.
- Severe damage to roots during transplantation.
- Carrying out work after the buds have opened.
If damaged roots are found, it is better to remove them and treat all sections with a solution of potassium permanganate. If there are scratches on the bark, spray them with a solution of copper sulfate or cover them with garden varnish.
You may be interested in: How to plant a plum tree in the fall: a step-by-step guide The plum tree reaches a height of up to 13-15...Read more...
Planting a plum in the spring is not difficult if you know the features of the process and purchase high-quality seedlings. Planting and care in the first year are very important; it determines whether the plant will survive the winter and how quickly it will grow.
Specifics of further care
No matter what time of year the transplant occurs, it is important to provide the plant with optimal care for full development and abundant fruiting.
The gardener needs to take into account that in the first seasons after transplantation, the shoots will stretch chaotically, distorting the shape of the crown. Therefore, it is necessary to carry out formative pruning of the plum tree.
You also need to control the acidity of the soil. If acidity increases, neutralization should be carried out with dolomite or lime.
Transplanted plums should not experience moisture deficiency. Watering is carried out regularly, its frequency is determined by weather conditions, and is reduced towards the end of summer.
Plum transplantation – Indasad
Plum is a moisture-loving tree; loves bright lighting and protection from northern winds; does not like soils with high groundwater levels. The roots are horizontal, grow at a depth of 20–50 cm, only some go to greater depths.
In adult plums, the roots extend beyond the crown perimeter by 1 - 1.5 m - this must be taken into account when replanting: digging up damages most of the root system. This leads to homosis - a disease when cracks form on the trunk with escaping gum (resin).
Transplanted plums older than 4–5 years do not take root well and suffer for a long time, so it is not advisable to move them.
Planting holes for spring planting are prepared in the fall, for autumn planting - 15 - 20 days before work. The size of the hole is 60–80 cm larger than the root ball of the tree. For a 2-year-old seedling, a hole of 70x70x70 cm of any shape is sufficient. When digging, the top layer of earth is thrown aside; The bottom of the pit is loosened with a bayonet.
If groundwater is close to the ground at the bottom of the hole, drainage is made from broken bricks, expanded clay, and stones. Then add the top layer of soil, 1 - 2 buckets of humus, 1 kg of ash, mix everything and fill it with two buckets of water.
Sometimes the grown root shoots are transplanted to a new place. If an adult tree has been grafted, then the work will not be worth it: the berries on a young tree may be small and sour.
But if the mother tree was also grown from shoots, and the quality of its fruits is decent, then digging up a seedling makes sense. In dry weather, its tree trunk circle is well watered, dug in at a distance of 40 cm from the trunk, trying to damage the roots as little as possible.
The dug up seedling is placed with its roots on cellophane and well packaged if transportation is required.
It is best to buy an annual seedling with a closed root system from a nursery. But seedlings with an open root system take root quite well if their roots are carefully packed and do not dry out. Before planting, their roots need to be carefully examined: rotten and diseased roots are cut off. For some time, the seedling can be placed in a bucket of water.
When transplanting a plum with an open root system, add soil to the hole to create a small cone in the middle. A stake is driven into the middle of the hole; A seedling is placed on the north side of it.
While adding soil, shake the seedling slightly so that all the spaces between the roots are filled.
The earth is carefully trampled down: at the edges of the hole it is denser, at the trunk it is lighter
When transplanting a specimen with a closed root system, peat, humus, fertilizers and fertile soil are poured onto the bottom of the hole, on top of the drainage. Everything is mixed, compacted and watered.
The seedling is placed on top so that the root collar is slightly above the soil surface. The gaps between the edges of the pit and the earthen lump are covered with fertile soil and trampled down.
A peg is driven in along the edge of the hole.
The seedling is covered with a rope, crossed with a figure eight and tied to a peg. Make a hole along the edges of the planting hole and pour 1 – 2 buckets of water with “Kornevin” into it.
The tree trunk circle is covered with a thick layer of humus or peat. After transplantation, the plum is watered weekly with fertilizers that stimulate root formation. In spring, the seedling is cut to a height of 1.5 meters.
In order for the plum tree to bear fruit abundantly, at least two trees are planted at the same time.
For a 4-5 year old plum, one year before transplanting, 70 cm from the trunk, in a circle, is dug in a ditch 50 cm deep; roots are cut off. The groove is filled with humus, sand, peat with the addition of ash; compact and water abundantly. Water several times during the summer; Many suction roots grow on the cut roots.
A year later, the plum is dug again along the outer edge of the previously dug ditch, trying to preserve the young roots. They gradually go deeper, cutting off the remaining roots and forming an earthen ball 70 cm thick. The tree is tilted and burlap is placed under it, then it is transferred to the underlying material. The roots are wrapped so that the earth does not crumble.
The stem and bases of skeletal branches are wrapped in moss or burlap, which are moistened with water for 2–3 weeks. The transplanted tree is regularly watered with Kornevin. In the spring, the conductor is trimmed to a third of the length and 2-3 year increments.
With good care, the plum tree can begin to bear fruit as early as next year.
Plum care
Trimming
In the first few years, the plum tree grows very quickly, while the branches grow unevenly, so the growths need to be shortened, the tops that are frozen may be removed, and thick branches should be thinned out. After planting, 10 skeletal branches are laid, with equal spacing and angles of departure from the trunk equal to 45˚. Remove all branches that have an angle of less than 40˚, as they may break off. Shorten branches on all tiers by 1/3. From an adult tree, those branches that extend beyond the crown area are cut out. Low-lying branches on the trunk are also cut out.
Fertilizer and watering
After planting, there is no need to fertilize in the first year. They begin to apply mineral fertilizers in the third year of life. Phosphorus and potassium are added during autumn digging. After flowering, nitrogen fertilizers are applied in the spring . The plums are also fed with organic fertilizers. In young plants, around mid-June, mullein infusion is added to the tree trunk circles. In mature plants throughout the tree planting area. Plum, for rapid growth and fruiting, needs magnesium, potassium and nitrogen. If the leaves become lighter, it means there is not enough nitrogen; in this case, the leaves are sprayed with urea and saltpeter. If the leaves become brown and curled, then magnesium and potassium granules must be added to the soil.
The soil should be sufficiently moist to a depth of 40 cm, in which case watering is considered normal. The plum tree is actively watered in the first half of summer, about 5 buckets per tree. If the trees are already bearing fruit, then increase watering, but do not over-water it so that fungus does not appear. If the harvest is good, then props are placed under the branches , otherwise they may break off under the weight.
With proper planting and good care, plum trees will delight you every year with an excellent harvest of healthy and tasty fruits.
{SOURCE}
Transplantation in autumn
Adaptation of a plant in a new place and its successful wintering largely depend on proper care of the bush.
You should take care of these important aspects:
- sufficient watering of honeysuckle;
- correctness of transplantation;
- fertilizing the plant;
- insulating the bush for the winter.
Did you know? It is very useful to plant honeysuckle in large quantities on the site. Its aroma helps to minimize nervousness and anxiety, as well as normalize the functioning of the nervous system as a whole.
Site preparation: diagram, pit, fertilizers
Initially, you need to decide on the place to plant the shrub. It should be sunny enough, but it is also necessary to correctly calculate the direction of the sun's rays during the day. If the lower branches are predominantly in the shade and the upper branches are in the sun, the harvest will be maximum.
If several bushes are transplanted at once, you should take care to maintain a distance of one and a half meters between them
It is also important to pay attention to the correct proximity: next to the honeysuckle it is best to plant lilacs or currants, which can protect the bush from strong winds
Transplantation of honeysuckle in the autumn occurs according to the following scheme:
- On old bushes, all unnecessary branches are cut off, and young bushes are left in their usual form.
- At the site of honeysuckle transplantation, 7 days before the procedure itself, you need to dig a wide hole measuring 1x1 m.
- Drainage in the form of broken bricks or crushed stone is placed at the bottom of the pit.
- The excavated soil is mixed with wood ash and phosphate fertilizers (100 g) to make the soil more fertile.
- Two-thirds of the fertilized mixture is poured back into the hole and filled with 2 buckets of water.
- When the soil has settled, you need to make a hole in it up to 40 cm deep and move the bush into it as carefully as possible, after digging it out with a large lump of earth.
- The root system of honeysuckle is straightened and sprinkled with the remaining fertilized soil. In this case, the root collar is covered with soil to an average depth of 3–4 cm.
- At the end, the bush is intensively watered with water.
Video: Transplanting honeysuckle in autumn
In autumn, honeysuckle can be fertilized using special potassium (20 g/m³) or phosphorus (30 g/m³) additives. The use of nitrogen fertilizers is highly discouraged.
Once every three years, you can add organic fertilizers, such as compost or humus, to the soil. This process will not only improve soil fertility, but will also further stimulate the development of beneficial bacteria in the soil.
Plant transfer
When moving a bush to a new location, it is very important not to injure either the branches or the root system. It is necessary to dig up the largest possible lump of earth along with the bush so that damage to the roots, as well as their pruning, is minimal
To move honeysuckle comfortably, you need to work together, using durable film or cardboard as a backing.
Preparing for winter and wintering
bending down honeysuckle in winter Even during flowering, the bushes are not afraid of frosts down to -7°C. It is worth understanding that only adult plants are so resistant to cold. Young ornamental bushes do not tolerate wintering well enough, so they need to be additionally insulated for the winter.
To do this, you need to remove all the vines and climbing stems from the supports, and then carefully bend them to the ground. This will help keep the plant under the snow. You can additionally lay them out on a peat covering and insulate them with a layer of spruce branches on top.
As a rule, rodents rarely damage the bark of these plants, which cannot be said about various forest birds. Honeysuckle often suffers because bullfinches and waxwings peck at the bark. To prevent this, it is advisable to cover the bushes with bags or synthetic fabrics.
Optimal growing conditions
After planting, the first 7 years of fruiting are weak, after 12 years the period of highest yield begins. Based on such physiology, it is necessary not only to acquire, but also to create living conditions. Correct growth and acceleration of the onset of intensive fruiting depend on this. Lowlands in which cold air accumulates in spring and autumn are not suitable for trees; it has a detrimental effect on plants. A good place would be the border of the property along the fence or next to the house, which will protect from the wind, but not in the shade. Drought has a bad effect on fruiting; during dry periods, watering is organized. The optimal pH of the earth is in the range of 6.4–7.2. Plum is afraid of high groundwater levels. Therefore, if they are located at a depth of less than 1.5 meters, you can plant plums in the fall on specially prepared high beds or organize water drainage from the site.
Timing for transplanting cherries of different varieties and ages
As mentioned earlier, the result of replanting is affected by the age and type of tree. Let's take a closer look.
Transplanting an adult cherry
Transplanting a two-year-old seedling is worth the effort, but five-year-old trees most likely will not take root. In addition, some varieties of cherries have a fertility period of about 10 years, that is, replanting such a tree is impractical.
When transplanting adult cherries, adhere to the following rules:
- You should carefully dig up the cherry. At the same time preserving the root system as much as possible.
- The soil should not be removed from the roots, but, on the contrary, the maximum amount should be preserved. If additives are purchased, then after purchase the root system is wrapped in a damp cloth and placed in a plastic bag.
- Carefully trim the branches, trying to balance the root and crown of the cherry tree.
Transplanting an adult cherry is allowed in very extreme cases. She does not tolerate the transplant well.
Transplanting an adult tree has a number of features: it rests on the side crown and is mainly fed by the main tree. When transplanting an adult cherry tree, part of the root system of the adult tree is separated.
Transplanting cherry seedlings
Seedlings allow you to get a harvest in the shortest possible time, without having to wait several years. When choosing additives, you need to carefully examine the young plants so that they meet high requirements, otherwise there is a high risk of the cherries drying out.
It is recommended to transplant in the fall. During this period, a wide selection of cherry varieties are available on the market. If you don’t want to replant the cherry tree in the fall, you can buy it and dig it in. Direct planting should be done in the spring.
One- and two-year-old cuttings are suitable for planting. The root system matters. She must be strong. After purchasing, I wrap it with a damp cloth and a plastic bag.
Requirements for a seedling:
- Intact root system.
- Clean and straight trunk.
- Intact leaves.
It is recommended to make purchases in special stores or nurseries. It is better if the nursery is located close to the site.
Replanting coppice cherries
It is recommended to replant the cherry shoots, since they grow very close to the mother tree and take away the strength for fruiting. Such a shoot grows on the lateral roots of the main tree without its own root system, so digging it up is not difficult.
It is better to replant coppice cherries in early spring. When transplanting in the fall, there is a high risk of damaging the transplanted shoots and the mother root.
Rules for replanting coppice cherries:
- Dig up the ground 30 cm from the shoots and cut off part of the mother root.
- The sections are cleaned with a sharp knife and treated with paint.
- Then sprinkle with earth.
Replanting bush cherries
Bush cherries are not recommended to be replanted. When replanting, there is a high probability of losing the tree. But the rules for transplanting are standard and similar to the rules for transplanting felt cherries. It is worth considering that in thickened bushes, cherries stop bearing fruit. Therefore, the pagons are removed.
Felt cherry replanting
They try not to replant felt cherry trees at all. Transplantation technology is the same as for other varieties. But this type of plant is replanted only in the spring, after the snow melts. In autumn there is a very high probability of injuring the root system.
Young seedlings are used for transplantation. Replanting old cherries does not make sense. They bear fruit for about 10 years. Sometimes the plant takes up to five years to recover. All this time it will not bear fruit.
How to properly transplant jasmine to another place
Replanting jasmine is quite simple. In order for the transplant to be successful, certain conditions must be met that are required for successful rooting and harmonious development of the shrub.
It is also important to follow a certain sequence of actions
Transplantation includes the following activities:
- site selection;
- soil preparation;
- preparing jasmine for transplantation;
- landing.
Simple rules and recommendations will help you plant jasmine correctly in a new place and grow a healthy, beautiful plant.
Preparing the plant for transplantation
You need to properly prepare for the transplant procedure. Removing a plant from its usual soil and planting it in a new place is a rather traumatic process. Proper preparation will help protect the plant from damage during replanting and make it easier to care for in the future.
Find out the difference between mock orange and jasmine.
You can prepare jasmine for transplantation as follows:
- First, it is advisable to trim off some of the shoots of the bush. The branches take up most of the moisture and nutritional components absorbed by the roots. Pruning will lighten the plant and it will take root better. If planting is carried out in the fall, you need to cut off all the branches, leaving stumps 40 cm long. This measure is explained by the fact that flowering will occur only after 7 months. By this time, new, young shoots will grow.
- Untouched shoots must be carefully tied with tape.
- Water the bush with 5-6 buckets of water. It is necessary to water gradually so that moisture has time to seep into the ground. It is easier to remove roots from damp soil without damaging them.
Selecting a location
The survival rate of the plant depends on the choice of location. For full development and abundant flowering, jasmine requires a large amount of sunlight. If the need for replanting is due to the fact that the bush grows in a shaded place, you need to choose an open space in the garden, away from large trees and buildings.
Important! It is imperative to take into account that there should be no groundwater in the place where the bush will grow. The roots of a plant planted in such an area will quickly rot in damp soil. Jasmine is unpretentious to the composition of the soil, but grows especially well in soils rich in chernozem.
Jasmine is unpretentious to the composition of the soil, but grows especially well in soils rich in chernozem.
Soil preparation
The selected area must be cleared of weeds and well loosened. Then dig a planting hole, the volume of which should be slightly larger than the root system of the seedling. This is necessary so that the roots of the grown plant can fit freely into the recess.
The substrate for planting is prepared in advance. To prepare the soil mixture, use mullein and soil (top layer of soil) in a ratio of 1:15. Then you need to add about two handfuls of wood ash and superphosphate to the mixture.
How to dig up jasmine (large bush)
The bush must be removed extremely carefully, damaging as few roots as possible. You should dig up the bush from all sides
In this case, you need to retreat at least 30 cm from the bush itself - in this case, only the outermost small roots will be cut off. Jasmine should be dug up along with the lump. Watering carried out earlier will make the work easier.
Did you know? In the art of Feng Shui, it is believed that indoor jasmine has a beneficial effect on the atmosphere of the home, helps maintain harmony and peace, and
lifts the mood in case of depression.
Landing technology
After completing the preparatory work, you can begin planting. The replanting technology does not depend on the time of year (spring, autumn).
Procedure:
- Pour the substrate prepared in advance (soil, humus, superphosphate, wood ash) into a planting hole dug to the size of the earthen ball.
- Dilute Kornevin water in a bucket and pour it into the hole.
- Carefully install the seedling and cover it with soil.
- Add 1-2 buckets of water.
- Apply a layer of mulch made from sawdust and pine needles.
How to care for young trees?
Rapid establishment and rooting directly depend on providing the young tree with comfortable conditions. The following manipulations provide comfort:
- regular watering - once a week within 40 liters per seedling. At the same time, it is important to avoid swamps, since excess moisture contributes to the rapid development of fungal diseases;
- fertilizing - carried out in the second year of growth, mullein, dung, urea are used as ingredients in the spring, superphosphate and potassium - in the fall;
- pruning - carried out starting from the first year of growth (the central conductor is shortened), the second - strong branches are cut to a length of 25 centimeters, the third - the apical growth is shortened by 30 cm;
- loosening is mandatory after each watering;
- mulching - the tree trunk circle is covered with sawdust or peat, this is additional protection from drying out and freezing;
- wintering - on the eve of cold weather, in addition to mulch, the tree trunk circle is covered with slate, and the trunk is covered with burlap.