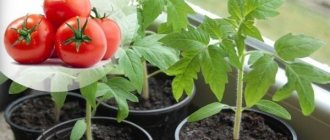
Most summer residents grow the most popular vegetable crops. Naturally, tomatoes are included in this list without fail. Their naturally grown fruits bring great benefits to the body. What to do when there is little space in the garden, but you want to get a harvest at the end of summer or early autumn?
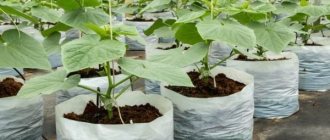
Even the most experienced gardeners strive to discover something new and extraordinary. We suggest trying the method of growing tomatoes in a bag from personal experience. This method will help save space, time for planting and maintenance. Portable, convenient bags can be placed in any corner of your garden without fear of damaging the root system.
Benefits of planting tomatoes in bags
For those who have not yet tried the method of planting vegetables in bags, it is recommended that you familiarize yourself with the advantages of this agricultural technique.
- Comfortable. This method allows you to plant tomatoes in bags almost anywhere;
- No special care required. An interesting planting method will save time on weeding around the vegetable.
- Minimum water. Tomatoes in bags require much less moisture than those growing in the garden;
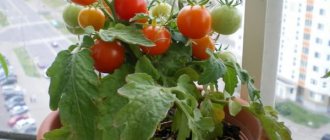
- Ability to change location. Without much difficulty, portable bags can not only be placed where convenient, but also rearranged in case of worsening weather conditions;
- The bags maintain the optimum soil temperature. Do not be afraid of overheating or freezing of the roots.
Agricultural technology and plant care
The process of caring for tomatoes after planting in bags is in many ways similar to agricultural techniques when growing in the classical way. However, there are several features that affect the development activity and fruiting of plants. By following the basic rules of care and taking into account all the nuances, you will be able to grow large and healthy fruits in due time.
Irrigation and fertilization
Tomatoes in bags should be watered as the soil dries. Before irrigation, you should make sure that not only the top part, but the deeper layer has dried. It is enough to check the condition of the soil at a depth of 4-5 cm. You should not use a large amount of water, since excess moisture often provokes the development of infectious diseases and the spread of rot.
If plants are grown outdoors, watering should be done exclusively at the roots.
Adding fertilizers to the soil promotes the rapid and proper development of bushes, as well as intensive fruiting. In the case when the soil mixture consists of humus or compost, fertilizers begin to be applied only when the ovaries are formed. In other situations, fertilizing is applied before planting seedlings, during the flowering period and 7-10 days before the expected fruiting.
Garter and bush formation
Plant staking is required when growing tall varieties and when placing containers outside. By fixing the bushes, it will be possible to prevent their damage due to the weight of the fruits and wind gusts. Fixation also ensures the growth of the stem in a vertical position without kinks.
The formation procedure includes the removal of excess foliage, deformed and old branches, and rotting parts. The formation of bushes has the following advantages:
- nutritional components from the soil are supplied only to healthy parts of plants;
- bushes acquire a decorative appearance;
- More natural light penetrates to the fruits, which has a beneficial effect on ripening time and taste characteristics.
See also
When and how to properly pick tomato seedlings, the best days in 2021
Read
Loosening the soil
After each watering, the soil should be loosened to ensure better aeration. Access to oxygen is necessary for plant roots to actively develop. At the first stages, loosening is carried out to a depth of 3-5 cm; with further development of the bushes, a layer up to 12 cm deep is loosened.
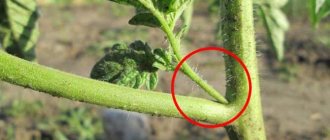
Stepsoning
A large number of tomato varieties grow side shoots during development. If you leave the shoots on the stem, they will begin to actively grow and form clusters with fruits. If the bushes grow too much, the fruits will become smaller and lose their taste.
To remove shoots in a timely manner, it is necessary to regularly inspect the plants.
You can remove stepsons manually or using special equipment. Use your hands to break off the shoots to the side. If a small stump remains on the stem after breaking, this will not affect the development of the plant. It is more convenient to cut the stepsons with sharp garden shears, previously disinfected in a solution of potassium permanganate. The scissors should be treated after each pruned plant to prevent the spread of possible infections.
Some varieties of tomatoes form several stems. Determinate varieties, when grown in the middle zone, are recommended to be formed into 3-4 stems, and in the southern region - not to be pinched. On medium-growing determinate varieties, it is better to leave 2 stems.
What varieties are suitable?
Selecting a tomato variety that can be planted in bags is quite simple. Both low-growing and tall-growing tomatoes are suitable for this planting method.
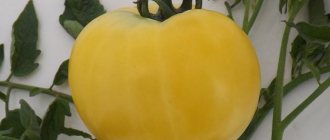
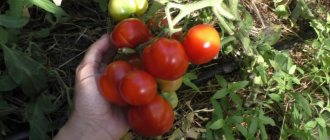
For example, the varieties Spring of the North, Azhur, and Bourgeois feel good during transportation and adapt to different weather conditions. These varieties are resistant to various diseases and insects, which facilitates further care. They bear fruit with fairly large berries ranging from 100-150 g.
In fact, this is only a small part of the list of tomatoes that can grow in bags. In an unusual container for soil, absolutely any variety that the summer resident likes will take root. It has long been proven that tomatoes bear fruit better when grown in a large container.
The principle of planting tomatoes
Tomatoes are planted mainly as seedlings. To sow it, use a ready-made mixture or prepare it yourself, mixing several useful substances:
- part of the peat;
- humus or compost;
- turf or leaf soil;
- part of the river sand.
For 10 liters of this mixture, add a glass of wood ash or crushed chalk, a tablespoon of mineral fertilizers. Next, to disinfect it, it is heated in the oven at 100 degrees for 1 hour. For the best effect, it is recommended to pour the mixture with a hot solution of potassium permanganate.
Seeds also go through the following stages of preparation:
- Culling in a saline solution (30 g of salt per liter of water) - seeds are placed, and after 15 minutes the unnecessary material floats to the surface and is thrown away. The rest is suitable for planting and goes to stage 2.
- Disinfection is carried out in a soda solution of 0.5 g per half glass of water. The seeds, dried on a napkin, remain in the solution for a day. This will not only disinfect them, but also speed up fruiting.
- Soak in boric acid solution (1 g per liter of water) for 24 hours. The water must be filtered or melted. Then place the seeds in any solution to stimulate growth (Epin, potassium humate, Virtana-micro).
- Hardening occurs after the seeds swell, which are placed in a bag in the refrigerator for a day. Next, this bag is moistened and placed on a saucer. After 4-5 days they begin to germinate and then you can start sowing.
Planting is carried out in pots, cups or containers. The containers are filled with soil mixture, in which depressions are made 3-5 cm wide from each other and 1 cm deep and covered with film or glass.
Attention!
Be sure to keep containers with seedlings warm, but not under a radiator, so that the temperature is always 30 degrees, providing the seedlings with a lot of light (installing phytolamps on the sunny side of the house).
Daylight hours for seed germination should be 16 hours. Water them carefully once a week along the edge of the container without a watering can and spray them every day with a spray bottle. Be sure to feed the sprouts in the form of fertilizers, eggshells or humus.
It is better to sow seeds depending on the climate. In the southern regions, sowing begins in late February - early March, and by May they begin to plant in the ground. In the northern regions, planting time is made later - in March or April, and planted by June.
You may be interested in:
Growing cucumbers in bags step by step Many people living in cities buy fresh seasonal vegetables only in markets, because to grow them you need...Read more...
After the seedlings have germinated, they can be planted in bags with soil under certain conditions:
- if the height of the seedlings has reached 25-30 cm;
- stem thickness 8-10 mm;
- number of true leaves – 7-10 pcs.;
- The first flower cluster has formed.
For low-growing varieties, the bag is filled 40%, the rest is tucked in, it will still be needed. First, you need to make holes in the planting soil, 3-4 in each, and plant the seedlings as deep as possible so that the stem is stable and the roots can grow.
What bags are needed
The method of planting tomatoes in bags is quite simple and does not require much effort, but in order for the seedlings to take root and ultimately get a good harvest, you need to stock up on some information. For example, not many people know how to choose a bag and which seedlings to choose - and the final result of the experiment depends on this.
Before you start planting, it is important to choose the right container - a bag.
The color of the bag should be white or light. Then it will reflect the sun's rays and the tomatoes will not overheat. It is better not to use dark colors, because in this case the tomato will require much more water.
There is one disadvantage to this planting method. When moving around the summer cottage, the heavy bag may tear: to comply with the growing technology, holes will be made in it for drainage. Burlap rupture can be avoided if the container is moved carefully, preferably with someone's help.
Many summer residents have found the best option for planting tomatoes - placing them in ordinary sugar bags. As practice shows, this is the best choice for the plant.
They do not need additional huge holes, they do not need to be drilled for drainage, it is enough to trim a little edge to allow air to pass through. This is why a regular sugar bag is a suitable and convenient container for planting tomatoes.
My main rules
Tomato is good for the health of all members of my family. We love to grow it, and it grows without pesticides. It turns out cheaper and tastier than in the supermarket. It contains a lot of lycopene, which protects us from diseases better than any pill.
Gardening becomes fun and less labor-intensive if you master biological methods of protecting tomatoes from diseases and pests and begin to use organic methods of working with the soil. Since the beginning of August, many people have lost up to 80% of their tomato crop from late blight. The solution is to follow five rules:
- Early ripening varieties.
- Protective structures.
- Seedlings with maximum run.
- Individual plant formation for each variety.
- And the fifth main rule: do not use organic and mineral fertilizers with a high nitrogen content until the ovaries form on the first cluster and carry out corrective feeding with phosphorus-potassium fertilizers with microelements when signs of nitrogen overfeeding appear.
Tomatoes are not cucumbers, or even peppers. Tomatoes come from areas with rocky, organic-poor soils. Overfeeding with nitrogen-rich organic matter at the beginning of the growing season leads to the growth of tops, and this cannot be corrected in the short northern summer. At the same time, without organic matter, without protozoan secretions, you cannot grow tasty, medicinal tomatoes.
We suggest you read: How to grow an orchid at home with your own hands
How do I choose varieties
For the greenhouse I select two types of varieties. Firstly,
hybrids
, which will ripen on the branches until October without disease, and then lie on the balcony until the new year. The taste is worse, but there is still lycopene and no pesticides.
And secondly, I definitely plant amateur varieties like Bull’s Heart, which can be grown up to a kilogram in weight and which differ from hybrids in their extraordinary taste.
Hybrids are more productive and are stored for a long time. In recent years, I have been bubbling seeds into the ACH. I add 5% vermicompost or old compost (useful aerobic organisms), 0.5% sweet molasses (molasses) to 0.5 liters of water, place the signed seeds in bags in the solution and pass air through the air with an aquarium compressor for 24 hours. All surface pathogens are washed away, they are eaten by beneficial soil organisms that multiply exponentially, and the seed embryo begins to develop rapidly, sensing spring. Indeed, in the soil, which the first spring thunderstorms saturate with oxygen and moisture, microorganisms awaken in the same way and stimulate the awakening of dormant seeds.
How do I grow seedlings
I plant seeds in containers with a reserve.
When they grow up, I pull out and throw away all the lagging ones - this is how I get rid of viruses. I also pull out all the upstarts that grow taller than everyone else - which means they are a mismatch. Three dangers await seedlings in the first week of growth
.
The first is when there are no available phosphorus salts in random soil. 7 days after emergence, it is clear that both lanceolate leaves of the seedling are directed upward at an acute angle, and the first two true leaves are pressed against each other and are small in size. All plates are violet-red on the lower side, and normal in color on the upper side. With a good supply of phosphorus, the lanceolate leaves (cotyledons) are located horizontally or are lowered down. Their underside has the usual green color. The first pair of true leaves are open. If you do not water the seedlings immediately, then in the future they will not produce a good harvest. The second problem is that the seedlings are burned by excess mineral water, which was not mixed well with the soil. The sprouts turn yellow and die. A terrible problem is fungal rot in contaminated soil. The best seedlings for planting in the ground are stocky, no older than 35-40 days. So plan for its growth.
There is always not enough space for good seedlings in March. I place seedlings in the true leaf phase into bags made of delicate non-woven material (spunbond). The volume of soil is about a liter. I put it on a tray and water it from below, feeding it from above. The aeration in such fabric bags is excellent, but in plastic glasses you either overfill or dry out. I plant seeds in three periods - from mid-February to mid-March: for early greenhouses, for amateur large-fruited ones and for open ground. I have a reserve in case of disasters.
Create conditions for seedlings!
Don’t believe that the main secret is in the variety and fertilizing.
The main thing is light and warmth
on your windowsills. At the first bright sun, everything will burn. In cloudy weather, it will stretch out without backlighting. At high temperatures it will overgrow and weaken; in cold soil it will sour and rot. Monitor, organize, do not thicken the window sill. Less often means stocky.
The most labor-intensive agricultural technique, which
gives a 30% increase in yield
, is the removal of seedlings outside in the last week before planting in a greenhouse or in the ground. Plants must be accustomed to air and sun. Literally after a week, the leaf becomes dense, emerald with chlorophyll, and the stem becomes strong. I have been accustoming my seedlings to the air since March, on sunny days:
Weak seedlings are sick for up to two weeks, while hardened ones begin to grow immediately after planting. I take all my pallets out from the veranda and place them on the south side of the house. I bring it home at night if cold nights are predicted.
If the seedlings are in plastic opaque pots, check the humidity at depth: if it is a little dry, then you need to water it in the morning, otherwise the wind will dry out the soil and destroy the plants. Conversely, in the cold on the windowsill, overwatered seedlings will rot. In the morning I pour water into the pan, and the bags of soil gradually suck it up.
Proper nutrition for seedlings
You have planted tomatoes in a greenhouse.
Observe the growth of the young upper leaves after a week. If the upper leaves are fatty, brittle and curled, this is the worst thing: overfeeding with nitrogen
. You need to water the soil well, wash out the nitrates, feed it with potassium sulfate at double the rate and cover it with a 5 cm thick layer of fresh sawdust. They will take away excess nitrogen. After a couple of weeks, remove the sawdust. If excess nitrogen is not removed at the beginning of flowering, the clusters will not set and fruiting will be delayed by half a month.
If the plant is stunted, the lower leaves turn yellow, and the soil is not cold and not flooded, this is
nitrogen deficiency
. It can be removed easily. There are a lot of nitrogen fertilizers in liquid form; it is better to use organomineral fertilizers. Water a couple of times with a warm, weak (half-and-half) solution and mulch with organic matter with sufficient nitrogen content.
Deficiency of potassium and microelements before flowering usually does not occur. This will happen later - when the fruits ripen, but
phosphorus deficiency
it is necessary to recognize: if the plant turns purple (the underside of the leaves, stems, veins on the leaves), it is worth feeding once with any liquid phosphorus fertilizer.
Don't be afraid to use
weak solutions of high-quality mineral fertilizers
at the beginning of plant growth. When the fruits begin to fill, then be careful with the advice of pouring mineral water into the soil.
I do not use modern complex liquid fertilizers with amino acids and stimulants (Brexil, Master and the like). Let the Chinese greenhouse growers do this. In my soil with old compost, spilled with ACH, there are more than enough stimulants that the biota gives to the roots.
Dangerous
calcium deficiency
. It is usually combined with overfeeding with nitrogen and lack of potassium. The fruits quickly become saturated and blossom end rot appears. There is only one treatment: water the roots with magnesium and potassium fertilizers, and spray the fruits and leaves with calcium nitrate a couple of times.
A good combination after chickens is pine aquarin and vermicompost.
How to form plants correctly
Delay in removing stepchildren has a very harmful effect on the crop, while the stepsons form powerful lateral branches, which consume a lot of nutrients.
The bush begins to branch and lag behind the growth and development of fruit buds. Stepchildren must be removed when they grow to 3-4 cm, without leaving stumps. Don’t listen to advisers who say that the lower stepsons need to be tilted and rooted. We are not Kuban. We are limited by the short summer. Our main reserve is a supply of stocky seedlings and the formation of plants for 3-5 clusters in the ground or up to 7 clusters in a greenhouse. And we always plant seedlings with a flowering cluster. In a greenhouse, semi-determinate varieties can be grown in 2-3 stems, leaving the first shoot under the first flower cluster, and another one a little higher, under the second flower cluster. You need to look at the quality of the stepsons: leave the thicker one, remove all the rest. After all, sometimes these varieties are crowned (instead of leaves, a brush grows at the top) above the third brush, and you will continue the trunk from the lower stepsons left behind. I grow indeterminate varieties into only one trunk; sometimes at the beginning of the first cluster the trunk splits, and I grow such a plant into two trunks. I don’t allow any games or pity for the stepchildren in the greenhouse, otherwise the tall varieties will not show their yield potential.
Only two weeks have passed - the greenhouse is unrecognizable on May 9th. The bird cherry tree on the street has not yet bloomed. I also remove unnecessary leaves. A healthy, green and well-lit leaf is a helper. But it has its time, its age. Old leaves often turn yellow, become covered with various spots, weaken and serve as a breeding ground for diseases. Therefore, they must be removed first. Usually, as the first clusters begin to mature, I remove everything below. Even healthy ones. Light and air are more important.
We suggest you read: Do-it-yourself temperature adjustment in a greenhouse
Organic or mineral?
My vast experience and the experience of ecologists around the world has shown:
on mineral fertilizers alone
when applied evenly throughout the soil
It’s impossible to grow tasty and healthy tomatoes
. The mineral water inhibits the biota in the entire root zone, and vitamins, minerals and other biologically active substances are given to the roots only by symbiont microorganisms and soil animals in their secretions in the rhizosphere.
But also vice versa:
tomatoes don't grow on organic matter alone
. That is, they will grow, but the taste is not the same, there is a problem with nitrates, the yield of tops is always greater than the fruit. Pests and diseases from all over the area flock to such overfed plants.
The solution is simple: when planting, I add 3-5-7 grams (depending on the gigantism of the variety) of any variety into a hole 5 cm from the stem.
complex long-lasting fertilizer for tomatoes
, in which potassium and phosphorus predominate. Organomineral Buisky OMUs are better, Kemir or Fertik are not bad.
I have plenty of two types of mulch. There is bedding manure lying in bags, which does not contain accessible sugars and amino acids, but contains all the minerals and trace elements in the bodies of soil biota. Its nitrogen to carbon ratio is still high, around 1/30.
There are woodchips from branches of deciduous trees, where, on the contrary, there is no soil biota, the ratio of nitrogen to carbon is 1/100, but there is a lot of sugar and lignin. This activates wood-destroying fungi - the best defense against pathogenic fungi, and subsequently attracts countless hordes of small predators, and all of them will loosen the soil, saturate it with fresh active humus, create microscopic pores in the soil, making it lumpy and structural. I constantly monitor the soil - its moisture and looseness. I monitor the growth of plants to see if there is excess nitrogen. And just as an artist, inspired by inspiration, selects paints, as a cook selects foods and spices, so I mulch tomatoes several times during the summer, selecting doses of compost, and on top - doses of sweet chips. And I activate all this every 7-10 days by spraying AKCh. And then I put my result on a platter for tasting - multi-colored, ripe, aromatic, sugary tomatoes and tomatoes.
So it is this time. In the fall, I harvested peppers, cucumbers and eggplants, didn’t dig the ground, and put chickens in the greenhouse. All winter they loosened the soil and litter and warmed it. In the spring, I removed the most nitrogenous layer and planted seedlings in loose, cotton-like soil, making a hole simply with my hand. I watered it with warm water with the addition of AKCH and vermichai. In places where the seedlings were stunted, a spoonful of vermicompost was added superficially before watering. If the seedlings began to grow fat, I sprayed the leaves and watered the soil with a weak solution of crystalline (for conifers) which contains little nitrogen and a lot of potassium.
The rate of growth and flowering of seedlings this year is ahead of forecasts. Three weeks have passed since the tomatoes and cucumbers were planted. The cucumbers have grown more than a meter and have dozens of ovaries. Tomatoes - 80-90 cm each. More than 3 clusters bloom, the first ones bear fruit. There are no diseases or nutritional imbalances.
It's only been 3 weeks since planting! ACH and chickens do wonders for the soil.
But I also grew seedlings for the street in the greenhouse. Since May 15th I have been keeping it outside in large pots. Here she is - stocky, with flowering tassels. On May 20, I planted them in the beds without any film.
And kittens love sweet tomatoes.
What you need for planting
Do not be afraid that planting tomatoes in this way may not give a good harvest. Using this method, it is easy to get juicy and tasty fruits. To plant, you need to have very little: bags, substrate and supports. Any summer resident will have such a necessary set.
- Bag.
As already noted, the best option is a sugar bag. The tomato feels comfortable in such a container: the root system receives a sufficient amount of oxygen and retains moisture. For drainage holes, the lower corners are cut off.
- Priming.
Some gardeners use ordinary country soil, lightly fertilized with humus. For looseness, add a little sawdust. You can fill the bag with soil and humus, mixing in equal proportions, or simply use compost.
- Supports for garter.
For support, they take, for example, ordinary wooden pegs or make a more serious structure using ropes and wire for garters.
For the method to give a positive result, it is important to acquire good seedlings. You can grow it yourself, or you can purchase it from trusted manufacturers.
Soil preparation
The soil for planting tomatoes should be prepared in the fall, especially if it is mixed with ash. If you add ash before planting, the roots of the plant may get burned. And by spring it will be neutralized, but important minerals for growth will remain, and the soil will be suitable for the new season.
If the soil is not prepared in advance, then instead of ash, water the seedlings with an extract from ash (infuse 1 glass in 10 liters of water for 24 hours, stirring occasionally) and filter through a layer of gauze.
To disinfect the soil from diseases and pests, it is steamed in a water bath under a lid for one to two hours and allowed to cool. Store the treated soil in boxes or bags outside so that harmful bacteria and remaining insect larvae are killed in the cold.
Before placing seedlings in the soil, it is necessary to additionally disinfect it from pests - the soil is treated with a hot solution of copper sulfate a week before the planned planting. Then fertilize and mix again.
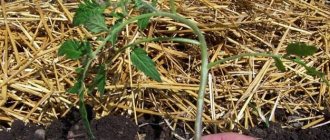
After planting, you can mulch the top layer with humus. This layer will additionally protect the root system from overheating, drying out and crust formation, which usually requires constant loosening.
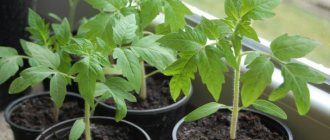
How to choose good seedlings
High-quality seedlings are the key to a decent harvest. Novice vegetable growers may not be experienced enough in this matter, so when choosing planting material you should pay attention first of all to the appearance:
- Stem. The height of good seedlings is approximately 20-30 cm;
- Leaves and trunk. The bush should be strong with a pronounced green color;
- The sprouts should have the beginnings of buds that have not yet bloomed.
If the tomato seedlings meet these criteria, then they are approximately 2 months old, which is what they need to plant in bags.
What materials will be needed for the experiment?
Growing tomatoes in bags is not much different from the standard one; you just need to prepare for planting seedlings. Required:
- Bags. It is better to use large bags for planting that previously contained sugar (30 or 50 kg): they are durable and allow moisture and air to pass through better than similar polyethylene ones. Drainage holes in such containers are made simply - just cut off the corners.
- Priming. The prepared soil should have a neutral reaction - tomatoes will develop worse in acidic or alkaline conditions. For better looseness, sawdust or vermiculite is added to the soil. The bag can be filled with rotted manure or humus to 0.5 volume, and the rest of the space with ordinary soil: until the ovaries appear, the tomatoes will not need to be fed. Some vegetable growers use only compost as a filler.
- Supports for tying tomatoes. Usually slats, ropes, and wire are used - they are stretched at a small height above the “vegetable garden”, and the shoots are tied with ordinary twine. You can insert wooden stakes.
See also
Super remedy for tomato seedlings: hydrogen peroxideRead
Having prepared everything necessary for this method of growing tomatoes, you should pay attention to the seedlings - how suitable the seedlings are for planting in new conditions (this method differs slightly from the greenhouse method). Healthy, strong seedlings must meet the following requirements:
- height - about 28 cm;
- the color of the stems and foliage is deep emerald;
- there should be no flowering of seedlings;
- Seedlings should be planted when they are about 60 days old and have 7–8 permanent leaves.
Only seedlings that meet the above requirements will grow well and produce a bountiful harvest.
How to plant tomatoes in bags correctly
Having found good and strong seedlings, you can safely begin planting.
So, you will need: a bag, soil, support, garter and seedlings.
Planting tomatoes (step-by-step instructions differ little from the technology for planting tomatoes in beds):
- To plant seedlings, you can choose compost or garden soil fertilized with humus. With any of these substrates, you need to fill the bag halfway or a little less. The filling height will depend on the variety of tomatoes. For tall varieties, fill strictly halfway, for low-growing tomatoes - by a third.
- Do not cut off the remaining unfilled part of the bag, but fold it outward (like rolling up sleeves).
- Next, you need to remove the seedlings from the container. It is very important to moisten the soil in which they are located before removing the roots. This way the roots will not be damaged, and the tomato will fully take root in its new location.
- Let's move on to the bag in which the tomato will grow. You can plant 3 sprouts per bag, this will be the best option. To transfer the sprouts to the soil or substrate, you need to make three holes in it that need to be watered. Place one root in each, digging it deeper into the ground than usual. This way the stem will hold tighter and more securely.
Advice from an experienced gardener on how to grow a good harvest of tomatoes in bags:
Nuances of cultivation
Depending on where the bags will be placed, outdoors or in greenhouse conditions, there are certain nuances for caring for plants. Compliance with all the features allows you to avoid plant death and obtain a stable harvest.
In the open ground
When growing tomatoes outside, special attention must be paid to air temperature. In case of cold weather, you will need to unfold the free edge of the bag and cover the seedlings. If the temperature drops to a critical level, it is enough to temporarily move the containers indoors.
In greenhouses
When placing bags in greenhouse conditions, it is not recommended to over-moisten the soil, since excess moisture slowly leaves the container, resulting in rotting of the roots. As the seedlings grow, it is necessary to add soil to the bags to cover the roots growing from the stem.
Growing tomatoes in bags
This method is not particularly different from the standard method. As always, it is necessary to replenish the tomato with moisture and carry out a number of mandatory procedures:
- Watering.
Like any other plant, tomatoes need water. It will be enough to water once every 2-3 days, but if the heat outside is unbearable, this needs to be done more often.
- Feeding.
If the soil is not fertilized, the tomato must be fed with special compounds. It is better to do this before flowering and during the ripening process of the fruits.
- Garter.
As the plant grows upward, it should be tied up. Especially when the fruits appear, the stem will begin to bend down or even break.
- Loosening.
This procedure is needed when the ground becomes crusty. When loosening, the root system will receive oxygen.
- Stepsonning.
It is necessary if a certain variety of tomato needs such a procedure. It is recommended to do according to the instructions included with each variety.
Growing tomatoes using the Maslov method
Growing tomatoes using the Maslov method
Experimentation in gardening always takes place. When growing a particular crop, different agrotechnical methods and techniques are used. Tomatoes are no exception. There is one very interesting and simple technique for them. Its author is a resident of Kaliningrad near Moscow, an engineer by training, I. M. Maslov.
The profitability of this technology has already proven itself in practice. Tomatoes grown using it give fairly high yields.
Biological substantiation of I. M. Maslov’s method
Tomatoes are one of those plants that easily form adventitious roots. Along the entire stem there are whitish root primordia that look like whitish tubercles. When they come into contact with the soil, they quickly produce additional root volume, strengthening the plant on the substrate. This is proof that tomatoes are prone to natural lodging.
Throughout the growing season, gardeners have to hill up tomatoes and tie them to a support. This guarantees vertical growth of vegetable plants. And just the opposite, growing tomatoes using Maslov’s method
implies maintaining natural features that allow you not to go against nature. The author offers two ways to implement his idea.
Growing tomatoes the first way
In a bed reserved for tomatoes, a trench with a depth of approximately 10 to 12 cm is prepared
It is important to maintain the correct orientation of the seed furrow - from north to south. Strong seedlings are placed in it not in the usual (vertical) way, but in a semi-horizontal way
To do this, it is necessary to place at the bottom of the trench not only the root, but also part of the stem (about 2/3), freed from leaves. In this case, the apex of young plants should face north. After some time, when active growth begins, the tomatoes, under the influence of geotropism, will tend to the south and thereby straighten themselves.
Even if the seedlings are very elongated, they can be successfully planted using the Maslov method. Another advantage of this planting is that the plants develop a powerful root system, which provides good nutrition to the above-ground parts.
Growing tomatoes using the Maslov method in the second way
When lower side shoots form on plants, they are not cut off, but, on the contrary, allowed to gain length and strength. After this, excess leaves are removed from them and pinned to the ground next to the mother plant. Hill up to a height of 10 cm and leave for rooting. Fruit formation on the stepsons occurs as intensively as on the mother stem.
As a result, tomato bushes become more powerful, and fruit set begins almost at the very surface of the soil. This makes the tomatoes more resilient and strong. But the main advantage of growing tomatoes using the Maslov method is that the amount of harvest increases significantly - up to 80%.
A feature of Maslov’s method is the large distance between separately growing specimens (0.9-1 m). Such spacious planting ensures more successful fruiting.
Further care for tomatoes should be as usual. Regular fertilizing, watering at the root or by irrigation. Traditional pinching need not be carried out; only dry or damaged shoots are removed. See you later, dear friends!
ayatskov1.ru
Adviсe
Any summer resident is faced with a number of situations that require a special approach to the plant. During the disembarkation or departure process, questions may arise that sometimes only specialists can answer.
The following few tips will help in case of frost or perhaps other problems arising during the maintenance process:
- If the weather becomes cold and frost sets in, you should unfold the folded edges of the bag, thus hiding the plant. In case of severe cold, it is advisable to move the plant to a warmer place.
- You should be careful with watering tomatoes. If you use a sugar bag, you need to pay attention to the fact that excess moisture comes out very slowly. If you water frequently, the tomato root may rot.
- In the first months of tomato growth, soil should be added to the stem to strengthen the trunk.
- After the tomato yields, the bags can be used for two more seasons, and the soil can be thrown into a compost pit. The remains of the tomato stems themselves must be burned.
- If the plant was sick while growing tomatoes, then before using the same bags the next season, they should be treated with a special product to prevent the situation from reoccurring. Potassium permanganate or Bordeaux mixture will do.
It turns out that growing tomatoes in bags is not at all difficult, and even convenient. This method is simply irreplaceable for those who have a small summer cottage and strive to plant a maximum of vegetable crops. Thanks to this method, you can protect the plant from unwanted insects, diseases and frosts. As practice shows, this method is ideal for obtaining a good harvest.
Pros and cons of the method
The method in question has the following advantages:
- bags can be placed in a convenient place and moved if necessary;
- when it gets colder, the “vegetable beds” can be moved to a warm room;
- due to the rapid heating of the soil, the crop ripens one to two weeks earlier;
- easy to maintain (no need to dig or weed);
- nutrients and water go directly to the roots, so the yield is pleasing;
- the risks of fungal diseases are minimal (the tomatoes are located high off the ground and well ventilated).
Gardeners note the following disadvantages of the method:
- bags can break through at the bottom;
- Not everyone can move filled containers with tomatoes.
Advice! To ensure that the bags last for more than one season, do not skimp on the quality of the product, choose high-density burlap.