When to plant tomatoes?
About two months should pass between the processes of planting seeds and planting seedlings, during which sprouts will sprout from the seeds. You can start working with seeds in February for those who live in warm regions, and in March for residents of the northern part of the country.
To plant seeds in the ground, it is necessary to take into account information about the weather in the near future. They need to be sown two months before the end of spring frosts - then the tomato bushes will take root better in open ground and will be able to bear fruit well.
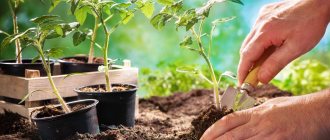
Another key point is the landing location. You only need to be guided by the weather when planting sprouts in a field or garden. If you have a greenhouse, this is not essential, and you can start seedlings in the middle of winter. The main thing is to provide the sprouts with good heat and light conditions.
When to sow tomato seeds for seedlings: optimal timing
Sowing seeds at the right time is very important for successfully growing home seedlings. As a rule, they are planted in February and March, but there are many nuances. When choosing the timing, you should focus on the varietal characteristics of tomatoes, weather and climatic characteristics of the region in which cultivation is planned. Thus, it is better to plant in the Moscow region in early March, in Siberia and the Urals - at the end of March or early April, in the South - in early February.
Important! Also, when choosing a time frame, you need to study the information on the seed package. There, as a rule, the recommended time for the procedure is indicated.
Selection of seeds in the store
In order to choose the right and suitable seeds, you need to pay attention to the parameters of the future bush and the conditions for its best growth.
Tomato bushes can be tall, medium-sized or low-growing. They differ in care, so you should choose them according to your growth capabilities.
Tall tomato bushes can reach a height of two or more meters. They are grown both in open ground and in greenhouse conditions. A prerequisite is the presence of support. This is due to the fact that during the period of fruit ripening, the weight of tomatoes can reach 20 or 30 kilograms per bush. If the plant is not given proper support, it may break and then the harvest will be lost.
Tall bushes bear fruit longer and produce a harvest much earlier. The fruits can be collected from mid-summer until late autumn. This plant option is suitable for those who have a small area for planting plants, but require a large harvest.
Most varieties have an average size of bushes. They reach one and a half meters at the peak of growth and do not require as much care as tall bushes. However, their yield is significantly less.
Low-growing varieties are the most popular among the population. They do not grow above a meter, are quite compact and easy to care for. They can be grown at home, for example, in a box on the balcony. They do not need support, since their trunks are strong enough to support a weight of up to 8 kilograms, which is exactly how much harvest is obtained from one bush.
Another choice parameter is the characteristics of the fruit itself. You need to choose what exactly the tomatoes are for. Large and fleshy varieties are perfect for making salads, and small tomatoes, for example, cream tomatoes, are ideal for canning. We recommend reading the following article for lovers of sweet varieties of tomatoes.
The color of the tomatoes may also vary. There are red, orange and black varieties. They all have different tastes, so you need to choose based on personal preferences.
You can also choose by price category. There are cheaper and more expensive varieties of seeds. According to statistics, expensive seeds germinate better and produce greater yields. Among cheap products, empty seeds are often found that do not germinate in the ground.
If you rely on productivity, then choose the appropriate varieties, for example, tomato seeds of Siberian selection have proven themselves well.
In addition, in stores there are seeds that have been processed - they can be planted immediately, or you can use seeds that you have prepared yourself for sowing.
Soil for tomato seedlings
Nowadays, stores offer a huge selection of soils for seedlings, so there is no particular need to create your own. If you nevertheless decide to take soil from your garden, then you will need to take some measures. Namely, to disinfect your soil and bring it to mind. What does it mean?
Two weeks before planting the seedlings, the garden soil should be thoroughly watered with a pink solution of potassium permanganate. Also, the soil from the garden is often too heavy and dense - loosening with fine river sand, perlite or vermiculite in significant proportions will be required. You will also need to add a significant portion of compost or vermicompost. It is welcome to add 1 tbsp ash. l per 1 liter of soil.
And before you use garden soil for sowing seedlings, make sure that it has neutral acidity (PH).
If all this is not done, there is a risk of getting thin, weak seedlings - for example, if your garden soil turns out to be too acidic, or too dense, and God forbid, it will carry spores of fungi or bacteria.
Therefore, an easier way is to buy high-quality seedling substrate in the store. As a rule, it has already been processed, has a loose structure and a peat base, which is perfect for the germination of the delicate root system of small seedlings. Such soils often already contain agroperlite and a nutrient additive and do not require additional loosening or fertilization.
Good soils that I have tried are Keva, Klassman, Greenworld, Ogorodnik, Krepysh, Zhirnozem, 3D, Terra Vita.
Seed preparation
In order for the harvest to be rich and pleasing to the eye, it is necessary to carefully select the seeds before planting them. This process will discard all low-quality seeds, leaving only the strongest ones. Most people buy regular seeds and prepare them at home, as there is nothing complicated about it:
- The first step in this process is seed sizing . To do this you will need salted water. In half a liter of ordinary water you need to add a teaspoon of table salt and stir thoroughly until completely dissolved. Then tomato seeds are placed in the resulting solution and left for several minutes. Over time, all the good seeds will settle to the bottom, and the bad ones will float to the surface. The top layer must be removed with a slotted spoon or spoon, and the bottom layer must be carefully fished out of the jar. It is the settled seeds that will subsequently be planted in the ground.
- The next step is disinfection . This is necessary in order to destroy possible pathogenic microorganisms and fungi so that the harvest is healthy. For this purpose, a solution of potassium permanganate has long been used in the proportion of 1 gram of the substance per liter of water. To disinfect, you need to keep the seeds in this solution for no more than 20 minutes, since overexposure can reduce germination. In addition to potassium permanganate, ready-made solutions are currently also used, for example Fitosporin, which can be bought in the same store as the seeds.
- Stratification is a fairly specific method of seed preparation. The method is to place them in winter temperatures. To do this, the seeds must be thoroughly mixed with a peat mixture, which is purchased in the store, and then placed in the refrigerator for a month. After this, the seeds are washed and dried.
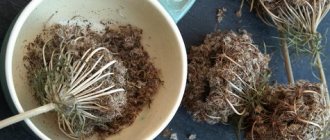
- Stimulating the growth of tomato seeds is one of the most important steps in preparation. Without this, the plant bushes will be sluggish and frail, and the harvest will be meager. To prepare the stimulant you will need ash and water. Take a glass of water for three teaspoons of ash. The stimulant must be infused for at least a day. Then the seeds wrapped in gauze are placed in the mixture for about 5 hours. After this, they need to be dried thoroughly.
calibration of tomato seeds
Disinfection of tomato seeds in potassium permanganate
Seed stratification
Stimulation of tomato seed growth
Picking tomatoes
If two true leaves appear, tomato seedlings
ready to dive.
You cannot tighten it, as the roots grow and intertwine with each other. Picking tomato seedlings
It is preferable to replant a sprout with a lump of earth, so we water it in advance, a day before.
- We prepare containers (purchased, homemade).
- Fill up the soil.
- We dig out a baby tomato with an earthen lump using the handle of a teaspoon.
- We put it in a personal box.
- We bury it 2-3 cm, deeper than it grew in the old box. As a result, new roots are formed in this place.
- We compact and moisten a little.
It has long been known that when picking tomato seedlings, some pinch the central tip of the root. There is no doubt – the method has the right to be. But judge for yourself - picking tomato seedlings is already stressful for them. But, no matter how carefully it is carried out, it will still no, no, and something will be damaged.
During this period, it is important to illuminate the seedlings from 19-00 to 9-00. And also feed once every two weeks. Now, in these separate “apartments”, tomato seedlings at home will survive until they are finally planted in the garden.
Soil preparation
An equally important point is preparing the land for planting seeds. Ideally, this is soil on which no other crops have grown for the last few years; in extreme cases, it is allowed to use soil after cabbage or zucchini. Soil after nettles is good. You can use soil from the forest. However, you need to check that it does not contain residues and seeds of other crops, especially harmful weeds.
You should always carefully check the soil for pests. Otherwise, you can lose the entire harvest or a significant part of it, which means time and money.
To improve the quality of the soil, you can add ash to it - it is an excellent fertilizer, especially for tomatoes. Tomatoes also prefer to grow in soil that contains sand, as it retains the moisture they need well.
If it is not possible to obtain the necessary soil in natural conditions, you can use the services of a store. Most garden centers provide services for the delivery of the required substrate, which does not contain pests and other crops, and is also fertilized with useful substances.
Video: Tomato seedlings from picking to planting in the ground
Do everything scientifically. Take into account the lunar calendar for tomato seedlings in 2021 and good harvests to you, summer residents!
It is with great pleasure that we invite you to visit our VKontakte group. By joining it, you will always be aware of the release of new publications on the “4 Seasons of the Gardener” website, and they will always be at your fingertips!
And a small request ! For those who are not burdened or lazy, please share this note with your friends on social networks. Perhaps they are also very interested in the tricks of growing tomato seedlings... ✍
Always yours, 4 Seasons of the Gardener
Containers for seedlings
In order for the sprouts to sprout and be ready for subsequent planting in open ground, it is necessary to provide them with a suitable container. There are quite a lot of them and each has its own advantages and disadvantages:
- A wooden box is considered a classic container for planting seeds. Its advantages are large capacity and convenient transportation. In addition, such a box can be assembled independently, which is quite economical. One of the disadvantages of this method is the weight of the container with earth - wooden boxes are very heavy. In addition, it is difficult to plant sprouts from it in open ground - their roots are easily damaged.
- An alternative to a box can be considered plastic cassettes - they can reach the same size as boxes, but have much less weight. In addition, their length can be easily adjusted using a knife or scissors. The downside of cassettes is their fragility - they easily break when overloaded with soil, which can damage unformed sprouts. They are also not very convenient to transport from place to place.
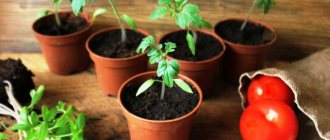
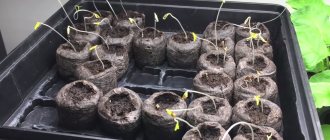
- Peat containers are environmentally friendly. They can be in the form of pots or tablets. They can be planted directly into the ground along with seedlings. This is a big plus, since the root system is not damaged. However, due to their natural nature, they are susceptible to mold, which can damage the sprouts and reduce germination. In addition, it is very difficult to select an irrigation regime in peat, since it absorbs a lot of water. These containers are among the most expensive, so not everyone can afford them.
- A cheap analogue can be considered ordinary plastic cups, which can be selected according to volume. It is very convenient to extract sprouts from them, since the roots are not damaged - this is their plus. The negative side of using them is the need to make drainage holes; this takes quite a long time, especially if there are a lot of seedlings. In addition, they easily turn over during transportation and can tip over even from a small draft.
- Experienced gardeners use not only the above containers for seedlings. Milk tetra packs are used as a budget option. The top is trimmed, and the lower part is used as a container for seedlings. Sour cream cups and plastic buckets after sauerkraut also work well. The only condition is that you need to wash them well after use to prevent rotting of the roots.
- A little-known, but no less good way is to place seeds in newspaper. To do this, you need to roll up a bag of newspaper, as you would for sunflower seeds, and cover it with soil, forming a stable bottom. This is the most cost-effective type of container for seedlings, which also has good air permeability. The disadvantage of this method is that transportation is quite difficult, since newspaper bags are easily turned over.
How to determine the time of transplantation into open ground
The gardener’s task when growing seedlings is to ensure that the seedlings are ready for planting by the time the weather finally becomes good outside (18-20 degrees Celsius during the day and 15 at night).
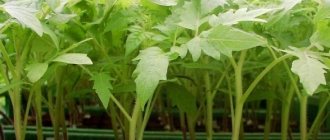
Plants should already have a strong stem, grow to 25-30 cm in height and have at least one bud.
By region, transfer times are approximately as follows:
- South – end of April,
- Volga region - end of May,
- Central Russia – end of May – beginning of June,
- Ural, Siberia, Far East - first half of June.
How to plant tomatoes for seedlings: step-by-step instructions
It is necessary to start planting seeds to obtain sprouts by preparing the soil. To do this, you need to add hot water with potassium permanganate to it two days in advance, and the next day add a fungicide. This will help prevent rotting of the root system.
In order not to confuse the seedlings in the case of planting several varieties, markings can be applied to the pallets, for example, multi-colored stickers with the names of tomatoes.
Planting the seeds itself is not difficult. To do this, you need to place the soil in a pre-selected container, mix it with a wooden stick and then level it. This is convenient to do with a ruler. After this, you need to make depressions (grooves) in the ground using the same ruler at a distance of no more than three centimeters from each other. The depth of the groove should be at least half a centimeter.
The seeds are planted in these depressions at a distance of 5-10 millimeters from each other, after which they are sprinkled with water and covered with earth.
The last step is to cover the future seedlings with polyethylene.
Planting tomato seedlings in a greenhouse
If you have a heated greenhouse, then seedlings can be planted directly in it. You can also build a greenhouse yourself.
The technology for growing in a greenhouse is no different from the traditional seedling method, but you need to be more careful in preparing the soil. It is necessary to add sifted river sand to the ground for better drainage, and then disinfect the substrate by treating it with a solution of Fitosporin or potassium permanganate.
IMPORTANT! Do not forget to ventilate the greenhouse to prevent fungal and bacterial infections.
Sprout care
The air temperature in the room must be constant and maintained at a certain level. The optimal temperature for tomatoes is considered to be from 18 to 20 degrees. In such conditions, the first leaves will appear on the third day.
After this, the tomatoes need to be moved closer to the light source - this way the leaves will gain sunlight and grow better. Usually natural light is enough, but in the case of winter planting in January-February, the tomatoes need to be provided with artificial lighting.
Daylight should be about 16 hours. You should not leave the light on all day long, as this can weaken the sprouts.
It is important to maintain a certain level of humidity in the container. Watering too much will cause the roots to rot, and overdrying will simply kill the plant. To prevent this, you must adhere to certain rules:
- There is no need to water in the first week of cultivation; there is enough water in the soil from the period of preparation and sowing.
- For watering, it is better to use a spray bottle - it will carefully and accurately provide moisture and will not damage weak shoots.
- If it is not possible to use a sprayer, you can water it with a watering can, but only near the edge of the container, so as not to wash away the soil from the sprouts.
- The water should be at room temperature.
Fertilizing is carried out after the leaves appear. From this moment you need to wait at least a week. For feeding, solutions and mixtures from specialized stores are often used.
After this, watering should be carried out 4 or 5 hours before picking. This is done to facilitate the process of moving plants. Picking tomato seedlings is carried out after three weeks from the emergence of most sprouts, but you need to focus on the condition of the plants.
Picking is carried out in order to provide the young plant with a large amount of soil and to prevent intertwining of root systems. To carry out the procedure, you need to prepare the soil in the same way as before planting seeds.
It is necessary to remove the plant from moist soil so that the roots are not damaged by lumps of dry soil. You need to place it in a separate container. It would be ideal to use individual cups. The sprout must be planted carefully, carefully immersing the roots and part of the stem into the soil. The soil around the plant is carefully pressed down with your fingers and watered to remove voids.
After the manipulations, the transplanted sprout is left alone for several days in a warm and dark place. This is necessary so that it takes root better in the new container.
After 3 or 4 days, the seedlings return to a bright place. During this period, you need to regularly water the plants, loosen the soil in containers, and feed the tomatoes with special solutions for rapid growth.
We also advise you to read the recommendations that will help you grow strong and healthy tomato seedlings - here.
What is the Chinese method of growing tomato seedlings?
When using this method, it is necessary to sow 25-30 days earlier than required.
IMPORTANT! This method can only be used for growing hybrids and indeterminate varieties.
The seedlings are cared for as usual. When the plant grows to 20 cm, pruning is done under the cotyledon leaves. Next, the cuttings are rooted in a new container, after soaking for 10 minutes in a solution of a root formation stimulator. Then the seedlings are removed to a dark place for 3 days.
IMPORTANT! The method is suitable only for experienced summer residents. At best, ¾ of the seedlings survive.
What size should seedlings be before planting?
In order for planting to be successful, it is necessary to develop a powerful root system in the seedlings. With proper care, this occurs 60-90 days after planting the seeds in the soil. This is individual for each variety.
Before planting, the plant must be prepared so that it does not die from unusual conditions. To do this, the seedlings need to be taken out into the open air a week after picking. The time should be increased gradually, starting from half an hour and ending with a whole day.
Let's watch a video on how to sow tomato seeds to obtain seedlings. We will learn how to create the necessary conditions for the growth of tomato seedlings, and how to properly care for the planted seedlings:
In order for the result in the form of a good harvest to be pleasing to the eye, you need to adhere to the simple rules and instructions outlined above, and then everything will work out, the tomatoes will be tasty and juicy, and their quantity will pay off all the effort invested in them.
0
0
Copy link
Growing tomatoes. Conditions for germination
If everything is done correctly, within three to four days the first green sprouts of tomatoes will appear. Don’t waste a moment, remove the cover and expose the pots with seedlings to the light. Otherwise, the tomato seedlings will stretch out. It will become thin and weakened.
For the first four days after this, we try to maintain the temperature. This is an indispensable condition for strong tomato seedlings:
- during the day – +12°С -15°С;
- at night – +9°С -13°С.
From the fifth day we increase the temperature:
- during the day – +23°С -25°С;
- at night – +11°С -14°С.
The easiest way to do this is to create a mini-greenhouse on the windowsill of the south window. You should try to isolate it from the rest of the room with polyethylene, and regulate the temperature using a window. This is especially ideal for tomato seedlings. But try to get by with just a curtain. Those. don’t close anything, just close the curtain and open and close the window as needed.
Interesting on the topic: When to plant seeds for seedlings: simple calculation of sowing dates
How to perform a transplant correctly
The quality of the future harvest depends on how correctly the seedlings are transplanted to a permanent location. It is important that the plants are strong and healthy at the time of planting. Visual signs of this are:
- presence of more than 7 true leaves,
- stem thickness more than 7 mm,
- plant height from 25 cm,
- developed root system.
Before planting, you need to take care of the quality of the soil in advance. It is considered a good option if cucumbers grew at the planting site before the tomatoes. It is also recommended to renew the soil and disinfect it.
In open ground
To plant seedlings in open ground, you need to carefully consider that the plant will constantly be exposed to environmental conditions without the possibility of additional heating. If the air temperature is below +10 degrees, the tomatoes will not grow and will begin to hurt. Too hot weather with an air temperature of more than 30 degrees can also have a negative impact. The optimal air temperature for planting is considered to be from +15 to +25 degrees. The ground should also be warm, the soil temperature should be from +16 to +22 degrees.
See also: Productivity and description of the tomato variety Makhitos f1 - recommendations for growing
To the greenhouse
Before planting in a greenhouse, you need to prepare the soil well. The soil should be well loosened and the clods of earth should be broken up. On the eve of planting, the soil should be watered so that at the time of replanting the soil is moderately moist. It is necessary to prepare the holes in advance, keeping a distance of about 40 cm between low-growing varieties, and 60-80 cm between tall varieties. It is worth paying attention to the direction of natural light. Low varieties should be planted closer to the sun, and tall varieties should be planted behind them.
Advice from Kizima and Ganichkina
Few people know how to sow tomato seedlings at home using Galina Kizima’s method. The technology she developed solves the problem of lack of space for growing seeds for seedlings.
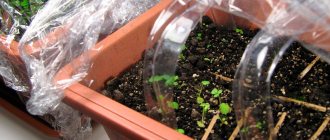
According to her method, tomato seedlings are grown in film, grow completely healthy and suitable for further cultivation.
Galina Kizima method
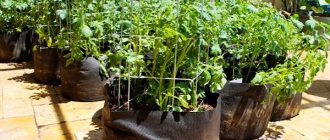
According to her method, seeds are planted not in boxes and pots, but in thick plastic film (diaper). A small volume of soil is formed in it, which is sufficient for growing seedlings. During plant growth, the film retains precious moisture.
The author's method has the following advantages:
- you can place many tomato seedlings on the window sill area;
- picking seedlings is easy and does not take much time, since to do this you need to unroll the film and take out one plant at a time;
- this method requires a small volume of soil, since 100 tomato seedlings can be grown with 5 kg of substrate;
- during the growth process, tomato plants are naturally protected from various diseases;
- Through the film you can see how the tomato seeds germinate.
Like any method, this one also has not only advantages, but also disadvantages. Here are the disadvantages experts note:
- tomato seedlings have little living space;
- high planting density degrades illumination, causing plant development to slow down.
Brief essence of the method
Planting tomatoes according to Galina Kizima’s method is carried out using several methods with variations. You can use dry and sprouted seeds. Planting seeds can be done in a substrate, or you can do without it.
A description of all the methods deserves a separate article, and we will consider one of them, using sprouted seeds. Here is the algorithm for planting:
- seed preparation is carried out using traditional technology, with calibration, disinfection and germination;
- then the seeds are placed in a damp cloth;
- a napkin with seeds is placed under the bag for 3 days;
- After this time, the first loops of seedlings will appear and you can begin planting.
Next, you need to carry out the planting process correctly:
- a certain amount of soil is laid out on the corner of the film;
- Germinated seeds are placed in it so that the cotyledons are located above the edge of the film and the roots are covered with soil;
- the film is folded in the center and rolled into a roll;
- so that it does not unwind, it is fixed with an elastic band;
- the prepared rolls are placed in a tray, and this, in turn, is placed in a lighted place;
- The date of landing is recorded on the tape.
Recommendations from Oktyabrina Ganichkina
Known throughout the country, Oktyabrina Ganichkina gives advice to gardeners on growing tomato seedlings at home.
| Her recommendations apply to all stages of cultivation. | |
| Sowing | Ganichkina believes that using home seedlings is preferable to using purchased seedlings. |
| Disinfection | For this procedure, it is advisable to use Epin or Energen, which not only kill pathogens, but also stimulate their development. The seeds should be soaked in this solution for a day. Then they are placed in a plastic bag and sent to the refrigerator for 3-4 hours. |
| According to sowing dates | Sowing seeds at home depends on the variety. If low-growing varieties are used, sowing is done in April. After 60 days, the seedlings are ready for planting. Late ripening tomatoes are sown in March. The seedlings are ready for planting after 70 days. |
Landing rules
Ganichkina advises sowing seeds 3 cm deep in plastic cups, placing one seed in each container. This way the plants will not shade each other and the growth of seedlings will not slow down. Covering the sown seeds with film should be a mandatory action.
When growing tomato seedlings, it is very important to maintain a given temperature. During the day, the temperature should be +20 degrees and above, and at night it is prohibited to allow it to drop below +15 degrees.
It is even worse to allow the temperature to rise above +30 degrees, because in this case the seedlings stop growing, flowers do not form, and the roots take on an ugly shape. The yield from such plants drops significantly.
In the video, Oktyabrina Ganichkina gives recommendations on how to sow tomatoes for seedlings at home:
Mandatory care work for tomato seedlings according to Ganichkina
The author believes that in the process of growing seedlings must go through the following stages:
- Formation. At the age of 2 months, the first bud forms on the tomato seedling. It should be removed as it inhibits the development of subsequent flowers.
- Feeding. On the eve of planting seedlings in a garden bed or greenhouse, they must be fed with ammonium nitrate. Thanks to this, the seedlings adapt faster to a new location.
- Hardening. 7 days before planting, Oktyabrina Ganichkina advises starting to harden the plants. In the first 2 days, she is taken outside for 2-3 hours. Every day this exposure should be increased, bringing it up to 8 hours a day. Hardened plants do not experience stress when planted in a permanent place.
Growing tomato seedlings at home is accessible to every gardener. To do this, you just need to have minimal knowledge about tomatoes, a small amount of free time and space on the windowsill.
To get a good result, you need to follow the recommendations outlined in this article. Correct and timely implementation of all requirements of growing technology will definitely have a positive effect on the harvest.
Victor Immel My entire childhood was spent in nature, which probably predetermined my subsequent choice of profession - to become an agronomist. ...
Preliminary preparation
An experienced summer resident carries out all operations to prepare for sowing seeds automatically, knowing when he needs to take the prepared seeds out of the box, what needs to be done with them first, where and what kind of soil to get, where he keeps reusable cups or wooden boxes, or where and when he needs to stock up. peat pots. He already has some fertilizers in stock for spring and potassium permanganate, which has suddenly become scarce, which is very necessary for disinfecting both seeds and soil.
Seed preparation
In different manuals you can find different descriptions of preparing seeds for planting, so I will try to briefly describe my more than thirty years of experience, without pretending that this is exclusively correct. But there has never been a season without good tomatoes. I must make a reservation that I have never bought seeds in a store, I only use my own and “from neighbors.” A useful remark. Firstly, recently a lot of seeds have been sold, pre-treated in one way or another; they just need to be sown immediately in pots. Secondly, many tomatoes are not varieties, but hybrids (F1). Their preparation is very different from the preparation of varietal seeds and is also minimal.
The first sowing usually begins immediately after March 8th. At this time I take out the seeds of early varieties. The disinfection procedure is combined with seed rejection. To do this, I use a strong, very dark solution of potassium permanganate. Advice often misses a small nuance that people who are far from chemistry do not pay attention to. Potassium permanganate dissolves very slowly in cold water, and decomposes to a large extent in hot water. Therefore, to obtain a solution, you need to dissolve a small amount of the drug (at the tip of a knife) in warm water (40 degrees), stirring occasionally and checking that there are no crystals left at the bottom. It is convenient to pour about half a can of water into a half-liter jar. If you rush and place the seeds there ahead of time, the undissolved crystals will immediately burn them.
You can often see advice on preparing a 1% solution of potassium permanganate for this purpose, but some strange numbers are written next to it. Firstly, it is not easy to dissolve such an amount, although the maximum solubility at room temperature is 6 times greater. Secondly, this is already a bomb that burns all living things. And few apartments have scales that allow you to take the necessary weights to prepare a glass of disinfectant solution. Therefore, we do it by eye and are not afraid. Treating seeds with a slightly pink solution can hardly be considered disinfection; the solution should be dark. Will the seeds be colored? Yes, they will stain, no problem. They will be covered with a thin layer of the permanganate reduction product - manganese dioxide, which at the right stage will play the role of a microelement.
Solutions of potassium permanganate of various concentrations are used as a disinfectant; I think it is possible to use a dark purple solution
I pour seeds of one variety into a jar with the prepared solution and keep them there for 10 minutes, shaking them well from time to time. Those that did not drown during this time, I mercilessly throw away, pouring the upper layers of the solution into another jar through a strainer. Then I filter out the good seeds through the same strainer and rinse them very well under the tap with water. I put it in a wet cloth and keep it in a Petri dish for several days, observing in the morning and evening. (For those who don’t have a Petri dish, you can place it in any small container, covering it with a lid that is not completely airtight).
As soon as I find at least a few sprouted seeds, I put them in the refrigerator for 12 hours. Then I take them out and keep them at room temperature for 8 hours. I alternate between cold and heat three times. All. You can sow.
It’s already too late to plant these seeds: it will be difficult not to break off the roots
There are tips on heating seeds near a battery, using hydrogen peroxide, boric acid, growth stimulants (Epin, honey, agave juice, etc.), etc. They even use air bubbling! Most techniques have the right to be used, each has its own technique. But... Gardening should not turn into fanaticism, so we do only the most necessary. And disinfection and hardening (except in the southern regions) are necessary! But, for example, bubbling helps seeds covered with a strong oily layer (for example, carrots, parsley) to hatch; tomatoes have absolutely no use for it.
As for hybrids, you won’t collect seeds from them in the garden anyway, it’s no use: you won’t understand what will grow. And conscientious producers nowadays pack them already prepared for sowing, and recommend sowing them dry. But... It seems that hardening them in the conditions of the middle zone and northern regions, if the plants do not have to live in a greenhouse, will not be superfluous.
Soil preparation
Seedlings will grow in almost any soil, unless it is contaminated, that is, not taken from a bed where vegetables grew last year and diseases raged. But, of course, we are not talking about her growing up in principle, but growing up strong and healthy. Now stores sell ready-made soil for any garden crops. You can buy a package of such soil to grow a dozen roots, but our person does not mess with that many.
Using such a package is convenient, but very expensive
In Saratov, tomatoes are almost “an object of national pride,” and few summer residents plant less than 150–200 bushes. Therefore, you can go broke on purchased soil. At the same time, it is problematic to create the optimal soil, which is recommended in most manuals, since it is equal parts of peat, humus and turf soil. And if in central Russia peat is not a very big problem, then in the Volga region it is exotic. So we take what we have.
And at the dacha there is heavy, clayey, but at the same time black soil, on which almost everything grows, except, perhaps, carrots, but which requires mandatory loosening a certain number of hours after watering, otherwise it will be an impenetrable crust. We bring several buckets of this earth every autumn and leave them on the balcony. The infection is partially frozen out, but before planting the seedlings, be sure to dilute the soil with sand (2:1) and sprinkle it well with a strong solution of potassium permanganate. If we don’t forget to grab compost from the dacha, we add it as much as we have. And a little ash.
I don’t think steaming soil in the oven is a very good idea. Firstly, being in the apartment during this procedure is a dubious pleasure. Secondly, the soil must be living, and not a simple inorganic substance. And at recommended temperatures (above 100 °C) not only pathogenic microbes will die, but also all beneficial microorganisms.
So, let's summarize. You shouldn’t bother with the composition of the soil for tomato seedlings, but it should be as nutritious as possible and at the same time breathable, not too heavy. To prevent seedling diseases, it must be disinfected by watering it well with a dark solution of potassium permanganate.
The second method of planting tomato seeds
The technology for planting tomato seeds using the second method has some differences. We are talking about growing seedlings in “diapers”. More details below.
Growing tomato seedlings in “diapers” first appeared as a method in the Moscow region. It was proposed by V. N. Kovaleva
Step 1. Cut a piece of polyethylene into strips, the width of which should be approximately 10 cm. The length is at your discretion. On top of the film you need to place a piece of toilet paper with the appropriate dimensions.
The film must be cut into strips
Toilet paper is placed on the film
Step 2. Moisten the paper with a special solution with a small amount of aloe juice (the latter acts as a biostimulator). If desired, aloe can be replaced with some other growth stimulant.
The paper becomes damp
Step 3: Place the seeds on the surface of the paper. The distance between them should be 3-4 cm. Cover with a layer of toilet paper and place another piece of film on top.
Tomato seeds are laid out on paper
Place a second strip of toilet paper on top
The paper becomes damp
You need to put a second strip of film on the paper
Step 4: Carefully roll it all up and place it in a plastic cup. To save money, you can place several rolls in one cup.
Everything rolls up
Step 5. Pour some water into the glasses. It should be enough to submerge the edge of the toilet paper by about 1-1.5 cm. This is done to moisten the seeds. Cover the top with a piece of polyethylene with holes for ventilation.
Water is poured into a glass with a roll
Step 6. Now all that remains is to wait for the shoots. This happens best in a warm place, so all cups need to be labeled there.
Cups with rolls should be kept in a warm place
Picking tomatoes planted in this way is easy and painless for seedlings. To carry out the procedure, you need to remove the bundle from the glass, pinch the roots 1-2 cm, unfold the diaper, take out the sprouts and plant them in a permanent place or (if it is too early for planting in the ground) in a separate glass. The paper will gradually dissolve in the soil, so you don’t have to tear it off
Aftercare rules
After the tomato seedlings have sprouted, it is necessary to maintain the humidity and light conditions in the room, as well as control the watering regime. Without this, the sprouts will wither and may become sick. Following the recommendations will allow you to avoid troubles and grow healthy seedlings, fully prepared for planting in a permanent place.
Temperature
For good growth of tomato seedlings, you need to avoid overheating or overcooling the plants. Temperatures above 25 degrees should be avoided so that the sprouts do not overcook. If you do not plan to harden, then you should avoid excessively lowering the temperature. A drop below 10 degrees can have a detrimental effect on fragile seedlings. A constant regime with a low temperature will lead to slow growth and a frail plant.
How to water sprouts
When the first cotyledons have just emerged from the ground, there is no need to water them for the first three days. If the soil dries out, it must be carefully sprayed with a spray bottle so as not to harm the greenery. Then watering should be done once a week at normal air humidity, and twice a week at low humidity. You need to water from a tablespoon carefully at the root. You can also use a syringe. 20-30 grams of water will be enough for one plant.
Top dressing
Each individual tomato seed contains a supply of nutrients inside. Once sprouts appear, you do not need to fertilize until the first true leaf appears. After this, you can use folk remedies:
- iodine,
- ash,
- hydrogen peroxide,
- yeast.
You can use ready-made fertilizers for tomato seedlings. Among them, the most preferred are “Kemira Universal”, “Rastvorin”, “Agricola” and “Universal”. It is important to remember that both a lack of nutrients and an excess are harmful to young tomato seedlings. Therefore, the dosage specified by the manufacturer must be strictly followed.
Dive
Diving is the transplantation of grown tomato seedlings from a common container into separate pots. It is necessary only when the seeds were planted not in individual containers, but in a common seedling box. The process is carried out when the first true leaves appear. This occurs approximately on the tenth day from the moment the cotyledons appear. The plants are carefully removed from the soil mixture with a special spatula or tablespoon. The roots are separated and the seedlings are placed in individual containers.
Hardening
Hardening is necessary so that when transplanted to a permanent place, the plants experience the least stress, also adapt better to new conditions and suffer less pain. To do this, you need to stop watering the seedlings one week before planting and periodically take them to a cool place. You can place it next to an open window, on a cold veranda, or leave it on the balcony. On the first day you need to leave it for 2 hours, on the second - for 4 hours, on the third - for 8 hours. Three days before planting, you can leave the sprouts to spend the night outside.
Lunar calendar 2021 for planting tomato seeds
Many gardeners compare their sowing, planting and caring for plants with the phases of the Moon and other celestial bodies. It is difficult to judge how correct this approach is, but there is probably something in it, because everything in nature is interconnected. True, a working person does not always manage to do everything exactly on those days when the Moon commands, but many pensioners try to adjust their gardening schedule to the lunar rhythms. The trouble is that in different sources you can simultaneously find slightly different lunar calendars.
In 2021, the following days will be favorable for sowing tomatoes for seedlings:
- February: 1, 2 (until 18:51), 3, 4, 7 (until 9:04), 8, 27, 28;
- March: 1, 2 (after 9:44), 3 (before 17:21), 6 (after 14:55), 7, 8 (before 17:00), 11, 29, 30;
- April: 1–4, 6–9, 11–13, 15–17, 20, 21, 24–26.
It is important not to plant seedlings on new and full moon days:
- February: 5, 19;
- March: 6, 21;
- April:5, 19.