At the end of winter, summer residents who grow vegetables on their plots begin sowing seeds for seedlings. And since tomatoes are one of the most popular vegetable crops, tomato seedlings are most often grown in gardeners’ homes. You can plant tomato seeds for seedlings either with subsequent picking, or initially grow them in such a way that you don’t have to pick.
Distinctive features of two methods of growing tomatoes at home
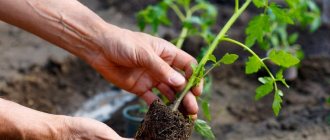
Picking means cutting off the edge of the tap root in order to stimulate its branching. This helps to increase the volume of the root system and, as a result, enhanced development of vegetable seedlings.
Most often, vegetable growers understand by picking to simply transplant seedlings from a common container into individual containers. Growing tomatoes without picking is also possible. In some cases, this technique turns out to be optimal.
Without picking, seedlings are grown:
- in separate containers (plastic glasses and peat-humus pots);
- in boxes with cardboard partitions;
- in film envelopes;
- in peat tablets.
All these planting methods can be modified and supplemented, adjusting to the individual characteristics of the vegetable farm.
The differences between the two above methods begin when the seeds are planted in a tray with soil.
- The timing of planting seeds for seedlings without picking is late - late spring. With picking - already in February the seeds should be in the ground. The harvest is obtained at the same time.
- In the first case, the seeds are sown in separate peat or plastic pots.
If they plan to plant the seedlings, the tomatoes are sown in a common container with soil. The volume of individual containers should be sufficient not only for a small sprout, but also for a grown tomato seedling. The optimal volume is 0.6 - 0.8 liters. - There are also differences in subsequent stages of cultivation - during care and planting of tomatoes in open ground.
We invite you to watch a video about how tomato seedlings are grown with and without picking, and what is the difference between these methods:
Algorithm for growing through seedlings
Growing tomatoes without picking includes three main stages.
Selection and preparation of seeds, soil and containers
For tomatoes, a soil mixture consisting of part garden soil, part humus, 2 parts peat (or compost) and 0.5 parts sand is best suited. You should lower the acidity level of the soil by adding a glass of wood ash or 4 tbsp. spoons of dolomite flour. Fertilize with a solution of 35 g of superphosphate, 10 g of urea and 12 g of potassium fertilizers (or buy one of the complex fertilizers - “Nitroammofoska”, “Nitrophoska”, “Universal”). If purchased soil is used, it is better to choose special soil (for peppers and tomatoes). It is important to carefully treat such a soil mixture by deep freezing or calcination:
- in the first case, the soil is wrapped in a bag and placed in a cold place for 5 days (the temperature should be -15°C), then transferred to a warm place for 7 days and re-frozen. The procedure should be carried out at least 2-3 times to kill all bacteria and parasites;
- in the second, the earth is poured with boiling water and laid out on a baking sheet, after which it is heated in an oven preheated to 90°C for exactly 30 minutes.
Related article:
How to preserve fresh tomatoes for a long time
You can cultivate the soil for growing tomatoes without picking using special chemicals:
- potassium permanganate (4 g of crystals per 10 liters of water - 40 ml of solution per 1 m2);
- fungicides (“Fitosporin”, “Planriz”, “Extrasol”, etc.);
- insecticides (“Aktara”, “Iskra”, “Grom”, etc.).
Chemicals are used strictly in accordance with the instructions. Do not overdo it with the treatment of the soil mixture: just choose one of the most affordable means.
As for seeds, you should choose fresh seed from the well-known ones, “Gavrish”, “Russian Garden-NK”, “SeDek”, etc.). The packaging must contain the following information:
- name of variety and crop;
- variety information;
- batch number;
- information about the manufacturer;
- best before date;
- GOST number;
- number of seeds in a pack.
Related article:
Tomato Golden Domes - description and characteristics of a mid-season variety
After purchase, you can disinfect the seeds using Fitosporin-M, Chlorhexidine (read processing instructions on the package) or brilliant green (0.5 teaspoon per 125 ml of water).
To improve seed germination, it is recommended to carry out a bubbling procedure:
- Place the seeds, previously placed in gauze, in a container of water at room temperature.
- Place the aquarium compressor hose on the bottom of the container and turn on the device for 12 hours.
- Remove the seeds and dry.
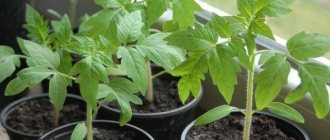
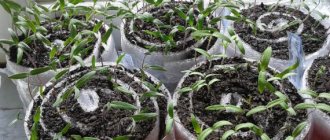
Individual boxes (pots, old buckets, plastic bottles, etc.) are suitable as containers for growing tomato seedlings without picking. The main thing is that their volume is from 0.5 to 1 liter (or more).
Sowing and growing in individual containers
Immediately before planting, you should place purchased seeds in one of the following nutrient solutions:
- potassium humate (one third of 1 teaspoon - 0.5 g per liter of water) - for 8 hours;
- 1% manganese solution (1 g per 100 ml of water) – for half an hour;
- “Epin” (5 drops per 100 ml of boiled water) – for a day;
- aloe juice - wrap a leaf of a 3-year-old plant from the bottom of the bush with a rag, place in the refrigerator for 7 days, squeeze out the juice. Dilute the resulting solution with water in a ratio of 1 to 1 and leave for a day.
Related article:
Mistakes in growing tomatoes
Direct sowing of seeds includes the following procedures:
- Drainage holes are made in the containers, then exactly 1/3 of the moistened soil is added to them.
- The prepared seed is placed in 3 pieces. (1 piece in the case of sprouted seeds) to a depth of 1 cm in each container, sprinkled with soil without compaction. Do not water immediately after planting, as the seed may be drawn deep into the ground.
- The seedlings are covered with plastic film to create a greenhouse effect.
- The finished pots are placed in a warm and bright place.
- Already a week after the formation of seedlings (7-8 days), move the container to a cooler place for hardening.
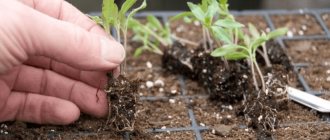
- After the seedlings have germinated, thin them out, getting rid of weak, non-viable sprouts: carefully cut them off (do not pull them out so as not to damage the root system). When several whole leaves are formed (about 3-4), select the strongest ones and remove the rest.
Related article:
Tomato Titan - description and characteristics of a late variety
- As the vegetable crop grows, on days 14-21, pour soil into containers and hill up the plant once a week. This procedure is necessary in order not to damage the main root and to grow additional roots.
- Water the plants periodically from a spray bottle (as the soil is added) with settled, warm water: not too often, but generously. To protect against fungal diseases, you can add “Fitosporin” to water in the proportion of 1 teaspoon of the drug per 1 liter of water. After each watering, it is recommended to carry out the mulching procedure using vermiculite or dry soil.
- During the entire period of growing tomato seedlings without picking, it is necessary to fertilize 2-3 times with special fertilizers. Feed for the first time 2 weeks after sowing. “Nitrophoska”, “Agricola” or organomineral fertilizers, for example, an infusion of chicken manure or mullein, are suitable.
- A couple of weeks before transplanting the seedlings into open ground, you need to start hardening the tomatoes: open the windows for ventilation, move the seedlings to the balcony every day for 2 hours (at a temperature of 10°C). After 3-4 days, the containers can be left for the whole day (if the air temperature is above 8-9°C). At night, cover the seedlings with plastic wrap.
Related article:
Tomato Miracle of the Lazy – description and characteristics of an early variety
If there is insufficient lighting during the germination period, the seedlings stretch out. Therefore, to ensure proper illumination, it is recommended to use specialized phytolamps with red and blue radiation.
Planting in open ground
Transplantation of ready-made seedlings to the garden bed should be carried out only after more than 10 developed leaves and 2 fully formed inflorescences are formed, i.e. approximately on the 35-40th day from the moment of emergence. The height of the plants at this time should be 30 cm (35 cm seedlings are considered overgrown).
The process of transplanting plants into open ground is as follows:
- Before planting, make sure that the soil has warmed up sufficiently - the temperature at a depth of 15 cm should be more than 14°C. It is better to plant seedlings in the garden in the afternoon.
- Make holes in the ground at a distance of 50 to 60 cm from each other (the planting pattern depends on the variety being grown). The depth of the holes is on average 20 cm for low-growing varieties and 30 cm for tall ones. Their diameter should allow the seedlings to be placed freely.
- Immediately before planting, treat the holes with a manganese solution to properly disinfect and get rid of unwanted microflora (on average, 1.5-2 liters of liquid are consumed per hole). Instead of potassium permanganate, you can use the drug "Trichodermin" according to the instructions.
Related article:
Tomato Bull's Heart - description and characteristics of a high-yielding variety
- During planting, plants need to be deepened to the cotyledon leaves. If the seedlings have grown to 35 cm and stretched out, then the seedlings should be placed in the holes at an angle, sprinkled with soil to 1/3 of the length. You should not plant tomatoes too close to each other: strictly follow the planting pattern.
- After the holes are filled with soil, lightly compact the soil with your hands to remove any air pockets. After this, the seedlings should be watered with warm water. Thanks to this, the seedlings will quickly take root in new conditions.
- It is important to get rid of the leaves located close to the roots and tie a wooden peg to each bush to support the vegetable crop during the period of active growth.
- After planting, the plants are mulched with peat.
Related article:
7 varieties of cherry tomatoes for open ground or greenhouse
You can grow tomato seedlings without picking in open ground. This method is especially suitable for residents of the southern regions of Russia. Seeds of early-ripening and low-growing tomatoes should be used. The possibility of direct sowing must be indicated on the packaging.
Is it possible to plant tomatoes without picking?
Many gardeners do not consider picking the best way to obtain tomato seedlings. They prefer to sow seeds in separate trays or glasses, filling them only a third with soil. Excess sprouts are cut off (not pulled out, so as not to disturb the root of the remaining seedling). Gradually, soil is poured into the container. At the same time, the root system becomes stronger and less vulnerable to disease.
Pros and cons of growing in a common container
Advantages of picking seedlings:
- The ability to plant a large number of seeds in a limited area (total capacity).
- Picking prevents the roots from intertwining and being injured when transplanting the sprout into the ground.
- Possibility of calibration. Allows you to select the strongest plants.
- Availability of growing tomatoes on heavy clay soils. The root system of the sprouts will be located closer to the soil surface, so air and water will become more accessible.
Minuses:
- In a common container, seedlings have an increased risk of getting sick. Crowded seedlings are poorly ventilated. Humid air stagnates and creates conditions for fungal diseases to occur.
- The complexity of the picking process. Attention is paid to every thin sprout.
- Large investment of time. Sometimes you have to dive 2-3 times.
- Much more soil mixture is required (both for a common container and for individual ones).
- Root injury.
Pros and cons of growing in individual containers
Pros:
- The survival period of the seedling after planting in the ground is reduced.
- The plant avoids stress, since the sprouts are transplanted along with the clod of soil in which they have grown since sowing.
- The tap root of a tomato can grow up to one and a half meters deep without picking seedlings. Therefore, this growing method is preferable for farms with intermittent watering.
- This method is easier. Saves time and effort. Seeds are sown directly into the ground without replanting.
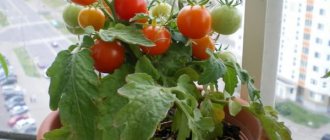
- Harvesting begins at the same time as the picked tomatoes or even earlier.
Disadvantages of growing without picking:
- Individual containers take up a lot of space.
- It is difficult to provide all seedlings with sufficient sunlight.
- Unpicked sprouts planted in the ground are taller than peaked ones and therefore immediately require support and garter.
Tomatoes without picking - 3 important advantages
Much depends on the type of root system, including the ability of the plant to independently provide itself with water. This is good news for weekend summer residents.
Traditional picking of seedlings promotes the development of a fibrous root system that colonizes the upper heated layers of the soil. Due to the superficial location of the roots, tomatoes receive more nutrients and ripen faster.
Growing tomatoes without picking has its advantages:
- saving time and effort on picking;
- an intact tap root develops well and is capable of further penetrating more than 1.5 m deep, right down to the aquifers of the soil;
- The seedlings do not suffer from additional replanting; they grow stronger and more resistant to the adverse effects of weather.
The use of simple agricultural techniques (in particular, mulching) allows you to grow tomatoes almost without watering or chemical treatments.
Step-by-step instructions for sowing seeds using the pickless method
Next, we’ll tell you how to plant and grow tomatoes at home without picking. Growing tomato seedlings begins with sowing seeds in separate containers.
Seed treatment:
- Disinfect the seeds in a pale pink solution of potassium permanganate for 15 – 20 minutes.
- Wrap in a damp cloth and leave them for three days in a warm, well-lit place.
- Make sure that the fabric does not dry out. Add water as needed.
- As soon as the grains swell and begin to hatch, prepare the soil and containers for planting.
Important! Seeds in a colored shell do not require processing.
Requirements for containers:
- the tray must have drainage holes (for a plastic cup);
- Be sure to install it on a tray to drain excess moisture.
Soil requirements:
- take loose and fertile soil;
- Before sowing seeds, the soil requires disinfection (calcination in the oven, treatment with a manganese solution).
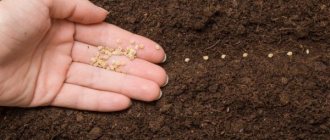
How to plant tomato seeds without picking:
- To grow tomatoes without picking, containers are filled one-third with soil.
- Seeds are sown to a depth of 10-12 mm, 2-3 pieces in each container or cell.
- Do not water the planting! The seed can be pulled deeper.
- Create an improvised greenhouse - cover it with glass or film.
- Place containers in a warm, bright place.
- To prevent the soil from drying out, the planting can be periodically irrigated with a spray bottle.
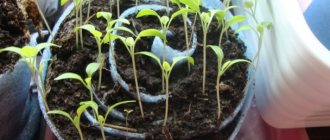
- After the first shoots appear (usually 7–8 days after planting the seeds), the cups with tomatoes are moved to a cooler room.
We invite you to watch a video with detailed instructions for planting tomato seeds without picking:
Planting tomatoes without diving
Reducing labor costs does not mean reducing the quality of the tomato crop. Picking the first fruits from the bushes 5-7 days later is not too much to pay. Agricultural techniques should be used correctly, and not left to chance.
Soil for seedlings
To grow such seedlings, it is convenient to use purchased universal-purpose soil. The main thing is that the soil mixture is loose and homogeneous.
To improve the properties, you can add vermiculite to the mixture - it increases the flowability of the soil and supplies the roots with oxygen.
If desired, you can prepare the soil for seedlings yourself:
- Mix humus (compost), sand and lowland peat in equal parts.
- For every 1 bucket of mixture, add 1/2 liter can of ash.
- To average the composition, sift through a sieve or mesh with a mesh size of 1 cm.
For growing seedlings, it is preferable to use a mixture with some deficiency of nitrogen components. This way you will protect the seedlings from being “pulled”, and the roots will seek nutrition and develop more intensively.
Containers for growing seedlings
For tomatoes without picking, it is important to grow seedlings from seed to the stage of 3-4 pairs of true leaves without damaging the roots, i.e. without intermediate transplants.
| Containers for growing | Advantages | Flaws |
| Peat tablets | Fast and convenient to use |
|
| Peat pots | convenient container, which subsequently serves as fertilizer | The financial side of the issue is the only drawback |
| Cassette |
| If you choose cassettes with a volume of 150-200 ml, this is an ideal container |
| Cups | Seedlings grow in sufficient soil volume | Containers take up a lot of space - a method for a small number of seedlings. |
| In "sleeves" | Each seedling develops without damage without lack of nutrition | Sewing the “sleeves” and filling them with soil is a labor-intensive, monotonous task. |
| Seedling boxes | Affordable containers and simple sowing method |
|
Seed preparation
Tomato seeds remain viable for a very long time - up to 10 years or more. All this time, the germ germ is in a “sleeping” state. If you “awaken” it correctly, the seedlings will appear much faster and will be strong and healthy.
Home-grown seeds must be disinfected to prevent fungal diseases.
The easiest way is to soak the seeds for 20-30 minutes in a weak (pale raspberry) solution of potassium permanganate, rinse with running water.
Germination stimulants “Energen” and “Fitosporin” provide better growth and provide immunity to various diseases. After processing according to the instructions, without washing, the seeds are left in a damp cloth to germinate.
Tomato seeds germinate quickly - you should check them at least 2 times a day.
- Monitor the condition of the cloth - it should be damp, but not wet.
- As soon as the roots begin to appear, the seeds are ready to be planted in the ground.
Pelleted seeds (in colored glaze) produced by large agricultural companies do not need to be subjected to any processing - they are calibrated, disinfected, treated with stimulants and covered with a layer of fertilizers.
Rules for planting seeds
Tomato seeds with root rudiments of 1-3 mm must be planted in a nutrient substrate as soon as possible, before the root outgrows - fragile roots take root much worse.
- Using tweezers or a toothpick, carefully place the tomato seeds on the moist soil.
- In each container - one sprouted seed, root down.
- The seeds must be lightly (0.5–1 cm) sprinkled with soil; they cannot be compacted; if necessary, soil is added during the growth process.
Care
- Thinning:
- After the first two leaves appear, leave two sprouts in a glass. Carefully cut off the rest.
- After 3–4 true leaves appear, one, the strongest and healthiest sprout will remain.
- Hilling. As mature leaves appear (after 2–3 weeks), soil is added to the container and the plant is hilled up. At the same time, the tomatoes begin to actively grow additional roots. Adding soil promotes the formation of the root system.
Watering. It is recommended to water the seedlings with warm, settled water as the soil dries.
- Illumination. Glasses with sprouts must be periodically rotated relative to the light. Otherwise, the seedlings will become distorted.
- Feeding. Produced 2-3 times with ready-made complex fertilizers for seedlings.
- Hardening. The seedlings are hardened off 10–14 days before planting in the ground. To begin with, open a window in the room for ventilation for a longer time. When the air temperature outside is above 10 - 12 degrees, tomato seedlings are placed on the balcony for 2 hours. If the temperature is above 8 - 9 degrees, then after 3 -4 days the boxes can be left on the balcony for the whole day. At night, it is enough to cover the seedlings with film.
- Disembarkation. It is produced together with a lump of earth when the seedling reaches the following parameters: height reaches 30 – 35 cm;
- about 10 developed leaves;
- 2 formed inflorescences.
Important: If the tomato seedlings are taller than 35 cm, then they need to be planted in the ground in a different way. Such seedlings are considered overgrown.
A tomato seedling obtained without picking is considered high quality when it is strong, with a powerful root system and a strong stem.
If the seedlings are not such, then mistakes were made during cultivation.
Sowing
There is nothing difficult about planting tomatoes without picking. It is important to decide on the choice of container, since the plants will continue to grow in them until transplanted into the ground. Disposable plastic cups with a volume of 0.5 liters and a height of no more than 30 cm are suitable. Drainage holes must be made to allow excess moisture to escape.
Another question may arise: when to sow tomato seeds, in what time frame? Early varieties 50 days before transplanting into the ground (in early April), and mid-season varieties 70 days before transplanting into the ground (in March). When seedlings are kept at home, the formation of the crop is delayed.
Technology of planting tomatoes for seedlings. Basic steps:
- Prepare soil for tomatoes - mix loose soil with compost, ash and sand. The prepared soil is disinfected by heating it in the oven or freezing it.
- The containers are filled halfway with prepared soil. The layer of soil should not exceed 15 cm. This height provides moderate moisture - does not lead to waterlogging of the soil and rotting of the roots.
- The soil in the cup is moistened. Sprouted seeds are buried 1 centimeter, sprinkled with a thin layer of soil and watered. Until emergence, maintain moderate humidity.
- The cups are covered with film or glass. They maintain the optimal temperature in the room: +26.. +28 degrees.
- When the seeds hatch, transfer the cups to a southern windowsill or place them under a phytolamp. Remember - with a lack of light, the seedlings stretch out.
Common mistakes and practical tips
- Low seed quality. When choosing seeds, you should give preference to well-known manufacturers.
Pay attention to the expiration date of the seed. Do not use seeds of unknown origin and expiration date. You can lose valuable time. - Using poor quality and unprepared soil. It is advisable to buy ready-made soil mixture. If you prepare the soil yourself, then you should adhere to the recommended composition. Be sure to treat the soil mixture against pests and diseases.
- The wrong choice of containers can lead to rotting of the roots. The container for seedlings must be well drained, ventilated and of suitable volume.
- Attempts to process purchased seeds. The finished seeds have already undergone pre-sowing treatment.
- Failure to comply with seed planting deadlines. The planting date table is always indicated on the seed packaging. If these deadlines are not observed, the seedlings will be weak or overgrown.
- Planting seeds too deep. The planting depth should not exceed two seed diameters.
Thickening of crops. Do not regret cutting off excess shoots. The seedlings simply will not have enough space and will not be able to develop normally. The result is weak, fragile seedlings.
- Watering immediately after sowing. Seeds are planted in moist soil and do not require additional watering. The latter will lead to the seeds being pulled into the ground and they will not be able to germinate in time.
- Errors in care. Violation of temperature conditions, lighting, timing of watering and fertilizing.
- Ignoring pests and diseases of seedlings. Having discovered unfavorable signs, one cannot hope that everything will go away by itself. You need to find the reasons and take measures to eliminate the problem.
- Neglecting hardening will lead to the death of the plant due to slight frost after planting in open ground.
- Overgrown seedlings do not take root well. If it is not possible to plant seedlings on time, watering is limited and the hardening temperature is reduced.
We invite you to read the following articles about growing tomatoes:
- Growing in Siberia and the Urals.
- How to grow delicious tomatoes from seeds and large size.
- Planting tomatoes with peppers and cucumbers.
Thus, choosing high-quality seeds, observing the timing of their planting, as well as proper care lead to strong and healthy tomato seedlings. And which growing method to use, with or without picking, each gardener decides for himself, based on his experience, the type of soil on the site, its location and other factors.
If you find an error, please select a piece of text and press Ctrl+Enter.
Advice from experienced gardeners
Experienced gardeners give the following tips for sowing tomatoes without picking:
- use only high-quality and fresh seed from well-known agricultural companies;
- strictly observe the planting dates - indicated on the package of seeds;
- observe crop rotation - do not plant the same crops in the same places. It is better to plant tomatoes in beds after cabbage, zucchini, pumpkin, carrots, beets, cucumbers and radishes;
- treat the beds with compost - it’s good if there is a special box for organic waste on the site;
- Do not get carried away with chemistry - an excess of mineral fertilizers will lead to growth at the expense of fruiting. It is better to choose preparations that are ideal for the vegetable crop in question, incl. superphosphate and magnesium sulfate;
- do not thicken the crops - the distance between plants should be at least 45 cm so that the beds are better illuminated and ventilated.