Growing seedlings on your own is a responsible and troublesome task. Today we will look at two interesting options for growing seedlings of vegetables and flowers - in snails and diapers.
To get a good harvest, you need to follow several basic rules. Here are some of them:
Plants with large seeds and large sprouts are sown in open ground. And small seeds of small crops are subject to many dangers, which is why it is best to grow seedlings first. It is not so susceptible to various diseases, pest attacks and atmospheric fluctuations.
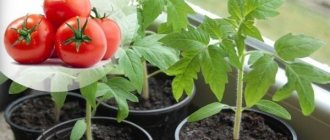
Plants with a long vegetative period (tomato, eggplant, cucumber, pepper) are grown only with the help of seedlings, having selected a specific variety in advance. Vegetable crops germinate at different times. Tomato seeds do not need to be germinated in advance; they sprout well on their own. It is recommended to germinate pepper seeds in advance.
What it is?
Any gardener knows how quickly space on the windowsill runs out when installing boxes with seedlings there. And if there are still indoor flowers there, then temporary difficulties begin to look more like a disaster. The problems don't end there. Containers with soil can be repeatedly turned over by children and pets, which adds to the hassle of cleaning.
Traditional planting of seedlings requires quite frequent watering; skipping this event can quickly destroy young seedlings. And watering itself requires you to spend a lot of time to bring moisture to each plant.
Planting in snails and diapers easily solves these problems. A simple and convenient design made from scrap materials allows you to save a lot of time by fitting almost all the seedlings on one windowsill.
Snails are most often constructed from the construction substrate left behind the laminate after repairs. Pieces of plastic film are used as diapers. Rolling a snail or a diaper is very easy; this method does not require special skills. Just read about it or watch the video once and you will succeed.
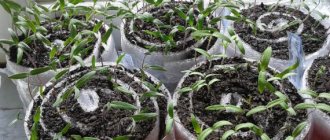
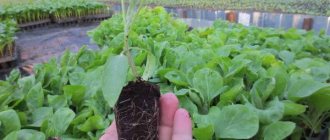
Initially, the seeds are sown in snails - rolled material rolled in a circle, between the layers of which the seeds will germinate. In a small area you can easily place two dozen such structures, and even more.
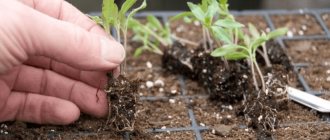
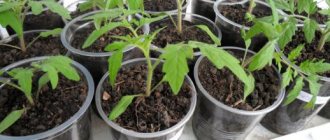
When picking, the seedlings are transferred to diapers - individual packages placed in a common container. Caring for such seedlings will be much easier, and when subsequently planted in open ground, the roots will not suffer damage, which will allow the plants to adapt faster.
Snail for seedlings. Where to start: video
Moscow way
Before you start swaddling, you need to prepare everything you need:
- plastic film;
- threads or elastic bands for fixation;
- toilet paper;
- atomizer (pulverizer);
- plastic cups;
- tomato seeds.
Now you can move on to making the diaper.
It should be noted that there is nothing complicated here, so even a beginner can handle it:
- 1. The first thing to do is cut the film into strips. The width of each strip should be 10 cm and the length no more than 50.
- 2. Place a strip of toilet paper of the same length on top of the cut film.
- 3. Then the paper must be moistened with water. To do this, you should use a sprayer, and if you don’t have one, a small bulb or pipette is perfect.
- 4. Now that the paper is dampened, you can start laying out the seeds. A small indentation should be made from the top, approximately 1.5-2 cm, and the gaps between the seeds should be at least 5 cm.
- 5. After the layout is completed, the seeds are covered with another strip of paper, and a strip of film is placed on top. Based on this, a kind of “sandwich” emerges: film - paper - seeds - paper - film.
- 6. Now you need to carefully roll it all up into a roll, trying to prevent the layers from shifting. To prevent the package from unfolding and maintain its structure, it must be secured with an elastic band.
- 7. The finished bundles are placed in plastic cups with a small amount of water (3-4 cm), wrapped in plastic bags and put away on the windowsill. In order for the seeds to receive fresh air and ventilation inside, several holes need to be made in the bags.
All that needs to be done next is to monitor the water level in the glass and constantly maintain it, after the first shoots appear, spray with any growth vitamin, and as soon as the seedlings grow up, transplant them into boxes with soil, a greenhouse or open ground, if the weather is bad conditions allow.
How to properly plant seeds in a snail?
First, you will need to prepare everything you need for planting and organize your workspace. To make a snail you will need:
- soft backing for laminate (sold in 1.5 m rolls);
- plastic bags;
- rubber bands for money, or twine;
- planting soil;
- seeds for seedlings;
- plastic transparent container with low sides;
- water bottle;
- tweezers.
You won’t need a lot of time; the process of making one snail will take about a quarter of an hour. The following procedure must be performed:
- Unfold the backing and place it on the table in front of you.
- Pour soil onto the material, level it and lightly press it down, you should get a layer 1cm thick.
- Having thus prepared an area 20 cm wide, begin to place seeds on it with tweezers closer to the top edge, leaving a distance of 1-2 cm to it. Mark this edge with a marker.
- The seeds should be located at a distance of 3-4cm from each other. Lightly press each of them into the ground with your finger.
- After the manipulations have been completed, carefully roll this section of the substrate into a roll and repeat all stages of work on the next free area.
- Using this method, fill the entire roll of backing tape with soil and seeds. At the end, tie the resulting package with an elastic band for money or twine, attaching a label with the name of the seeds.
- Pour plenty of water over the snail from a bottle and put a plastic bag on it, creating a miniature greenhouse. The edge near which the seeds were planted should be on top.
- Place the snail in the container and begin making the next design.
- Several snails are placed in one container at once, depending on its volume.
The container with snails is placed on the windowsill. The package is removed when the first shoots appear.
The advantages of this method include:
- Possibility of more uniform illumination. After all, it is easier to turn a container with snails on the other side towards the light than a bulky planting box full of soil.
- Saving money on purchasing soil for city residents. With this planting method, very little land is used.
- Reusable backing. After planting the seedlings, wash the film thoroughly and dry it. Next year you will not have to make new preparations.
- With proper care in the snail, seedlings develop a strong root system. In addition, picking from this design is lightweight and allows you to avoid injuring the roots.
It is not known exactly who the author of this original method is, but many summer residents have already adopted it and are grateful to the nameless inventor.
The process of “swaddling” seedlings
It is more convenient to carry out work on a table using a shallow tray. It is easier to remove spilled soil from it. Prepare bags and strips of toilet paper in advance, arrange and lay out everything you need at arm's length.
We lay the sprout on the ground
A “diaper” is spread on a pallet, with the narrow side facing you. A strip of toilet paper is placed in the lower part and, stepping back 7-8 cm from the edge, pour a full, well-heaped spoonful of soil. If it is more convenient for someone to do this with their hands, then a handful of soil will be enough.
The soil is leveled, slightly compacted and watered well (of course, not to the point of dirt), and it is better to use a sprayer.
The “snail” is released from the fastening and the roll is carefully rolled out to the first shoots. Then remove the plant from the substrate with a spatula and place it on the surface of the earth. If the root system of the sprout is strong and extends beyond the bottom edge of the bag, they must be carefully tucked towards the top.
It is also possible to bend the stem of the plant, but you should be extremely careful not to break it.
Pinching the roots is not done so as not to cause additional stress to the delicate sprout. Pinching is most often practiced in cases where the seedlings have one long and very underdeveloped root.
Sprinkle more soil on top
The upper part of the bag should be located at the level of the cotyledon leaves. Add another 1-2 tablespoons (or a handful) of soil on top of the roots. Now you need to bend a strip of toilet paper and press it to the ground, and so as not to have to hold it, sprinkle it with water.
This will be the bottom of the cup, which will prevent the earth from crumbling. All that remains is to roll the bag so that you get a roll with a sprout inside.
Ready glass with sprout inside
The paper will soon get wet and will not cause any inconvenience to the seedlings. When soil falls from the top of the bundle, it should be added and, if it is dry, then watered.
There is another option for diving into “diapers”. It just prevents the soil from falling off both from below and from above the “diaper”. The entire technology of plant transplantation is similar to the rules described above.
The only difference is the location of the sheet of paper. It is first cut in half by ⅓ of the length and laid not along the bottom edge of the bag, but across it, also retreating 7-8 cm. The cut should end at the top edge.
So that the earth does not crumble from above
Then the same sequence: earth, plant, earth. Now we bend the top 2 strips downwards one by one, leaving a sprout between them and lift the lower part up. Sprinkle with water so as not to distract, and roll up the roll.
All packages with seedlings are placed in a container as tightly as possible so that there is no possibility of them falling. After transplanting, the seedlings are watered a little more to compact the soil around the root system.
This is what the cup looks like with the top closed
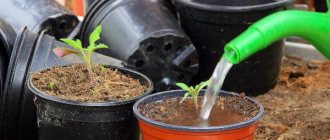
Further watering of plants can be done in two ways: pouring water at the root or directly into the container.
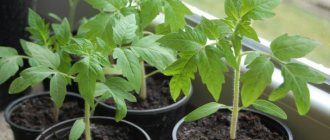
For the first time (3-4 days), the seedlings, planted in “diapers,” are shaded, and then the usual care for the transplanted crop is carried out.
What plants can be grown in snails
The method of growing seedlings in snails is suitable for almost all vegetable and berry crops, as well as flowers. The seeds of these plants do not need a light source to sprout. This new method is successfully used by summer residents to grow seedlings of zucchini, cabbage, peppers, tomatoes, eggplants and other vegetables.
You can plant strawberry and wild strawberry seeds in the snail. Seed material of various colors germinates well in such conditions, which will then decorate the flower bed in the garden.
On a note! This method of planting is not suitable only for root crops (beets, carrots), since seedlings require further replanting, and the fruits may become distorted because of this.
How to dive into a diaper
Seedlings grown in snails develop rather slowly. They should be plucked when sprouted roots appear from the lower cut of the snail. If some plants develop more slowly than others, it’s not a problem. You can only pick up grown seedlings, and wrap the rest back in the snail and grow them a little.
For picking, you will need to prepare the same thing that you used the first time, with the exception of the substrate. Bags made of thick film will become a new “house” for plants. You can use used covering material for these purposes, it does not matter.
Wrapping plants in diapers will require a little more time, because now each seedling will be grown individually. But saving soil and space on the windowsill will be present in this case as well.
The sequence of actions at this stage will be as follows:
- The film must be cut into pieces the size of a notebook sheet.
- Place a tablespoon of damp soil near the top edge in the left corner.
- Place the seedling on the ground, carefully straightening the roots, then placing another spoonful of soil on top. The leaves should extend beyond the film.
- After this, the lower edge of the film is folded in and the structure is rolled into a roll.
- The plant in the diaper is secured with rubber bands in two places and watered with water to which fertilizer has been added.
- Seedlings in a diaper are placed vertically in the same containers that were used for snails and transferred to a sunny window.
On a note! This method is also suitable for germinating seeds. In this case, the seedlings will not require picking, but can be grown until the stage of planting in open ground.
Diving into diapers is especially suitable for those crops that are planned to be planted in a greenhouse. The fact is that this method is convenient for summer residents, but it restricts the roots of the plants themselves. If you keep the seedlings in diapers, their condition may worsen due to the limited possibility of developing the root system. And weather conditions do not always allow plants to be planted in open ground in a timely manner, but a greenhouse solves this problem.
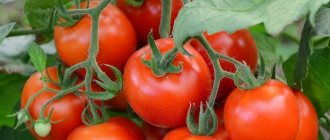
When planting diaper seedlings in open ground, you can use a cushion of straw or sawdust, then the roots of the seedlings will not freeze. Cover the top of the seedlings with film or use plastic bottles with the bottom cut off, covering each plant with them. Soon, in a large volume of soil, the root system will become stronger and, with proper care, such specimens will produce a full harvest, in no way inferior to vegetables whose seedlings were grown in the usual way.
Picking seedlings from snails into diapers: video
Growing seedlings without soil and picking
If your seedlings are affected by blackleg, then you should try soilless growing technology. The fact is that the causative agent of the disease is in the soil and, under favorable conditions, begins its dirty work. The older the plants, the more resistant they are to the disease.
That's why craftsmen plant hybrids on toilet paper. The idea, like everything ingenious, is simple. The seeds contain a supply of nutrients, and seedlings at first develop exclusively due to them. The need for soil arises only after the cotyledon leaves unfold.
Caring for seedlings in snails and diapers
Growing seedlings in snails and diapers requires taking into account the peculiarities of such planting when caring for plants. You should not over-water, because in the film the water evaporates slowly and there is a risk of waterlogging the soil with the seedlings. Due to the small amount of soil, plants need additional fertilizing for normal growth.
Nutrient compositions based on humic acids are recommended as fertilizers. They feed seedlings 2-3 times a week. The fertilizer is made half as concentrated as it is written in the instructions; it must be taken into account that excess nutrition of the seedling is harmful. During the first days, when seed germination occurs, the bag placed on the snail is regularly removed and shaken to remove condensation.
Important! When moisture gets on newly formed thin stems, it can cause a “black leg” to appear.
Just as with conventional growing, seedlings may stretch out - this will indicate a lack of light. In this case, fluorescent lamps are installed next to the seedlings for illumination on cloudy days and in the evenings. For most crops, daylight hours should be 12-15 hours. Lighting is simply necessary for seedlings planted in January and February.
The subtleties of growing strong seedlings: video
Basic mistakes
Some gardeners complain that they are unable to grow high-quality seedlings in snails and diapers. But the cause of problems is often their own oversight. Here are some typical mistakes that are made with this method of growing:
- The shelter from the snails is not removed in a timely manner. As a result, the seedlings become stretched and may develop blackleg disease. The bag must be removed from the seedlings when the first shoots appear.
- Some people refuse soil and instead put several layers of toilet paper in the snail. You can often find such recommendations on the Internet. In fact, toilet paper cannot provide seedlings with nutrition and is not able to retain moisture for a long time. As a result, seedlings grow poorly and can quickly dry out if watering is not timely.
- It happens that a summer resident rolls up a snail too loose, believing that this will give the seeds the opportunity to germinate unhindered. In fact, at the first watering, the tiny seeds will simply slide down, which will complicate their further development.
- A gardener may simply confuse the top and bottom of the snail when placing it in a container. Thus, the seeds will be almost at the bottom of the constructed structure.
- Planting seedlings too early. Frail seedlings always do not tolerate transplantation well. Carry out this procedure only after roots appear on the lower section of the snail.