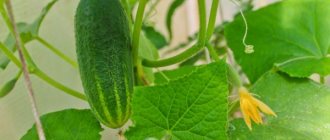
A completely new, unique way of growing seedlings has emerged in Japan. With the help of this technology, environmentally friendly products are cultivated at home, which are so valued by all residents of Japan. The Japanese originated this idea because they have very small areas for planting. The shortage of land in Japan is due to the high price. Thanks to T. Hasegawa, it became possible to grow tomatoes in five-liter bottles.
The student was the first to create a device from a plastic container and grow delicious vegetables in it. Then this method of cultivating vegetables migrated to post-Soviet countries, and an ordinary five-liter eggplant began to be used as a device. Moreover, the bottles are suitable not only for growing tomato bushes, but also for picking them. Let's find out in more detail how to grow tomatoes in bottles (plastic).
Advantages and disadvantages of bottled drip irrigation
The structure of such a system is as follows: a plastic bottle with small diameter holes is dug in near each individual plant in the greenhouse. The bottle is filled with water, which seeps through small holes and nourishes the roots of the plants.
Organization of drip irrigation of tomatoes using plastic bottles
The individual advantages of drip irrigation are discussed above, but what are the advantages of the scheme using bottles? They are as follows.
- Cheapness. In fact, the system using plastic bottles is free - the main material for arranging drip irrigation can be found at home or purchased at a nominal price.
- Easy to create. Setting up drip irrigation from plastic bottles does not require any technical knowledge or special skills from you; absolutely anyone can do it.
- Simplifying the care of seedlings and plants in greenhouses - with such a watering scheme, there is no need to frequently visit the garden plot. Now you can go on trips for work and other needs, without worrying about the condition of the future harvest.
- When the bottles are dug into the ground, water will not get on the leaves or flowers, which means that the problem of sunburn of plants is solved.
- Autonomy - unlike other drip irrigation systems that require a water supply and more or less constant pressure in it, drip irrigation from bottles only requires the water itself.
- The water supplied to vegetables, fruits and flowers has the same temperature as the air in the greenhouse, which has a positive effect on the condition and yield of some crops.
- Easy to repair or dismantle. If for some reason one of the elements of the system fails, then it is very easy to replace it - the bottle is dug out, and a new one is dug in in its place.
Methods for arranging drip irrigation from plastic bottles and other containers
But the system also has its drawbacks. The disadvantages of drip irrigation using bottles are presented below.
- The difficulty of creating such a system over a large area. Therefore, if you have many greenhouses, then it makes sense to think about another, more advanced method of drip irrigation.
- There is a risk of bottle holes becoming clogged, especially when used on soils containing large amounts of clay.
- Due to its primitiveness, such a system is not capable of completely replacing irrigation, so sometimes it will be necessary not only to add water to bottles, but also to supplement drip irrigation with the same watering can. For complete watering that requires a minimum of effort from you, it is preferable to use specialized drip tapes and dropper dispensers connected to the water supply.
Example of a simple drip irrigation system
Tomatoes from 5-liter bottles without picking
A new method of growing tomatoes is to germinate seedlings in bottles. Experienced gardeners cultivate tomatoes in this way as the most common vegetable. To use it, you will need to properly prepare the container and soil. You can use bottles that have already been used. What is important here is the germination technique and the peculiarities of caring for seedlings.
Selection of containers
There are many advantages to using the bottle type. This is an economical product that every family has. The plastic container can be of any volume: 1.5 liters, 3- or 5-liter. Most people choose a larger container, usually 5 liters. This bottle is easier to use and less hassle than using several small jars.
The general operating scheme does not depend on the outer diameter of the bottle. Simplicity and effectiveness have long been empirically tested by many gardeners.
Work technique
The sequence and technique of execution remains close to the long-established version. A plastic bottle in a vertical position is cut approximately in the middle. Two parts are formed: one in the form of a cylinder, with an open top, and the other in the form of a cone with an open bottom plane. Soil is poured into the lower part. The top one is left for later.
The container must be carefully prepared. It should be washed and dried. Since most people use used containers, it is better to use water or other light liquids.
Soil and sowing
The poured soil must be checked and disinfected if there are reasons for this. According to the advice of senior gardeners, soil saturated with fertilizers can be poured into the bottom. Fans choose eggshells, humus, or buy them in bags at the store. When the soil is filled, it is compacted. You should not press too hard; a light sprout will not be able to break through the dense layer.
Recommendations for sowing:
- Tomato seeds are planted in several rows.
- Four stripes are optimal for dividing space and germination. If there are five stripes, this affects the amount of space for each sprout.
- The distance from the seed should be within 2-2.5 cm in all directions. With denser planting, the sprouts grow worse, the first ones stretch too high and have a weak root system. The remaining ones grow in the shadow of the first ones, growing frail and unviable.
To increase efficiency and not waste energy on ungerminated seeds, they are first selected. The largest and densest ones are used. The selection is done manually. A saline solution will help you cope faster. You just need to prepare it and throw a bag of seeds into it. The seeds, empty inside, form an air cavity and float up. Then the bulk of the water is drained and the seeds necessary for planting are taken from the bottom.
The grains selected after the salt bath are disinfected. Potassium permanganate is used as an oxidizing agent. A weak solution kills bacteria that have a detrimental effect on the plant within 15-25 minutes. Additionally, it has a preventive effect against subcutaneous fungus.
Experienced summer residents advise using growth stimulants. This is also some kind of solution in which the grains are soaked overnight (about 12 hours). Allows you to increase the number of seedlings and germination time in the ground.
When the seeds are planted in their places, the ground is watered a little. It is not recommended to overfill. If the humidity is too high, rotting occurs. Moderate watering is best.
Sequence of work
The greenhouse effect is created by the second cone-shaped cut part of the bottle. They cover it first and wait for the result. Can be wrapped in plastic wrap or a plastic bag. After a week, the first green shoots appear. Then the film is no longer needed; it is removed. If watering is necessary, it is repeated. The frequency depends on the degree of flooding, fertilizing the soil and the dryness of the room.
It is imperative to place the bottle with seedlings on the sunny side. Change the sides facing the sun every few days. The uniform growth of the stems depends on this. As it grows, the top layers of the earth become compacted. As soon as the sprouts allow, they need to be sprinkled with a fresh portion of soil. Further special care is not required. If the seeds are distributed correctly, they can be easily separated from each other for planting in the garden. It is possible to do this with part of the soil from the container, and some wash the roots with water. Both do not affect the yield. Some gardeners continue to grow tomatoes in a bottle.
There is a second option for dividing the bottle into two parts. When the bottle lies and is cut in a horizontal position. You get two parts that look like boats. Growing in this form is similar to the previous one. Only the layer of earth will be smaller due to the low side of the remaining part. About 2 cm of sand is poured on top of the shell, then the soil is covered. Before laying the seeds, it is steamed, which allows the soil to be disinfected.
Modern methods of growing seedlings are surprising. Constantly updated methods do not stand still, allowing you to achieve good harvests.
Required materials and tools
To set up drip irrigation using regular plastic bottles, you will need the following materials and tools:
- plastic bottles;
- a piece of cotton fabric or old nylon stockings;
- shovel for digging holes for bottles;
- ruler for measurements;
- sharp nail, thick needle or awl;
- a lighter, fire or other source of open flame on which you can heat a nail or needle.
Before you start arranging watering, you need to figure out what size bottles are suitable for the plants in your greenhouse. The choice depends on the crop being grown - some require more moisture, others, on the contrary, less. Also, consider the weather in your area - the higher the temperature, the more water you will need. And, of course, the volume of containers depends on how often you are willing to visit the dacha.
Plastic bottle for drip irrigation
Table. How long does a bottle of a certain size last for one plant?
| Volume, liters | Time, days |
| 0,5 | 2 |
| 1 | 4 |
| 1,5 | 5-6 |
| 2 | 7-8 |
| 5 | 12-16 |
Plastic bottles
As you can see, it is not advisable to use small-volume containers - bottles with a volume of 0.5 to 1 liter will require frequent “refilling”, which will force you to visit your garden plot as often as before.
The best option is a container with a volume of 1.5-2 liters, when using which you can come to the dacha once a week to “refuel” the containers, additional watering and perform other work that the plants in the greenhouse require. If the crop you grow requires a lot of water, then you should give preference to large bottles with a volume of 5 liters. But keep in mind that a five-liter plastic container takes up a lot of space and a hole for it must be prepared of the appropriate size.
Some summer residents may have a question: “Why do you need fabric for drip irrigation? Are there not enough bottles with holes? The problem is that these holes can become clogged and clogged with soil over time. To prevent this, from the outside (and sometimes from the inside) that part of the bottle where the holes are located should be wrapped in an old nylon stocking or a piece of cotton fabric. Water will seep through it, but the soil will not get inside.
Another issue that requires consideration is how many holes and what diameter should be made. Their number should depend on the properties of the soil - the worse it absorbs moisture, the more holes will be required. So, if you bury a bottle in a hole with the neck down, then 2-3 holes are enough for sandy soils, and 4-5 for clay soils.
Relationship between hole size and watering amount
Holes in the bottle or cap are punched using a nail or needle heated on a stove/lighter. The optimal diameter is from 0.5 to 1 mm. Figures of 1.5-2 mm are the maximum permissible; with larger values, water will be consumed too quickly.
As for the ratio of bottles to plants in the greenhouse, the ideal option would be 1:1 - one plant per container. If there is not enough space or the crop does not require a lot of moisture, then you can use one bottle (preferably 2 or 5 liters) for 2, 3 or even 4 plants. But, accordingly, more holes will need to be made in the container.
Planting methods
Great way to grow crops
There are two main ways to plant tomatoes in bottles: vertical and horizontal. But there is a third method with suspended structures. You can choose the one that suits you.
Vertical
Growing tomato seedlings using this method goes like this:
- the bottle is cut into two parts horizontally so that the lower part is 15-20 cm high;
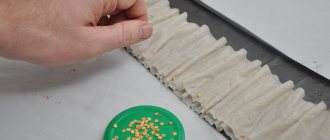
- a strip of polyethylene 10 cm wide is covered with a layer of toilet paper or napkins;
- The surface is moistened and tomato seeds are laid out on it at a distance of 3-5 cm from each other. They should be at a distance of 1-1.5 cm from the edge;
- several layers of paper (toilet paper) are placed on the seeds, after which it is moistened with a spray bottle with warm water and covered with another layer of polyethylene of the appropriate size;
- a strip of the resulting layers is rolled into a snail (roll);
- The structure is placed in a cut-off five-liter plastic bottle in a vertical position. It is important to prevent drying out during this period - the water should always be at a level of 3 cm from the lower edge of the snail. Gardeners add growth stimulants to the water to promote the rapid development of young shoots. Seedlings grown in this way will be strong and viable.
This method (in paper napkins or toilet paper) is only suitable for germinating seeds. Seeds germinate and form an embryonic root and cotyledon leaves only due to the nutritional reserves in the seed itself. Having used it up, further growth will be problematic and there can be no talk of any strong and viable seedlings.
Horizontal
This method of cultivating tomato seedlings in plastic bottles is often used in a greenhouse. For this:
- a plastic liter bottle is cut crosswise into two parts;
- napkins or toilet paper are placed in each of them and then moistened with a spray bottle;
- seeds or seedlings (sprouts up) are placed on the prepared surface at a distance of 3-4 cm from each other;
- the halves of liter containers are wrapped with film on top, in which several holes need to be made for ventilation;
- containers are placed in a dark and warm place until the first shoots appear.
When planting using this method, seedlings should not be watered: the greenhouse effect that is created under the polyethylene provides the necessary condensation.
Suspended structures
Many people grow tomatoes on the balcony. The presence of hanging tomatoes will improve not only the balcony, but also the garden plot. Hanging vases from which clusters of miniature tomatoes cascade down are mesmerizing. Delicate and fragile branches that stretch upward attract attention even more.
The second option is when tomatoes are planted upside down. Not all gardeners like this method.
source
I start planting and growing seedlings (as I already wrote) in February. Now I want to tell you how I use a mini-greenhouse to grow excellent tomato seedlings without resorting to picking. I’ve been using this method for quite a long time, so I had time to experiment, so to speak, and came up with the best option for such a “miracle” mini-greenhouse, which I’ll tell you about.
Planting seedlings doesn’t take me that much time; the main thing is to collect, so to speak, everything in a “pile”, namely:
* earth (soil) - for such purposes I buy a specialized bag of soil for seedlings (necessarily for vegetables, and not for flowers, as many people practice);
* tomato seeds - I always take early, low-growing ones and it is desirable that the height of the stems is slightly different. I discovered from my own experience that this way they do not obscure each other;
* 5 liter bottle (plastic);
* egg shells or expanded clay - I use shells, I specifically collect them for drainage, fortunately after the New Year holidays there is a lot of them;
I cut off the top part of a 5-liter bottle, and then it serves as a lid for a mini-greenhouse. At the bottom of the bottle I put roughly broken shells, about 2 fingers deep, which, in addition to its drainage function, acts as an excellent fertilizer for the germination of tomato seedlings.
I don’t add much soil, about 10 cm, because as the seedlings grow, I gradually add more soil under the roots. And I make sure to compact it lightly so that there is greater contact between the seeds and the soil.
I thoroughly pour the compacted earth with a weak solution of potassium permanganate, but always hot. This will disinfect the soil and give the seeds better germination.
I sow the seeds in 4 rows (maximum 5), although previously I sowed 6 rows, but this made it difficult for my small tomatoes to grow. In the row between each seed I leave a space of at least 2-2.5 cm. Now I sprinkle the sifted seeds with a little earth, about a finger's length.
I cover my sown seedlings with a cut-off lid, the edge of which I cut a couple of centimeters from bottom to top so that the “lid” I made can easily fit into the lower part of the bottle. Thus, creating a miracle mini-greenhouse that saves a lot of space, and I can easily move it from window sill to window sill for greater lighting on cloudy days.
When planting seedlings in such a bottle greenhouse, I forgot about picking, since it is absolutely not required when growing seedlings this way.
I wish everyone excellent harvests in the coming gardening year.
source
It occurred to me to use plastic 1.5-liter bottles a long time ago. All seedlings in plastic bottles feel good. It's convenient, and reusing bottles is good for the environment. And at home they constantly accumulate. There is only one subtlety in this matter.
Tomatoes in five-liter bottles
Seedlings in five-liter bottles are planted a little differently. You need to lay the bottle flat, cut off part of the bottle from the top, like a cap. Make holes at the bottom to drain excess water. Fill it with nutritious soil for seedlings and plant the seeds. It is good to grow flower seedlings in such five-liter bottles.
What to plant in 30 liter plastic bottles:
- Ampelous flowers will look very good in them;
- You can also make vertical flower beds for petunias and strawberries from them (you need to cut holes in the sides and plant flower seedlings along the entire height of the bottle);
- Tomatoes and cucumbers will grow well from vegetables in 30-liter bottles. Don't forget to make drainage holes at the bottom of the bottle so that the water doesn't stagnate.
Advantages of the method
Growing tomato seedlings in a plastic bottle has many advantages:
- There is a saving of space, since the container takes up little space, unlike a wooden box.
- There is no need to use soil, which saves money and leaves the room clean without the soil crumbling.
- There is no need to look for a suitable soil composition, since the soil is replaced by ordinary toilet paper.
- In such a base you can grow not only tomatoes, but also seedlings of other vegetables.
Growing seedlings in this way will not be possible without a plastic bag, a transparent plastic bottle (preferably a 2-liter bottle), toilet paper and seeds.
Planting options
How to plant tomatoes using a new method? There are several known methods for growing tomatoes in plastic bottles.
Option No. 1, also called vertical, does without land. For tomato seedlings, a 2-liter bottle, which is divided into two parts, is useful.
The part with the bottom will be useful:
Wide strips of about 10 cm are cut along the entire length of the prepared plastic bag. Toilet paper is cut to the same length as the bag strip. Several pieces of paper moistened with water are carefully spread on a strip of the bag. The seeds begin to be laid out, retreating from the edge 1.5 cm, at a distance of 5.5 cm. The grains are again covered on top with several more layers of paper and one plastic strip. The strip of all layers is carefully twisted. Approximately 3 cm of water is poured into a glass made from a bottle and twisted rolls are placed there.
Option number 2 is a horizontal method of growing tomatoes in toilet paper, which is carried out without soil:
- The plastic bottle is cut crosswise to create two parts.
- Toilet paper is placed in the recess of each half and sprayed with water.
- The seeds are laid out at a distance of 3.5 cm. If they have germinated, then they are laid with the sprouts facing up.
- The bottle halves are covered with film or a bag.
- Several holes are made in the film surface to allow fresh air to flow inside.
- After all work, the container is moved to a warm, dark place.
Tomato seedlings planted using these methods do not need to be watered, since the greenhouse effect remains under the film.
As soon as two leaves appear, the seedlings begin to be transplanted into separate containers. To do this, simply unroll the roll or remove the sprouts from a horizontal container.
How to grow tomato seedlings in a plastic container, there is also option No. 3, which involves preparing the soil.
Many vegetable growers choose plastic containers for seedlings. Reviews about such an experience are only positive: “In recent years, I have been growing seeds only in five-liter plastic bottles, which I cut in half. I don’t make holes in the bottom, since the container is transparent, and you can see how long the moisture drains when watering. I use the crushed shells of several eggs as drainage, then add a layer of sand and soil suitable for the variety.
I always disinfect the soil by pouring boiling water over it. After the earth has cooled, I make holes into which I place the planting material. I sprinkle compost on top, cover the container with film and move it to a warm place. The film retains heat inside, creates a greenhouse effect, seedlings will appear simultaneously and quickly. After the shoots emerge, I remove the film and lay out the seedlings on the windowsill.
This way you can see that growing a tomato in a plastic bottle is simple and convenient. The container does not need picking, water does not flow out when watering, so there is no need for pallets, and the grown bushes quickly take root in any place.
Close the bottle tightly until the seeds germinate
Bottle, it is best to choose a square version. It will be stable, but simple round containers will do.
Toilet paper. You can cut it in advance into strips about the length of a bottle. Use the cheapest options without fragrance or additives.
Scissors. They carry out all the main work
Cut the bottle lengthwise . This does not need to be done for the entire length; leave the bottom intact so that the halves hold well and close; this is necessary for growing seedlings.
Fold the paper in half, as in the photo . Make cuts almost all the way to the end, almost the entire width. Do not reach about 1 cm from the edge
Uncover the cut strips and arrange. The main thing is that the pieces are separate and not caked together.
The stripes do not have to be whole. If they break, no big deal.
Open the container and place a layer of paper approximately 1 cm thick on the bottom. Distribute it evenly over the entire surface.
Soak the paper with warm water. Carefully add water and press the paper with your fingers until it is completely saturated. Don't pour too much, the water shouldn't stand
Open the package of seeds and place them on a flat surface. This is necessary to ensure convenience during the work process.
Place the seeds one at a time. Leave 2-3 cm between seeds, and make row spacing about 3 cm. Seeds easily stick to a wet finger, so work is done easily and quickly
Place a small layer of paper on top of the seeds . There is no need to cover the seeds too much, 1-2 layers are enough.
Gently press the paper . It will be saturated with moisture, which is what we need. There is no need to add water, there will be enough moisture as is.
Wrap the bottle in plastic. It is important to ensure tightness so that there are no gaps on the sides. You can screw a cork onto the neck.
Place in a bright, warm place. There is no need to water, as all moisture is retained inside. After the stems grow, transplant them into separate containers. Planting is carried out as usual, and thanks to the paper you will not damage the root system when picking
The video shows the growing process clearly from start to finish.
The advantages of this method of watering
Now let’s look at the advantages of do-it-yourself drip irrigation from plastic bottles for tomatoes:
- The most important thing is that you don’t need to spend money, the method is accessible to absolutely everyone.
- Simplicity. Installing an irrigation system in this way will take very little time and effort.
- You can organize the flow of fertilizers dissolved in water directly to the roots.
- You don’t have to constantly water the plants; you can safely leave them for a week and not worry.
- Protection against fungal diseases that form due to excess soil moisture.
- There is no need to loosen or soften the soil.
- Watering will take place with warm water, since while in the bottle the liquid will warm up to ambient temperature.
- The watering method is universal. It is great for cucumbers, cabbage, tomatoes, peppers, and eggplant.
Please note that you do not need to use this method for plants whose roots are fruits. When using watering tomatoes through plastic bottles in greenhouses, you should not completely forget about manual watering, since sometimes it is still worth irrigating the leaves, this is useful.
Advantages of using plastic containers
When growing cucumbers in 5-liter bottles, you do not need to spend money on buying seedling boxes and other containers. Plastic bottles in which drinking water is sold are found in every home. Compared to peat pots or cassettes for growing seedlings, they are almost free. Given the resistance of plastic to rot, containers with careful handling will last for many years. Therefore, growing cucumbers in plastic bottles is convenient and profitable.
The soil in a plastic container can be quickly replaced if necessary. It is easy to remove soil that has become unusable, infected with pests, or has become sour from a spacious container, maximizing the health of the plant root system.
The volume of a plastic jar is limited. Therefore, when watering, water does not seep deep into the soil. Thanks to this, the plants' need for moisture is significantly less than with traditional cultivation in open beds or in a greenhouse.
Compact cans take up little space. They are convenient to carry if necessary without damaging the plant. This option for placing cucumber bushes makes it possible to save area of a summer cottage. Plants in plastic eggplants can even be grown on a windowsill or balcony, producing a harvest of vegetables at home.
Care
The main principle of caring for seedlings and tomatoes on the balcony in general is regularity. Absolutely all procedures are carried out according to a clear scheme - thereby increasing the percentage of successful and abundant harvest.
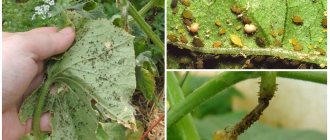
Pest Prevention
Tomatoes have many diseases and pests. Since this is a heat-loving, capricious plant - even in the conditions of an insulated balcony - they are very sensitive to all procedures and atmospheric influences.
Insect pests can enter from open windows, with soil, or as a result of insufficient disinfection of seeds. The first signs of the disease are not immediately visible; gardeners usually begin to notice drying out of the leaves and the appearance of spots on the surface.
Unfortunately, this is already a progressive process, meaning that the insects are already firmly attached to the back of the leaf.
One of the ways to prevent pests is regular spraying with soda or soap, alkaline solution from a spray bottle.
Before planting, we recommend treating the soil, for example, with Trichodermin or a mixture of Gamaira and Alirin. Find out about the characteristics of the Benito tomato variety at this link.
Watering
By the appearance of greenery, it is easy to determine whether there is enough moisture, whether there is an excess or lack of it. Poor watering affects the color and direction of the fibers on the leaves. The greenery itself becomes dark in color with drooping hairs.
With an overabundance, a different picture is observed: the foliage becomes light green, very pale, and the trunk itself is fragile and easily vulnerable.
Temperature, humidity
The optimal range for keeping Kumato, Agata and others tomatoes is from +18 to +30 degrees. When temperatures are violated relative to the lower or upper limits, development is inhibited. Self-sterilization of pollen is also possible. All these problems lead to reduced yields.
Comfortable humidity for tomatoes is quite high - 50-60%, it is achieved by periodically ventilating the room, as well as irrigation and installing humidifiers and steam convectors on the balcony. This material will tell you about Dutch varieties of tomatoes.
Harvesting
When the first frost occurs, tomato cultivation should be stopped and the entire harvest should be harvested. Green. I place unripe fruits on newspapers on the windowsill, and cover them with newspaper to prevent sunburn.
The best temperature for reddening tomatoes is considered to be +25 degrees with a relative humidity of 70%.
If cherry tomatoes grow on the balcony, then there will be no issue with ripening, since their life cycle is shorter than that of classic tomatoes, and the ripening process occurs in all tomatoes at the same time.
Plant care
May be interesting Preparing soil in a greenhouse for planting cucumbers in the spring How to store carrots in a cellar in winter? Description and characteristics of the April f1 cucumber variety: planting and care
The basic operations for caring for plants grown in plastic containers coincide with the agricultural techniques for cucumbers in open ground or in a greenhouse. To water the seedlings, use soft, settled water at a temperature of +25 degrees. If seedlings are grown with supplementary illumination with phytolamps, irrigation is performed in the morning and evening. For cucumbers grown in natural light, watering once a day is sufficient.
15 days after planting the seeds, the seedlings are fed for the first time. As a top dressing, a mixture of superphosphate, urea, potassium or magnesium sulfate is used. You can use ready-made mineral complexes for seedlings, for example, Fertility fertilizer. The plants are fed a second time when a pair of true leaves appear. Plants are watered with a mixture of 1 tbsp. l. wood ash, 1 tsp. nitrophoska and 3 liters of water. The liquid is poured only under the root. The procedure is carried out in the morning, before it gets very hot. Then fertilizers are applied according to a schedule every 15 days.
On the balcony
In addition to standard procedures, plants on the balcony need special measures:
- They will be provided with additional illumination with phytolamps if the window sill or balcony does not face the south side of the house;
- regularly remove side shoots by pinching;
- when the height of the bushes reaches 25 cm, they are tied to an individual support;
- against pests, plants are sprayed with garlic or soap solution, or a decoction of onion peels.
For plants grown in an apartment, chemical insecticides cannot be used against pests. In a confined space, any amount of a toxic drug sprayed into the air can cause serious poisoning.
In open beds
On unprotected ground, carry out the following care measures:
- the plants are covered with the cut off top part of the bottle to create a favorable microclimate;
- during cold weather, you can additionally cover the plantings with spunbond;
- Covers are periodically removed for ventilation or irrigation;
- During the active growth of green mass, flowering and fruiting, fertilizers must be applied.
After the final warm weather sets in, the plastic rim located around the plants is carefully removed, since it has already fulfilled its function and the plant no longer needs it. It is carefully removed from the soil, trying not to damage the root system of the cucumber bush.
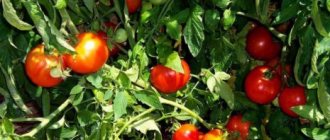
Growing tomatoes in bottles
Tomato seedlings in bottles can even be grown in greenhouses. However, no matter where the plant is planted, it requires proper care.
In order to grow tomatoes in greenhouse conditions or on the balcony, it is necessary to plant seedlings 50-60 days after germination. Since the plants are grown at room temperature, they do not need to be hardened off. Planting tomatoes in five-liter plastic bottles in a greenhouse and on a balcony does not require much effort, the main thing is to do everything correctly.
Balcony miracle
The first step is to prepare the container. To do this, the bottom is cut off from a 1-liter bottle; its height should be about 1/3 of the total height of the container. For planting, a cut off part of the bottle with a neck is used. The tomato bush is placed in a container. The tops should be outside, and the roots should be in the container. Next, the bush must be covered with soil and watered. The resulting pot with the plant is hung like a flowerpot.
Important! Don’t get too carried away with watering; indoors, moisture evaporates slowly, and high humidity is an excellent environment for the proliferation of microbes. Seedlings can also be transplanted into 5-liter bottle containers, in which the tomatoes will grow until harvest
Seedlings can also be transplanted into 5-liter bottle containers, in which the tomatoes will grow until harvest.
Prepare bottles before use
Advantages of this option:
In five-liter drinking water containers you can fully grow tomatoes
- Cheap and accessible . There are plastic bottles in every home and you don’t need to buy them specially; you get free containers that are ideal for growing seedlings. The main thing is to decide in advance on the number of bottles and collect them, so that by the time the seeds are sowed, you have as many containers on hand as you need.
- Ease of preparation . You can use two options: in classic bottles the top part is cut off, and in square bottles you can cut off one of the sides and you get a kind of elongated container. It is best to use water bottles; you do not need to prepare them in any way, just rinse them before use.
- Ease of use . There are so many options that you can choose the right size container for any conditions. From small half-liter bottles to five-liter bottles and even more. You need to choose so that they fit normally on a windowsill or other place where the seedlings will be grown.
- Versatility of use . The container can be used both for preparing seedlings and for growing tomatoes indoors or on a balcony. Or you can take the plants outside during the warm season, and then bring them back and grow tomatoes further.
- Long service life . Plastic perfectly resists deformation and does not break upon impacts or falls. It is also not afraid of water, which allows you to use the same container for at least several years. The material loses its properties over time from sunlight, but this happens after 4-5 years of use.
- Safety . The bottles are made of food-grade plastic, which does not release harmful substances into the air and soil. Therefore, healthy and environmentally friendly seedlings are grown.
It is easy to germinate seeds in a bottle and grow plants before planting; this method requires minimal time investment
Preparatory activities
Place
For growing tomatoes in bottles, balconies or loggias facing the southeast and southwest are suitable. On the south side, plants can overheat and get burned; to prevent this from happening, you need to organize shading; if the balcony is located on the north side, the plants will need additional lighting for full development.
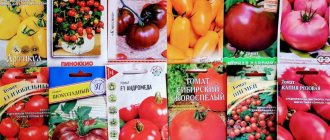
Varieties
Considering that there is not much space on the balcony, varieties with small fruits are suitable:
- Cherry;
- Cascade;
- Pearl Red;
- Ed.
Or any others that meet the stated requirement. When growing in a plastic bottle, it is better to abandon tall varieties, giving preference to low-growing and dwarf varieties, which are characterized by a compact bush and abundant fruiting.
Capacity
The preferred bottle shape is cylindrical. This option is the easiest to fill with the root system. The material of the container is plastic, but the dimensions must correspond to the size of the plant. If this is the stage of seedling cultivation, the bottles can be small; if the bush is transplanted to a permanent place, the volume of the container should be at least five liters.
Each bottle contains one seedling.
Priming
Soil mixtures for planting tomatoes can be purchased ready-made in stores, or you can prepare the soil yourself. To do this, you will need to mix turf soil with humus in equal proportions, with the addition of peat and sawdust, which will improve the air permeability of the soil. At the bottom of the bottle for planting, you must place drainage, for which you can use expanded clay.
Planting seeds
There are two ways to plant cucumbers for growing in bottles, depending on the use of the container:
- with the top part cut off and the container positioned vertically, no more than 2 seeds are placed in it;
- If the bottle is cut lengthwise and the container is positioned horizontally, you can plant 3 to 5 seeds in it.
The seeds are lowered to a depth of 2 to 3 cm from the soil surface. The containers can be placed in open ground, placed in a greenhouse, a greenhouse or on a balcony. They can be arranged in one or two rows with a distance of 40 to 50 cm. At the same time, an interval of 30 cm is maintained between plants. You can watch the video for more information on how to properly plant cucumber seeds in plastic containers.
Popular varieties for growing on balconies and in greenhouses
Balcony miracle. This variety is low-growing and resistant to fungal diseases. Does not require removal of side shoots; it develops well even on cloudy days.
Room surprise. The variety is characterized by its compact size, excellent germination and high yield.
Mystery. The variety belongs to low-growing crops with a ripening period of only 85 days. The weight of the fruit reaches 100 g. The plant is resistant to a lack of sunlight and to the most common diseases.
Balcony bonsai. The most compact plant with a height of no more than 30 cm. Small round tomatoes with excellent taste are located on an attractive bush.
When cultivating tomatoes in bottles, you must remember that, just like in open soil, they require regular watering and fertilizing.
Growing tomatoes in a greenhouse and on a balcony in 5 liter plastic bottles was appreciated by both agronomists and summer residents. With the right approach, you can grow a good harvest even on the balcony, providing the whole family with healthy vegetables.
Growing tomatoes in plastic bottles originated in Japan. The shortage of land for planting and the high price of land gave rise to the idea of growing seedlings in such a unique way, and with the help of T. Hasegawa, it became possible to even grow tomatoes in five-liter bottles.
While still a student, he created a device from a plastic container and got good tomatoes in it, which contributed to the spread of the method of growing vegetables in the post-Soviet space. And already domestic gardeners began to use five-liter bottles for cultivating tomatoes in this way.
Brief description of the method
Growing tomatoes in a greenhouse in 5 liter bottles is both economical and effective. The method is that the seeds are sprouted not in the ground, but in toilet paper. The seedlings are clean, without lumps of earth, which makes it easier to remove side shoots from the plants and subsequent planting of the sprouts in the soil. Another advantage of this method is its hygiene. So, even when sowing seeds in an ordinary apartment, soil will not be scattered anywhere, and there will be no need to constantly remove dirt from the window sills.
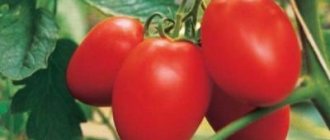
Tomatoes in plastic bottles
On a note! This method of growing seedlings is suitable not only for tomatoes, but also for such flower crops as marigolds and petunias, as well as for sowing eggplants and cucumbers.
Preparatory stage
With any method of sowing seeds, they require preliminary preparation. Raised according to the rules, they will not cause trouble. The seed material of hybrid tomatoes does not require additional processing: producers took care of their disinfection and fortification.
Seeds, collected by hand or purchased from ordinary sellers, must be properly prepared:
- For seedlings, choose dense, large seeds. You can check their quality as follows: place in salted water (1 teaspoon of salt per 1 liter of water). Hollow specimens after 5-7 minutes. float to the surface;
- The seeds remaining at the bottom of the container must be disinfected. A weak solution of potassium permanganate or hydrogen peroxide (soak for 15-20 minutes) will help kill harmful bacteria;
- For a more active and simultaneous appearance of young sprouts, gardeners recommend germinating the seeds first by placing them in a damp cloth for 1-2 days. All this time it is necessary to maintain a stable temperature and prevent the seeds from drying out.
Tara
Plastic five-liter bottles are used as containers. Initially, they must be scalded with as hot water as possible (when using boiling water, they become deformed). Tomato seedlings in plastic containers are grown in two ways:
- one bottle (2- or 3-liter) is vertically cut into two parts. This way we get two containers for seedlings;
- they make glasses from bottles, which can be obtained from containers with a capacity of 1-1.5 liters by cutting off its upper part. This method is especially convenient when growing tomatoes using the diaper method, when the seeds are rolled into polyethylene in the shape of a snail.
Plastic bottles
Using plastic bottles for seedlings allows you to install them compactly, using a minimum of space. For this method you do not need to buy a lot of soil; this method is simple and pleasant to perform. Those who have experienced it in practice will never give it up.
Where to begin
You need to start by preparing the seeds. First, they need to be calibrated by immersing them in cold salted water. Weak seeds will float, and strong, full-fledged ones will end up at the bottom, and they should be used for sowing. Then the seeds are disinfected in a one percent solution of potassium permanganate or a three percent solution of hydrogen peroxide or in preparations specially designed for this, for example, phytosporin, Baikal EM.
What is the essence of sowing?
Now let's prepare our improvised containers. We cut five-liter plastic bottles into two halves. Those parts where there is a neck will be useful in the future to cover the seedlings that have just been planted in the country, but now we need the lower parts of the bottles.
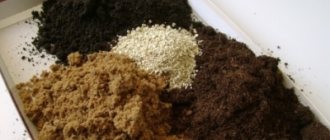
The first layer, two centimeters thick, will be crushed eggshells (you should start collecting them in advance), then a layer of sand of the same thickness, you will get good drainage. Thanks to this, you don’t have to make holes in the bottom; in a transparent container it will be visible if there is a lot of water. 10–12 centimeters of soil is placed on top of the drainage; all this must be poured with boiling water. We evenly distribute 20 seeds onto the cooled ground, lightly sprinkling them with soil.
Attention! To maintain moisture and warmth inside the bottles, and to prevent the soil from drying out, it is necessary to cover the containers with film or glass.
Now we put our containers in a warm place and wait for shoots. After they appear, the film must be removed.
Watering should be done carefully and as needed. The soil should be constantly moist and not crack, but it should also not be over-watered.
To prevent the seedlings from stretching towards the light, the containers need to be rotated. In order for a strong root system to form, you need to add soil as it grows. This makes it possible to do without diving. When the height of our seedlings reaches 20-30 centimeters, they can be planted in open ground.
Planting seedlings
The ground should already be sufficiently warm at the time of planting. To avoid damaging the roots when planting, you need to lightly press on the sides of the bottle, as if squeezing the soil with the seedlings out. You need to place a bowl with a small amount of water in advance and immerse the contents of the bottle there. The soil will become wet and the roots of the seedlings will easily separate from each other. You just need to tear off the cotyledon leaves and immediately plant the plants in the holes, watering them abundantly. During adaptation, they can be covered with the upper halves of the bottles, but the caps should be unscrewed so that the plant can “breathe”. Seedlings grown in this way always take root well and do not get sick.
The advantage of using plastic bottles for seedlings
What does this method give us:
- At home, dirt from boxes with soil does not spread;
- There is no need for diving;
- When planting in the ground, the roots are not damaged;
- Easy to transport from home to garden;
- As a rule, all plants take root.
Tomato seedlings in a bottle
Planting tomato seedlings in plastic containers is an economical way to grow high-quality planting material at home. In addition, tomato seedlings in a bottle
will develop not in the ground, but in toilet paper, which also makes it easier not only to plant small sprouts after picking, but also to plant ready-made seedlings in the ground. If you are growing a plant in an apartment, then using toilet paper instead of soil is more profitable from a hygienic point of view, because the soil will not crumble. You can use this method for other vegetable crops that will take up space in your garden, for example, cucumbers and eggplants, and gardeners also use it for flowers - marigolds, petunias.
At the first stage, it is necessary to prepare the seeds: calibrate and disinfect with a manganese solution. When the seeds are ready, you can start preparing containers with a kind of soil. We will need plastic bags, which should be cut into strips 10 cm wide along the entire length of the bag. Toilet paper should also be cut into the same strips. Then place toilet paper on polyethylene and place the prepared seeds on top. First, spray the paper with water from a spray bottle, and place the seeds in the middle, keeping a distance of four centimeters between them. After which the strip must be rolled into a tight roll so that the diameter of the roll matches the diameter of the container with the neck cut off. If the diameter of the roll is smaller, then you can additionally wind a layer of polyethylene. The roll should be placed in a bottle, and three centimeters of water should be poured onto the bottom. The container must be placed in the sun, and within a few days shoots will appear.
If you don’t have suitable boxes or containers on hand in which to plant seeds in rows, you can cut a plastic two-liter container in half lengthwise, line the bottom of each half with several layers of toilet paper, and place the prepared seeds between the layers. Then the halves should be wrapped in a bag and left on a sunny windowsill for several days. You can lightly spray the paper with a spray bottle. Thanks to the greenhouse effect, no additional watering is needed.
We would also like to draw your attention to the fact that for this method, transparent plastic is best suited, through which the maximum amount of sunlight will pass through.
This is interesting: Why tomatoes turn yellow in a greenhouse - you need to know this
Advantages
The modern grocery industry provides us with many items that can be adapted to different needs. Plastic bottles are a real godsend for gardeners. With their help, they grow crops, decorate their garden plots, and even decorate their premises by planting indoor plants in them.
Among the main advantages of growing tomatoes in plastic containers are the following:
- space saving - ergonomic containers take up less space than wooden boxes;
- there is no need to use a substrate - paper napkins or toilet paper are suitable for germinating tomatoes in plastic containers, this reduces the amount of waste and eliminates the need to purchase special substrates;
- The bottle growing method is suitable not only for tomatoes, but also for other vegetable crops.
A prerequisite for growing tomatoes using this method is that the plastic bottle must be transparent and have a volume of at least 2 liters. Napkins or high-quality toilet paper are another necessary element of this method.
Using plastic bottles when growing cucumbers in open ground
To provide cucumbers with good conditions for growth, it is necessary to take a responsible approach not only to the planting itself, but also to the selection and preparation of the site.
Site preparation
For cucumbers, it is better to choose a place with light sandy loam or loamy soils; groundwater should lie at a depth of 1.5 m. If you want to plant cucumbers in a garden bed, then try to choose a sunny and wind-protected area. When planting cucumbers, it is recommended to take into account crop rotation: this crop grows well where potatoes, tomatoes, onions, cabbage and green manure (alfalfa, clover, rye, mustard, etc.) were previously placed; plant cucumbers again in the same place and after pumpkin (pumpkin, watermelon, zucchini, squash) are undesirable.
It is better to prepare the site in the fall, but it is also possible in the spring, approximately 3 weeks before planting. For this purpose, add organic matter (rotted manure, compost or humus) - 6-8 kg/m2 and a mineral complex - ammonium nitrate (15 g/m2) + superphosphate (40 g/m2) + ash (200 g/m2) under digging. or potassium salt (25 g/m2).
Before planting cucumbers, the soil in the garden must be improved.
If necessary, 10–12 days before improving the soil, deoxidize it by adding slaked lime (200–300 g/m2) or dolomite flour (350–400 g/m2) under digging.
If you prepared the bed in the fall, then dig and loosen it before planting, and then form the bed. If you fertilized the soil in the spring, then it will be enough to dig the area shallowly with a fork, loosen it, and then form a bed.
Ways to use plastic bottles when planting cucumbers
As a rule, shoots are planted in the ground at the age of 20–25 days, that is, approximately at the end of May. By this time they should have 3-4 true leaves. In addition to timing, take into account the quality of the soil: if you have not improved the soil, then when planting, add 0.5–0.7 kg of humus or compost and 1/5 cup of ash to the bottom of the hole, and 0.15–0.00 to the bottom of the hole. 2 kg of organic matter and 2 tbsp. l. ash and moisten.
Planting with a bottle
In the prepared soil, dig a hole large enough to fit the bottle.
Please note that the soil in the bottle should be level with the soil in the garden bed. Carefully remove the bottom of the bottle and place it in its hole. Fill the empty space between the sides of the pit and the sides of the bottle with soil to give it stability. Gently moisten the plant at the root.
Fit in plastic rim
In this case, you need to use seedlings prepared in separate containers.
- Place the sprouts in the prepared holes along with a lump of earth or a peat cup.
- Sprinkle with soil and water.
- Remove the top of the bottle up to the shoulders or 2-3 cm below and the bottom.
- Place the resulting rim around the sprout and press it into the ground 3–5 cm.
- Place the sprouts under the covering material.
The plastic rim provides good protection against insect pests
Landing under the hood
If you do not have the opportunity to provide the sprouts with temporary shelter in the first 5–7 days after planting, then you can easily use a cut funnel. Some gardeners prefer a more spacious version of the “greenhouse” and remove the bottom of the bottles.
- Place the sprouts in the prepared holes along with a lump of earth or a peat cup.
- Sprinkle with soil and water.
- Carefully cover the sprout with a cap, pressing its edges 3-4 cm into the ground. Also remember to remove the cover.
Five-liter bottles are often used as temporary shelter
Video: how to plant cucumbers under a hood
Features of care
Care measures are almost the same as those recommended for home cultivation, but there are several features:
- Instead of sodium humate, use chicken manure for the first feeding (1 part organic matter to 15 parts water), for the second and subsequent feedings use mullein (1 part organic matter to 6 parts water).
- If you grow cucumbers in a greenhouse, then provide ventilation after each watering.
- Don't forget to mulch your plantings. Sawdust or straw, sprinkled with a layer of 5 cm, are well suited for this purpose. Also, from time to time, the layer of mulch must be updated.
- Weed the garden bed regularly.
- Store the harvested crop in a cool, dark place. If there is a need to cover it, use burlap or cotton cloth rather than film.
As you can see, planting cucumbers in a bottle is not a difficult task, and you can handle it quite well even if you have no experience. Carry out all the work on time and do not neglect caring for your plants, and you will be able to get a good harvest both at home and in the garden.
Various methods of growing without picking
The initial stage is completely traditional. The seeds undergo pre-planting treatment, the substrate is prepared and disinfected, and containers are selected. The choice of container affects subsequent actions.
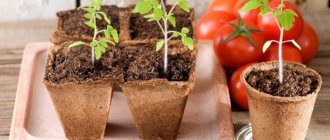
Peat tablets
The method requires material costs, but saves the gardener from hassle with the substrate. Tablets are taken of medium diameter, soaked and seeds are sown. When the roots begin to break through the protective shell, the seedlings are transplanted into pots, greenhouse beds or under film covers if climatic conditions allow growing tomatoes in open ground.
The cost of peat tablets is reduced by using tea bags - the seeds only need heat and moisture for successful germination.
Plastic cups
Such containers are inexpensive. If necessary, food packaging and plastic bottles from various drinks are collected during the winter. The standard recommendation is that the volume should be 0.5 liters. If the tomatoes will grow in a heated greenhouse, make do with smaller containers.
The glasses are disinfected and drainage holes are made in them. Fill one third of the volume with soil and plant 2-3 seeds. When the first shoots appear, the strongest ones are left. The weak ones are trimmed with nail scissors, the normal ones are transplanted to get more seedlings.
As the seedlings grow, soil is added to stimulate the development of additional roots.
Similarly, seeds are sown in special cassettes sold in stores. The small volume of the cells does not cause difficulties, since the soft walls make it easy to remove seedlings and transplant them into the ground.
Planting in bags
Thick plastic bags, homemade or from dairy products, are used. They are thoroughly washed and disinfected beforehand. At the sowing stage, the edges are folded, then they are gradually straightened and soil is added. Before planting seedlings, the bags are carefully cut, and the plants, along with a lump of earth, are placed in planting holes.
Large containers
If the required container is not available, they are sown in ordinary seedling boxes made of wood or plastic using standard technology. The difference is in the distance between the seeds - 10 x 10 cm. When the first grains germinate, they are separated by partitions made of cardboard or plastic. Such walls prevent the roots of seedlings from intertwining.
Pots made of peat or pressed cardboard
The method is expensive; it is usually used to germinate seeds of exotic, expensive or especially productive varieties at home. Sowing is carried out in the usual manner. The main difference from plastic containers is that there is no need for drainage holes. Before planting seedlings in the beds, it is enough to carefully remove the bottom so that the tap root can freely go deeper into the ground.
Lighting, watering, feeding seedlings
After the first shoots appear, I remove the film and place the improvised pots on the windowsill of a south-facing window.
water the seedlings with settled water at room temperature after a visual inspection of the soil. Through the transparent sides of the containers, the degree of water penetration is clearly visible and it is clear when to water the bottled seedlings. At the beginning of the growing season, I water the seedlings every 3-4 days. As the plants grow and develop, I increase the frequency of watering, as well as the volume of water used.
To provide plants with additional nutrition and protection from infectious agents, once every 7-10 days I carry out foliar feeding with a solution of EM fertilizers (“Shine” or “Baikal”).
I regularly turn containers with seedlings towards the light in different directions.
Fresh harvest all year round
After two leaves develop on a young sprout, it is necessary to transplant it into separate containers. Seedlings can be picked into plastic bottles.
When the weather outside is bad or even winter, you can pick up seeds intended for indoor growth. If you plan to grow tomatoes on your balcony or windowsill, you can use a large bottle.
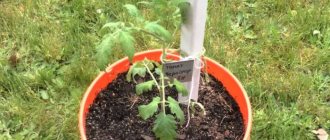
You can grow tomatoes in 5 liter bottles on the balcony windowsill. The top and neck are cut off, and suitable soil is poured into the bottom.
If there is not enough space on the balcony, then you can make an improvised hanging pot from a plastic bottle. To do this, you need to take a plastic bottle with a volume of 1.5 or 2 liters. For the work, only the upper third of the bottle with the neck is required, so it is cut off. At the edge of the cut, holes are made on opposite sides through which a thick rope is passed. It is on this that the structure will be suspended.
As soon as the seedlings are two months old, they can be transplanted. The landing will be unusual. The sprout is removed from the cup along with the earthen lump. The bush is turned over with its growth point down and pushed through the neck. The roots remain inside the plastic container and are covered with soil. After the container is completely filled with soil, it must be watered.
Further care consists of watering with a watering can and regular application of fertilizers. Some varieties of tomatoes require pinching the growing point, cutting off side branches and tying up the stem.
Preparatory work
Before sowing the seeds, you need to carry out a selection. Only large and dense seeds are suitable for sowing. They can be selected manually, using tweezers, or using a special solution. Pour the salt with water, stir and pour all the seeds from the pack into the resulting salt mixture. Hollow, small seeds will float to the surface and need to be thrown away.
Those seeds that have fallen to the bottom must be subjected to a disinfection procedure. There are a lot of bacteria and fungi on the seed coat, which need to be gotten rid of in time. You can place the planting material in a weak solution of potassium permanganate for 30 minutes.
In the future, some vegetable growers carry out the germination procedure. The seeds are distributed on a wet cloth, covered with another layer of wet material and placed in a warm room. As soon as the sprouts hatch, you can begin planting.
To grow seedlings, you can choose any plastic or wooden container. If you don’t have a suitable container on hand, you can use a plastic bottle of milk, juice or water.
How to grow seedlings in a plastic bottle on toilet paper?
Growing seedlings for tomatoes is not a very labor-intensive process, but it has its own characteristics. That is why summer residents are increasingly coming up with new ways and methods that more or less optimize and facilitate this process. Seedlings in a plastic bottle on toilet paper is one of the relatively new methods. What is its essence? How to use it?
Seedlings in a plastic bottle on toilet paper
Plastic bottles and paper - for what?
This method is new and therefore raises many doubts. But we want to draw attention to its undeniable advantages:
- Significant savings: seedlings grown in plastic develop much faster than those growing in traditional peat pots. In addition, plastic bottles take up very little space, so growing seedlings will not cause any embarrassment for family members. This method does not require soil, which significantly saves money that could be spent on purchasing it. In addition, the absence of soil allows you to get rid of the debris and crumbs that accompany it.
- Comfort: no need to run around stores looking for related products. There is no need to purchase special containers or substrates.
- Versatility: this type of planting seedlings is perfect for different crops, not only vegetables, but also flowers.
To plant seedlings in plastic bottles, you will need the following materials: plastic bottles, toilet paper, polyethylene, water and seeds. Immediately before planting, you need to prepare the seeds. How to do it? First you need to check the ability of the seeds to germinate; to do this, they are dipped in a liquid to which a little salt has been added. Those seeds that have sunk to the bottom are optimal for planting as seedlings. Selected seeds must be dried. Experienced gardeners distinguish two methods for planting seedlings in plastic bottles.
First method:
- cut the polyethylene into strips ten centimeters wide;
- cut toilet paper into the same strips;
- put paper on polyethylene;
- moisten the entire structure with water from a spray bottle;
- cut the plastic bottle by one third;
- Place the crop seeds on strips of paper at a distance of three centimeters;
- put another layer of paper and polyethylene on the seeds;
- twist the strips with seeds and place them in a bottle;
- Fill the bottle with water three centimeters from the bottom.
It would be a good idea to add minerals that can speed up seed development. After this, the seedlings need to be placed in a bright, warm place, for example, on a windowsill.
Second method:
- a plastic bottle is cut lengthwise into two halves;
- each half must be lined with toilet paper from the inside;
- toilet paper is wetted with liquid;
- the seeds of the crop are laid out on paper;
- wrap each part of the bottle in polyethylene;
- Place in a bright place, ideally in the sun.
In order to plant grown seedlings in a greenhouse or greenhouse, you need to act very carefully. First of all, you need to cut a roll of polyethylene, unfold a strip of paper, after which the sprouts of the planted crop will become visible. As a rule, by the time it is planted in the ground, the roots of the crop have already reached a length of five to seven centimeters. It is not forbidden to plant seedlings in the ground without removing toilet paper. This is done to prevent possible damage. The roots are a rather delicate part of the crop, so you need to treat them very carefully.
So, seedlings in a plastic bottle on toilet paper is a method that has been used relatively recently, but it has already been fully proven to be economical and effective.