For seedlings, the soil in which they will be grown is important.
But the soil, even purchased in a store, must be properly prepared before planting.
This is the key to good seedling growth and, in the future, a bountiful harvest. Which soil is better to choose, which one will be the best, and which one is better not to take at all? Let's figure it out together!
Soil requirements
The main requirement is that the soil must contain all the elements necessary for the development of seedlings.
The soil should be:
- Loose.
- It is good to allow moisture and air to pass through.
- Have sufficient, but not excessive amounts of nutrients.
- Have neutral or weak acidity.
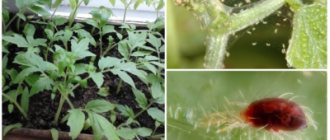
- It should not contain toxic substances, harmful microorganisms, weed seeds, fungal spores, eggs or larvae of insect pests.
You cannot use soil from the garden where tomatoes, peppers, eggplants, and potatoes were grown. They also do not take soil from a greenhouse or greenhouse.
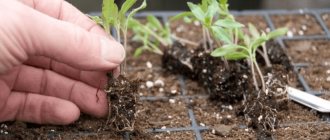
Transplanting seedlings into the ground
- Before you start transplanting tomato seedlings into the ground, you need to thoroughly dig up the ground several times;
- A hot solution of copper sulfate, which is used to treat the soil approximately a week before the planned planting, will help get rid of pests;
- Fertilizers are applied to the soil, after which the area is dug up again;
- The distance between holes should be 40-50 cm, and between rows - about a meter; tomato seedlings love space;
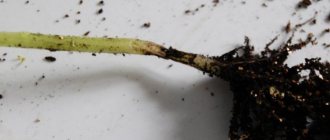
- Organic fertilizers - semi-rotted manure or humus - are applied directly into the holes;
- After planting, the seedlings are mulched with rotted manure mixed with sawdust, humus, and leaves. A layer of mulch protects the root system from overheating and drying out; earthworms breed in the ground, loosening the soil, and the mulch layer itself, rotting, supplies nutrients. In addition, in this case, a crust will not form on the top layer of soil after watering, requiring additional loosening.
- Tomatoes are planted in open ground or in a greenhouse, in the evening or in cloudy weather.
Components that should be included in the soil and which should not be
It is impossible to determine exactly which soil will be the best for tomato seedlings. Different varieties may like the presence of a certain component in the soil or, conversely, its absence. Much depends on the growing region.
Soil mixtures containing:
- Sod land.
- Meadow land.
- Peat.
- Rotted leaf humus (not from all types of deciduous trees).
- Rotted and frozen manure from cattle.
- Sphagnum moss.
- Garden land.
- Fallen pine needles.
- Coconut fiber.
- Rotten sawdust.
- Also included in the soil mixture is the presence of:
- Sand.
- Perlite.
- Hydrogel.
- Vermiculite.
- Some gardeners use substances such as:
- Wood ash.
- Chalk
- Dolomite flour.
- Lime.
Ash can protect against diseases, insect pests, and acts as a fertilizer and soil deoxidizer. But the usefulness of ash and its chemical composition depend on the type of wood being burned.
Should not be present in the soil:
- Fresh manure.
- Not rotted leaf humus.
- Insects, worms or weeds.
- Hay dust.
Useful video
We recommend watching an interesting video about soil for seedlings for tomatoes, peppers and eggplants:
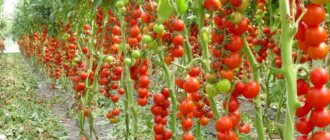
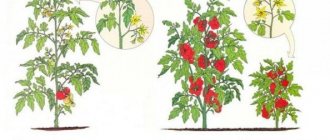
As you can see, the basis for obtaining a large harvest of tomatoes and peppers is well-selected soil components for seedlings. The health of the crops depends on it. Plants receive from the soil the nutrients necessary for their growth and fruiting. Its purity and the absence of pests and weed seeds will allow the plants to develop properly and delight you with an excellent harvest.
Rate the article, share the material with friends on social networks, and express your opinion in the discussion below!
How to prepare substrate at home
Purchased soil does not always turn out to be of high quality and suitable in all respects.
Therefore, experienced summer residents prefer soil made by themselves.
To do this, you need polyethylene or tarpaulin, onto which the necessary components are poured in exact proportions, and then mixed.
First way:
- Soddy soil, peat and river sand are mixed in equal parts.
- A nutrient solution is prepared (10 l - water, 25-30 g - superphosphate and potassium sulfate, 10 g - urea).
- Water the soil mixture with this solution and let it dry.
Second way:
- Mix equal parts of turf soil, peat and humus.
- Pour two matchboxes of superphosphate and half a liter of wood ash into a 10-12 liter bucket.
- Mix everything thoroughly again.
Preparing the soil for planting yourself has its pros and cons.
Advantages:
- The necessary proportions are observed;
- saving money.
Flaws:
- Cooking takes time;
- If there is an error in the proportions, you will have to start all over again with new soil.
- It is not always possible to find all the necessary elements for a soil mixture.
- Harmful microorganisms may be present in the soil.
What soil mixture is better to buy in the store?
To choose soil for tomato seedlings you need:
- Decide which primer is best suited for use, universal or special. For beginning gardeners, a soil mixture marked “universal” is suitable .
- Check the package with soil for a label with instructions for use, chemical and mechanical composition and information about the manufacturer. If this information is not available, then it is better not to purchase such a soil mixture.
- Good soil should consist of 3-4 elements : two types of peat, vermiculite or sand, mineral fertilizer. The amount of chemicals such as phosphorus, nitrogen, potassium should not exceed 300-400 mg/l.
- The soil purchased should be loose, without large lumps and not greasy. Water should drain well through such soil.
Benefits of Store Soil:
- The soil is almost ready for use.
- You can purchase the necessary packaging (from 1 to 50 liters).
- The composition is rich in all necessary elements.
Flaws:
- The amount of microelements is not always indicated correctly.
- Acidity is indicated approximately.
- Instead of peat, the manufacturer can add peat dust, which is not suitable for growing seedlings.
- You may get contaminated soil or with insect larvae.
Next, you can watch a video on how to analyze finished soil:
Tips for choosing purchased land
Purchased soil is a ready-made mixture with all the additives and components necessary for the growth and development of plants. The basis of any mixture in most cases is peat. Other components are added depending on the needs of the crop for which the mixture is intended. We carefully read the composition of the soil.
Let's outline the main components that we need:
- The main components are peat, sand, humus, poured.
- The main microelements are nitrogen, phosphorus, potassium.
When choosing soil, be sure to pay attention to the expiration date. The soil should not be expired. During long-term storage, the base of the soil – peat – can change its properties. It has the ability to heat up on its own, which will affect the quality of other soil components.
Ground for pepper seeds. Photo used as illustration. Source: Yandex.Images
Let's look at what type of peat underlies the soil. High peat has an acidic reaction, while low peat has a slightly acidic or close to neutral reaction. For tomatoes and peppers, it is necessary to choose soil with neutral peat.
We recommend that you first buy a small package of your chosen mixture. Unpack and carefully examine the contents. The soil should be moderately crumbly and not release moisture when it is compressed. The mixture should not be sticky, viscous or too dense, or have an unpleasant smell of rot.
The soil must contain sand, perlite, vermiculite or another loosening component. Good soil does not contain weeds, grubs and other similar components.
Wet a small amount of soil. When drying, no salt crystals should form on the surface. Be sure to pay attention to the inside of the package. There should be no traces of mold on it.
How to prepare a substrate for planting at home
In order for the seedlings to develop well, the soil mixture must be prepared before planting.
Actions:
- Sift the soil . This removes large particles, enriches the soil with oxygen, and makes it light, which is good for the roots of the seedlings.
- Treat with cold . This treatment kills insect larvae and reduces the likelihood of further diseases to a minimum. It is best to stock up on soil in the fall, and freeze it outdoors and thaw it indoors several times during the winter.
- Before planting, add urea, rotted manure or compost to the warmed soil . If desired, wood ash and superphosphate are added. You can also add lime (15 grams per 1 kg of soil).
The treatment involves soil purchased in a store and prepared independently.
Checking the acidity level
You need to check the soil for acidity! How well the seedlings will feel depends on this. There are several ways to determine acidity:
Testing with litmus paper
A set of litmus strips with a color scale can be purchased at a specialty store.
You need to take some soil from several areas of the garden, from different depths. Wrap it in gauze and place in a vessel with distilled water for 5 minutes. There should be 4-5 times more water than the amount of soil.
Remove the gauze with soil from the container and place a litmus indicator there for 2-3 seconds. Compare the color of the strip with the pH values on the color scale.
Using vinegar
You need to dig a hole 20-25 cm deep, from below which take the required amount of soil. Roll the soil into a ball and place it on a plate. Pour vinegar onto the earth ball.
If there is lime in the soil, whitish bubbles will appear on the ball and a hissing sound will be heard. If the reaction is weak, then the soil has neutral pH values. If the reaction is strong, then the acidity of the soil is weak. A complete lack of reaction indicates that the soil is acidic.
Using grape juice
To determine the acidity of the soil, only natural grape juice is suitable.
Pour 50 mg of juice into a transparent container. Add some soil taken from the depths there. Monitor the reaction. If there is no reaction, then the soil is acidic. If the sap changes color slightly, bubbles slightly, and has a little foam on the surface, then the soil has a neutral pH value. A violent reaction indicates a low acidity level.
With chalk
Pour 2 tbsp of soil, 5 tbsp of water and 1 tsp of chalk into the bottle. Wrap the bottle in paper so that heat from your hands does not transfer to the water and the experiment is more accurate.
Attach a medical latex fingertip to the neck of the bottle. If the soil is acidic, the fingertip will fill with carbon dioxide and straighten out. With neutral acidity, it will not straighten completely. If the soil is slightly acidic, then the fingertip will remain in its original position.
Disinfection
By disinfecting the soil, gardeners destroy various pathogens. There are several ways to disinfect soil:
- Potassium permanganate . Prepare a weak solution of potassium permanganate (3 grams per 10 liters of water) and treat the soil with it.
- Steaming . Cover the top of the pan with water with a thick cloth and tie it so that it does not sag. Soil is poured onto the fabric. The pan is placed on a heating surface. When water boils, the soil begins to be treated with steam. This procedure must be carried out within half an hour.
- Calcination . Add boiling water to the soil and mix. Place a layer 5 cm thick on a baking sheet. Preheat the oven to 90-100 degrees. Place a baking tray with soil in it for half an hour.
Expert opinion
Ulanin Konstantin Grigorievich
Agronomist, work experience in the specialty - 12 years
Before planting, it is necessary to add bacterial fertilizer to the soil treated by calcination, since heat treatment kills not only harmful, but also beneficial microorganisms.
Disinfection
Preparing the soil for seedlings begins with its disinfection, during which all larvae and bacteria are removed from the soil. This procedure is carried out to prevent the death of bushes and obtain a good harvest.
You can disinfect the soil using a solution of potassium permanganate. It is prepared from several grams of the substance mixed in a bucket of water. After this, the soil should be sprayed with the resulting mixture. In addition to potassium permanganate, you can use the steaming method.
To do this, pour 2-3 liters of hot water into the pan. Then a clean cloth is attached to the top of the container, into which the soil should be poured. Place the pot with water and soil on low heat and boil for 40 minutes. Under the influence of high temperature, all pathogenic microorganisms will die.
It is also recommended to check the acidity level of the soil in advance. You can do this in several ways:
- use the services of a special laboratory and get tested there;
- use litmus paper to check;
- wild herbs are planted on the site, which do not grow in soil with high acidity.
If the acidity is too high, then I treat the soil with lime or dolomite flour. About 20 grams of substance are consumed per kilogram of soil mass.
The best compositions for tomatoes
The stores have a large selection of soil mixtures from different manufacturers. Often gardeners are faced with the question of which soil is best. Here are just some popular types:
- Soil mixture “Living Earth” . The basis of the mixture is peat. Suitable for planting seeds and seedlings for all types of plants. Can be used as fertilizer. Available in universal, special and floral types. Cost from 300 to 400 rubles per 15 kg.
- Soil mixture “Microgreenhouse” . A universal soil, time-tested. Suitable for growing any plants. With such soil, germination increases and productivity increases. Cost from 45 to 120 rubles per 10 kg.
- Agricola soil mixture . A universal soil that accumulates and partially releases nutrition to seedlings. Contains high-moor peat, which facilitates easy access of oxygen to the root system and retains moisture in the soil. The composition includes all the minerals necessary for plant seedlings. Cost from 70 to 100 rubles per 6 kg.
Soil for sowing tomato seeds for seedlings
At different periods of seedling development, the composition of the soil mixture must be adjusted. When preparing the soil for sowing seeds for seedlings, add a little more sand and less humus. The mixture for sowing tomatoes must be sifted and disinfected. The best effect is achieved by steaming in a double boiler, which kills not only pathogenic bacteria and fungal spores, but also weed seeds. It is advisable to steam the soil mixture 7-10 days before sowing so that the vital activity of beneficial bacteria in the soil is restored.
Steaming the soil for seedlings The soil for sowing tomatoes should be loose, breathable and, at the same time, sufficiently moisture-absorbing. To increase breathability after steaming, you can add dry crushed sphagnum moss (sphagnum) to the soil.
Adding Sphagnum Moss to Planting Soil If you don't have sphagnum moss on hand, you can buy a variety of raising agents at the store, such as coconut chips, perlite, or vermiculite. This will contribute to the good development of the root system of tomato seedlings.