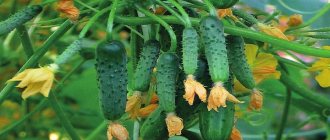
Description of the cucumber variety
The Hector F1 variety should not be pinched to enlarge the bush due to the lateral branches; the plant has an end point of growth. Due to this, the height of the bush does not exceed 80 cm. Usually the bush is female.
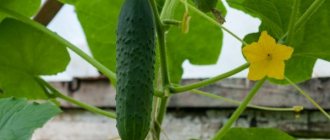
The foliage of the plant is of medium size and dark green in color. The formation of the ovaries occurs after the appearance of the fourth or fifth nodule. The variety is an early ripening variety, and all cucumbers reach their readiness almost simultaneously. The time that passes from the moment the seedling is planted in the ground until the first fruiting reaches an average of 30 days.
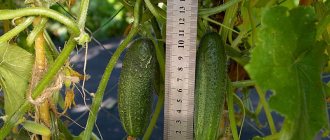
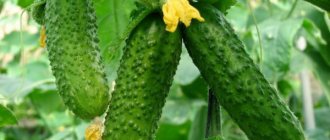
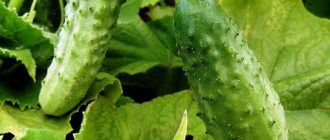
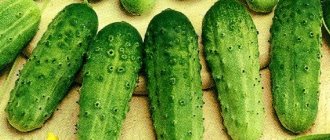
The length of the formed greens does not exceed 10-12 cm. The surface of each fruit has a white-thorned structure, large-tubercular format. They are shaped like an elongated cylinder. The average weight of each fruit is up to 100 grams. When you bite into a raw fruit, the flesh becomes crispy and juicy; the upper peel is thin, without bitterness, and has a pronounced cucumber aroma.
The main distinguishing feature of the shrub is that it has a compact size, thanks to which the plant is planted in an area with less space than other varieties.
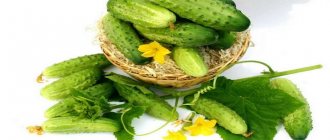
Cucumbers can be planted both for personal consumption and for sale. This is due to the fact that the fruits have an attractive presentation. They do not deteriorate over a long period of time, show good shelf life, and also have the ability to be transported over long distances. Under favorable conditions, a gardener can remove approximately 4 kg from one bush. fruits In addition, cucumbers lend themselves perfectly to seaming for the winter.
Features and general characteristics of the variety
The Hector F1 cucumber variety was bred in Holland at the beginning of the 21st century. A team of scientists from the Nunhems selective farm (Netherlands) worked on its creation. Breeders wanted to obtain an ultra-early variety of cucumbers, which would be characterized by high yields and excellent commercial qualities of the fruit. Today this variety is widespread in Europe and Russia.
Main characteristics of the Hector F1 cucumber variety:
- The variety is early ripening - the first fruits ripen approximately 1 month after seed germination.
- The bush is determinate, compact, reaches a height of about 80 cm. The leaves are dark green, medium in size.
- Each plant produces a large number of ovaries. Fruiting is consistent and lasts for 140 days, until the very beginning of autumn.
- From 1 bush you can collect up to 3 kg of ripe cucumbers. The yield per 1 m² in open ground is 3.9–6 kg, and in a greenhouse - up to 16 kg (when grown on a trellis).
- The fruits are medium in size and 10–12 cm long. The weight of each specimen is about 100 g, and the average diameter of ripe greens is 3 cm.
- The outside of the fruit is covered with a thin green skin with a noticeable layer of waxy coating. On its surface there are large tubercles on which small white spines are located.
- They have very juicy and crispy flesh with a pleasant fresh aroma. It has a dense structure and a sweet taste without bitterness.
- Hector F1 cucumbers are recommended to be consumed fresh, as well as used for preparing canned preparations for the winter.
Did you know? The name "cucumber" comes from the ancient Greek word "aguros", which translates as "unripe, unripe."
Advantages and disadvantages
In order to accurately determine the choice of planting material on your own personal plot, it is worth familiarizing yourself with both the advantages and disadvantages. The following advantages of the Hector F1 variety are highlighted:
- Increased yield from compact shrubs - up to 4-6 kg per 1 m2.
- Not susceptible to diseases: cucumber mosaic virus, olive spot, powdery mildew.
- A quick opportunity to sing: the first fruits can begin to be harvested within 30 days from planting the seedlings in the ground. But it should be remembered that the cucumber variety usually yields most of its harvest during the first 3 weeks after the start of active fruiting.
- The variety is not susceptible to short-term frosts, so many gardeners try to plant it in the first days of spring, when the return spring frosts have not yet passed.
- The bush is quite compact - thanks to this, gardeners place up to 6 seedlings per 1 m2 on their plot.
- High quality cucumbers - they not only have a beautiful appearance, but also beneficial properties. They contain a number of useful and nutritious substances.
Among the shortcomings of culture, only a few comments stand out. First of all, the disadvantage is that the planting material of the hybrid variety Hector F1 cannot be collected; the seeds should only be purchased. In this case, it is better to make a purchase in a specialized store. This is due to the fact that the seeds obtained when collected from fruit-bearing shrubs do not meet the established qualities of the variety.
The next disadvantage is the thickening of the outer peel. Such an unpleasant moment can happen if the gardener leaves the ripe fruit on the bush and does not remove it in time. The finished fruit does not outgrow under such conditions, but its peel becomes significantly thicker, which negatively affects not only the appearance of the cucumber, but also its taste.
Pros and cons of the Hector F1 cucumber variety
This hybrid is grown not only on private plots of land, but also on an industrial scale. Compared to other varieties of crops, this variety has significant advantages, which attract many gardeners.
- The advantages of the variety include:
- early ripening of the first harvest;
- self-pollinating plants;
- cold resistance;
- unpretentiousness to soil composition and care;
- good presentation and taste of the fruit;
- compact bush size;
- friendly and long-term fruiting;
- good shelf life and transportability;
- the fruits do not outgrow - their maximum size is no more than 15 cm;
- good immunity to diseases;
- versatility of fruit use;
- high seed germination.
Did you know? Cucumber pulp is 95% water.
- Despite the long list of advantages, some gardeners note a number of negative qualities in this crop:
- small fruit size;
- hardening of the peel when the fruit remains on the bush for a long time;
- high price of seeds;
- the appearance of a bitter taste in greens due to insufficient watering.
Site and soil preparation
Hector F1 cucumbers do not differ in planting and cultivation technology from other varieties of green vegetables. Therefore, first of all, it is recommended to observe the following basic rules:
- Maintain a clear distance between seedlings - place no more than 6 of them per 1 m2.
- Crop rotation is important. This type of hydride cannot be grown in areas where pumpkin crops grew in the previous growing season.
- It is recommended to always carefully monitor how the seed is planted.
Before planting, it is recommended to prepare the place where the plants will be located and check the quality of the soil. If necessary, the soil substrate should be fed.
This way, all debris is neutralized in the selected area: weeds are pulled out along with their root system, stones, branches and roots from other plants are removed. It is definitely recommended to nourish the soil with peat, sawdust and humus.
All nutrients should not just be poured on top, but dug well along with the soil.
All these manipulations should be performed 2-3 weeks before sowing seeds or planting seedlings. This is due to the fact that the soil takes time to become saturated with substances.
Watering
Like any other cucumbers, Hector F1 grows best with high air and soil humidity. Immediately before planting, about 3–4 liters of water are poured under each plant. Further watering is carried out from the moment the first ovaries appear.
It is worth noting that the first ovaries of this variety appear at a height of 4–7 centimeters literally 7–8 days after germination.
On days 18–22 after germination, the standard watering scheme is up to 12 liters per square meter. Frequency – every 5 days until the end of fruiting.
Seed preparation
Most often, seed manufacturers write on the packaging about the processing the seeds have undergone. If no such indication is found, then it is better to carry out this procedure yourself. This is required so as not to put the plant at risk in the future and worry about possible infection with pathogenic bacteria.
The seeds are usually light cream in color. If the purchased planting material is replete with different colors: green, orange or turquoise, this indicates that the seedlings have been processed and have a set of nutrients in their shells that stimulate their rapid growth and successful development.
Before planting, you should follow a special procedure:
- Calibration is a manual procedure. It involves sorting the seed into deformed, hollow seeds, as well as separating them by size. Many gardeners find that large seedlings germinate faster and better than smaller seeds.
- Quality check - after the procedure, the selected seeds should be placed in salted water and mixed thoroughly. If the seeds are healthy, they tend to sink to the bottom of the container, while pest-affected or unsuitable seedlings will float to the surface. The latter are removed from the container and thrown away. The rest are washed under running water and dried on a napkin.
- Disinfection - seedlings are heated in a container at 60 C, preferably for 3 hours. After this, you need to place the soaked seedlings in a 1% solution of Potassium Permanganate and keep it in it for half an hour. Then rinse and dry.
- Soaking planting material in nutrients for better germination of the root system, and then repeat disinfection in an infusion of wood ash. Place the seeds in a diluted solution of 2 tbsp. crushed ash for 30 minutes. Afterwards you need to dry the planting material.
- Stratification - in order for the seedlings to be powerful and strong, and most importantly, not susceptible to pathogenic microorganisms, hardening should be carried out. To do this, the seeds are laid out on a plate and placed in the refrigerator. It is necessary that the temperature does not exceed the permissible 0..+2 C. Initially, it is recommended to place them in the coldest place, closest to the freezer, and then put them on the lowest shelf for vegetables.
After completing all the procedures, the planting material should immediately be buried in the ground. This is the only way to achieve high-quality seedlings, hardened and treated against various diseases.
Timing and rules for planting seeds
You can plant seeds either to obtain Hector F1 cucumber seedlings or directly into open ground. Carry out the procedure in any case until the air temperature rises to +20 C. Most often, this moment occurs from the second decade until the end of May.
The soil is selected to be light and fertile, which can easily absorb nutrient moisture and nutritious oxygen necessary for the normal development of the root system. The acidity of the soil should be neutral. This is due to the fact that cucumbers will not be able to grow on heavy soil with a high acidity pH environment.
In addition, it is recommended to check the level of groundwater - it is considered optimal when the moisture is at a depth of no more than 1.5-2 m.
If the site has been prepared before, then the next step is planting seedlings or seed that has undergone treatment. Otherwise, dry sawdust and humus should be added to the soil. It is also necessary to introduce fertilizers: wood ash, urea, superphosphate and potash fertilizer. Everything is thoroughly mixed and evenly distributed over the surface of the area.
You can learn more about how to properly plant cucumber seeds in the ground from the video:
When planting seeds directly in open ground, follow the recommendations:
- The seeds are laid out horizontally, making sure that the sharp end points upward.
- Using your fingers, you need to carefully deepen the seed 1.5-2 cm, lightly pressing on it.
- Press down the soil on top.
- Pour the soil from a spray bottle and cover the top with film to create a microclimate for faster germination.
When the first shoots appear, you should gradually accustom the seedlings to the open air, periodically opening the film, first for a couple of minutes, then for a longer period. Subsequently, they can be fully opened when warm spring nights arrive, the air temperature will not drop below +15 C.
Planting in open ground
Before planting cucumber crops in open ground, read some tips on site preparation and technology for planting seed and seedlings.
Site preparation
Regardless of how you plant the cucumber (sowing or seedlings), you need to prepare the place. It is recommended to choose a well-lit area. The groundwater underneath must lie at a depth of at least 1.5 m from the surface. The bed should be located in the direction from north to south.
- Prepare a soil mixture from the following components:
- peat;
- sawdust;
- manure humus or compost at the rate of 1–2 buckets per 1 m2.
- Apply the nutrient mixture to the soil and dig up the area.
- Immediately before planting seeds or seedlings, fertilize the bed with a solution of cow manure (proportions for the solution: 1 part organic matter to 5 parts water). If this is not possible, then use:
- chicken manure solution (it should be prepared in the following proportion: 1 part manure to 20 parts water);
- complex mineral fertilizers.
- Level the bed with a rake.
The best predecessors for Hector F1 are lettuce, early and cauliflower, green manure (mustard, buckwheat, all legumes except beans), acceptable are potatoes and tomatoes, prohibited are melons, carrots (cucumbers can be planted in their place after 4 years) .
Direct sowing of seeds into the ground
Direct sowing of seeds is carried out from the end of May to the beginning of June, when the air temperature reaches 20 °C and the soil temperature reaches 18 °C.
- Using a hoe, make longitudinal furrows 2–3 cm deep in the prepared bed and water them well.
- Sow the seeds in moist soil (don’t forget that they should be horizontal with a slightly raised sharp end) at a distance of about 10 cm from each other. The distance between the rows should be at least 45 cm. Up to 6 plant bushes can be placed per 1 m2.
- Carefully press the seed onto the ground and lightly sprinkle it with loose, moistened soil.
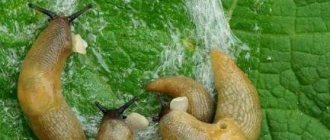
- If you are afraid that the seeds and later seedlings may be damaged by mice, ants, slugs or other pests, then sprinkle the garden bed with ground black pepper to repel them.
- Cover the bed with film to speed up the emergence of seedlings. Keep the soil moist.
Video: sowing seeds in open ground
Transplanting
The procedure for planting seedlings in open ground is best done in sunny weather in late May - early June, when the air temperature reaches at least 25 °C. The soil temperature should be approximately 20 °C.
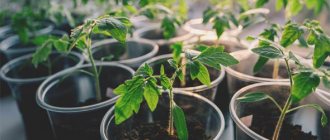
Don't forget to harden off Hector F1 seedlings before planting them in the ground. To do this, take the pots out into the open air (for example, onto a balcony or veranda) for a week, but make sure that the sprouts are not exposed to direct sunlight.
Make rows with a hoe (they should be 45 cm apart), fertilize them with an organic solution and plant the sprouts at a distance of 25 cm from each other. Seedlings in peat pots should be planted with them. In this case, it is necessary to make a hole of sufficient size so that the entire pot fits into it. If you grew seedlings in containers, then carefully remove the sprout along with a lump of earth and plant it in the ground, sprinkling only the roots, otherwise, if planted too deep, the plants may develop root rot.
Cucumber sprouts must be planted together with a lump of earth so as not to injure the root system
Basic rules of care
Like any other cucumber crop, Hector F1 needs careful care. To keep the plant healthy and produce a bountiful harvest, follow these recommendations:
- Keep the soil moist. Seedlings need to be watered in the morning and evening; the water temperature should be at least 20 °C. For 1 m2, 1.5 liters of water will be enough.
- Carefully follow the recommendations for preparing the site for seedlings. If you add all the necessary fertilizers to the soil, then additional feeding will not be needed in the future.
- Loosen and weed the beds in a timely manner.
- Try to remove yellowed leaves whenever possible and pick the fruits in a timely manner. Harvesting is carried out in the morning every 2 days.
Caring for cucumber plantings
Care Tips
To get a good harvest of cucumbers, you need to know the basic points of care:
| Action | Recommendations |
| Watering | When the fruiting period begins, nutritional moisture is extremely important for cucumbers. Watering should be regular and in large quantities. The best option for adding nutrient moisture is drip irrigation or rationed water input, regularly and on time. |
| Top dressing | The drugs used are those that do not contain nitrate nitrogen. It is recommended to use substances that contain a larger list of nutritional ingredients. Mineral fertilizers should be alternated with organic ones. |
| Weeding | It is necessary to periodically loosen, remove sprouted weeds, and eliminate possible debris located next to the root system (yellow foliage, lashes). It is recommended to thin out the plantings. |
In addition, many gardeners recommend using organic mulch when growing Hector F1 cucumbers. This is required not only to protect the plant from rapid evaporation of moisture from the soil and protection from parasitic individuals, but also as an additional source of nutrition with useful substances.
Diseases
Although cucumbers of the Hector F1 variety are not susceptible to diseases of various kinds, if not properly cared for, they tend to become infected with any disease that is inherent in the cucumber crop. The table highlights the most common diseases, their symptoms and methods of treatment.
| Disease | Signs | Treatment |
| Ascochyta blight | It affects both seedlings and adult plants, both when grown in greenhouse conditions and in open ground. Grayish-light spots form along the perimeter of the foliage, which gradually affect the entire surface of the leaf blade. Black dots are visible on them - the bodies of the fungus. There are light brown spots on the stems, root collar and young shoots. | It is recommended to avoid temperature fluctuations and water only with warm water. Plant seedlings only from trusted producers. Treat the plantings with Bordeaux mixture (1%), copper sulfate and urea. |
| Bacteriosis | Occurs on any part of the plant. Oil stains with a brown tint form. They are gradually increasing in number. In dry climates, the spots on top become crusty and fall off the bush. | When growing in greenhouses, the room should be ventilated. Disinfect seeds with Fitolavin-300 before planting. |
| Cladosporiosis | In most cases, young shoots become diseased. They become distorted and small spots of dark shades form on them. As they dry out, scabs and ulcers form. | The bushes should be irrigated with Bordeaux mixture (1% solution), and the seedlings should also be treated with a solution of copper oxychloride (0.3-0.4%). |
| Mosaic | The foliage acquires a wrinkled structure. There is a crack along the entire length of the stem. The number of female inflorescences and fruits decreases sharply. The fruits become stained and die before they ripen. | Seeds should be disinfected before planting, and all items used when planting cucumbers should be disinfected. Treatment of seeds with trisodium phosphate (15%) or potassium permanganate. Fight the spread of aphids on bushes. |
| Powdery mildew | A white coating appears on the leaf blades below. Over time, whitish round spots form on the upper part, which begin to acquire a dark tone. The foliage takes on a wavy appearance and dries out completely. | It is recommended to disinfect the seeds and spray the bushes with a soda solution and some laundry soap. The chemical preparations Baktofit and Pseudobacterin-2, Topaz, Cumulus, Novosil also have an effect. |
To prevent cucumber crops from being infected by pathogenic bacteria, it is worth constantly monitoring the plants. When the first signs of the disease occur, it is necessary to take action immediately, and not wait for further developments.
Planting and care
The same conditions are suitable for growing the crop as for any other hybrid cucumbers. The recommended scheme is 3-4 bushes per square meter. However, the Hector F1 variety tolerates planting thickening up to 12 seeds per square meter.
When planting a variety under trellises in greenhouse conditions, the recommended scheme is:
- 25-35 centimeters between bushes;
- 70-80 centimeters between rows.
One of the key advantages of these cucumbers is that they do not outgrow. The maximum length of the fruit reaches about 15 centimeters, after which the skin simply thickens. A bitter taste will only be present if there is insufficient watering.
Pests
In addition to diseases, harmful insects can settle on Hector F1 cucumbers. Some varieties quietly settle on shrubs and carry out their activities covertly, completely suppressing the plant. The most common pests are listed in the table.
| Pest | Symptoms | Struggle |
| Nematode | A parasitic worm of miniature size that damages the root system. Growth is inhibited, the leaves turn yellow and droop, and when the plant is removed from the soil, thickening will be noticeable on the root system. | Spraying with chemicals is carried out: Dimethoate, Rogor, BI-58, Metarizin, Pecilomycin. |
| Aphid | Inflorescences fall off, leaf blades lose strength and elasticity, leaves dry out, and settlements of small green insects appear on the back of the leaf. | Insecticides used: Commander, Iskra, Karbofos, Bicol, Fitoverm, Biotlin. Soap-ash infusion also helps. |
| Whitefly | A midge with a milky body that feeds on the juice of leaves. Whitish dots form on the leaf. | The following drugs are used: Actellik, Fitoverm, Confidor, Verticillin, Aktara. |
If any signs of the presence of harmful insects are detected, therapeutic action should be started immediately. Only timely spraying against pests allows the bush to be preserved.
Video on how to properly care for cucumbers in open ground:
Sowing
Seeds are planted in open ground to a depth of 2–4 centimeters. The “ideal” planting scheme, according to the manufacturer’s instructions, is 50x90 centimeters in open ground, and 60x120 in greenhouses without trellises. It is not necessary to pre-soak the seeds for germination. For better resistance against infections, you can treat with a 1% solution of potassium permanganate.
If the seeds are initially planted in saturated soil (that is, in cups or special “honeycombs”), then it is also recommended to treat them with preparations such as “Baxis” or “Fitosporin” - this will significantly reduce the likelihood of root rot or bacteriosis.
Reviews from gardeners about the variety
The Hector F1 variety of cucumbers is popular among gardeners. Almost all reviews about the plant are positive.
Viktor Grigorievich, 58 years old, Perm: “I have been growing cucumbers for a long time. I tried different varieties, but I like Hector F1 the most. The downside, of course, is the inability to get seeds yourself, but the harvest from several bushes pays for any growing costs.”
Margarita Semyonovna, 46 years old, Krasnodar: “My friend recommended Hector F1 cucumbers to me; she very much praised the resulting harvest both in appearance and taste. I decided to try it and planted it as seedlings. The first harvest pleased me. All the fruits are as smooth and neat as a selection. The main thing is that they ripen all together and in large volumes.”
Evgeniy Sergeevich, 49 years old, Pyatigorsk: “I saw an article about cucumbers in a magazine and decided to try it. I planted it and got the first harvest on the 28th day after planting the seedlings in open ground. During the entire period of cultivation, I did not encounter the problem of infection with diseases and pests. Due to the large harvest, some had to be transported to relatives 100 km away. The cucumbers withstood transportation perfectly. I'm happy with the variety."
Thus, cucumbers of the Hector F1 variety are distinguished by their compactness, external appearance and good transportability. The most important thing for growing crops is to know how to plant seeds correctly so as not to disturb their growth quality and how to care for adult plants.