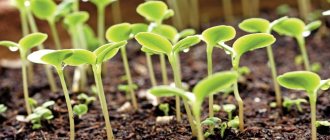
When growing tomato seedlings, you can come face to face with various problems. For example, the following story may happen: you prepared a soil mixture, container, seed, planted tomatoes, and now you are waiting for seedlings, but they do not sprout, or the seeds take a long time to germinate, unevenly, only single plants appear. The problem is really unpleasant, because if there are no shoots for a long time or very poor germination, you will have to sow the seeds for seedlings again. Let's figure out why this happens, what to do in such a situation and how to avoid it.
Note! The normal germination time for tomato seeds is 7-10 days. If after 12 days you have not seen shoots, then most likely you will not wait for them anymore. In this case, it is recommended to sow again according to all the rules.
What to do to help tomatoes
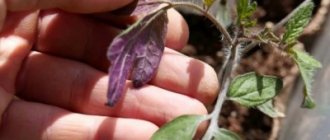
If there are a small number of seedlings with a shell on the leaves, you can do nothing, and everything can be attributed to natural selection. Its essence lies in the fact that if the sprout does not have strength at a very early stage, then later the seedling will lag behind in growth and the harvest from it will not be very rich. However, if seedlings appear in large numbers with skins on the leaves, and it is not possible to plant a second time, then the tomatoes will have to be helped.
It is important to know. You cannot pick off the shell with your nails or pull it off with your fingers. This is due to the fact that the leaves are very delicate, and you can accidentally tear them off the stem, but the film will never be removed.
To avoid damaging the seedlings, you will need a pipette or syringe, as well as warm water to pour over the shell. It is enough to wait a little for the seed to soften. Remove the peel very carefully using the blunt end of a needle or a toothpick. If it doesn’t work the first time, it is recommended to moisten the shell again; you can even cover the seedlings with a bag for several hours to create a greenhouse effect. These measures should help.
Incorrect growing conditions for tomatoes
It turns out that illiterate cultivation of tomatoes can affect their future “well-being,” including in terms of untimely emergence of sprouts from seeds.
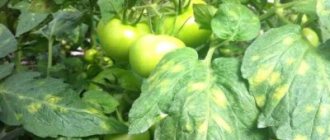
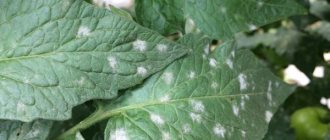
The most dangerous thing in this case is “overfeeding” growing tomato bushes with nitrogen fertilizers (as in principle any unbalanced diet) or growth stimulants - a ripe fruit oversaturated with such substances from the outside becomes an excellent “springboard” for premature seed germination. Tomatoes grown using hydroponics technology are especially at risk, where it is especially easy to upset the balance of water and fertilizers.
Are you delayed in harvesting? It is also quite possible to wait for tomato seeds to germinate in fruits directly on the bushes. Especially if autumn is very warm, humid, and light. Or in the case when overripe tomatoes still hanging on the bush survived the first sharp cold snap, and then again found themselves warm under the capricious autumn sun - remember what we said above about the state of cold dormancy.
- Growing tomatoes in open ground: planting, care and harvesting
How to properly grow tomatoes in unprotected soil?
Prevention
To avoid unnecessary problems with seedlings, it is recommended to choose seed material as responsibly as possible and follow the rules of sowing:
- Do not use old and overdried seeds. Tomatoes retain their ability to germinate for 7 years, but much depends on how the seeds are stored and what their original quality was. When preparing your own seed material, it should be used in the near future. If the purchase is made in a store, then you need to carefully check the expiration date indicated on the package;
- When preparing the soil for seedlings, you do not need to make it very light and add peat in large quantities. It is recommended to mix the substrate with turf, leaf soil and humus. Additionally, you can compact the soil a little with your hands;
- When deepening the seed material, it is worth remembering that the optimal depth for tomatoes is 1 cm. Before sowing the seeds, it is recommended to soak them to soften the seed coat and accelerate germination;
- If there is dry air, it is worth covering the heating devices. Some gardeners use household humidifiers; this useful device greatly facilitates the life of seedlings;
- the soil in containers with seedlings must be moistened, even in the absence of seedlings. It is best to use a spray bottle for watering, but it is important to take precautions so that the ground does not get too wet;
- It is recommended to remove covering materials only when seedlings appear. Seeds will germinate successfully if the tomatoes are provided with suitable microclimatic conditions.
Helpful advice. If there is any doubt that the planting material is not of very high quality, and the seeds look very dry, then they should be soaked not in an aqueous environment, but in solutions that stimulate plant growth.
Method for germinating seeds using toilet paper
The option of germinating tomato seeds using toilet paper is quite original, simple, and minimal in financial and time costs. The advantages of this method are as follows:
- toilet paper contains the minimum substances necessary for the germination of grains;
- minimal care for seeds (no need for fertilizer or fertilizing).
In order to obtain sprouts from tomato grains using toilet paper, you will need a plastic bottle/glass, plastic film (or several bags) and a roll of toilet paper:
- Cut strips of polyethylene 10 centimeters wide so that the seeds are placed in one row.
- Lay a strip of toilet paper on each strip of film, maybe in two layers, moistening it with water.
- Place the tomato seeds on the paper so that the distance between them is 2-3 centimeters.
- Lay down another layer of toilet paper moistened with water, and cover with a strip of film on top. Roll these ribbons into rolls and wrap them with an elastic band.
- Place the resulting rolls in a plastic glass with the seeds facing up and pour in water so that it does not touch the grains themselves. Leave the glass in a warm place for several days. The future seedlings will be enriched with oxygen from the air, and will receive moisture from wet toilet paper. As a rule, with this method, the first shoots from the seeds appear on the seventh day.
It is possible to use a plastic bottle cut lengthwise. Place two layers of toilet paper at the bottom, generously moistened with water. Lay out the tomato seeds and wrap the bottle tightly with cling film, making holes in several places, and leave the resulting structure in the sun. Thus, oxygen enters the container and creates a greenhouse effect, in which seedlings will appear already on the third or fourth day.
The process of spreading tomato seeds on toilet paper for further germination is shown in detail in the following video:
Useful tips
To achieve good results in germinating seedlings with seedlings, you should use some tricks:
- Before planting, seed material must be sorted out and unsuitable seeds must be discarded. Seeds that have the following deviations are not suitable for planting: small size, damage, dried out specimens.
- To simplify the work, it is recommended to prepare a saline solution (1 teaspoon of table salt per 250 grams of water. Dip the seed material into the solution for half an hour. Those seeds that sink to the bottom can be planted, and those that float up should be thrown away. Seeds that have been in salt are Be sure to rinse with clean water.
- Manganese solution is needed to disinfect seeds; it is also recommended to use “heteroauxin”; it strengthens the immune system of plants and makes them stronger.
- A number of crops are grown with preliminary germination of seed material; you don’t have to do this with tomatoes. If everything is done correctly when planting, the seedlings appear simultaneously and in a very short time.
- Pelleted seed material does not need to be pre-prepared. Under the shell there are disinfectants, as well as nutritional components, thanks to which the plants will grow well and remain healthy.
- After disinfecting the soil that will go into the seeding container, it is recommended to place it in a room at room temperature for 14 days. This period is enough for the proliferation of beneficial microorganisms living in the soil.
- If, before the seedlings hatch, the soil becomes waterlogged and mold appears on it, then the top layer must be removed and “phytosporin” or potassium permanganate in the form of a solution used to disinfect the soil.
- Seedlings need to be kept in a place with sufficient sunlight; in its absence, additional lighting is used.
- To prevent bending and stretching of seedlings, the container with plants is periodically turned with different sides towards the window.
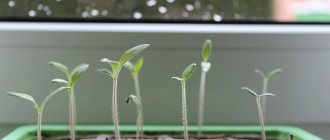
Caring for tomato seedlings after germination
Specific moments of seed germination
In order for the seeds to hatch and sprout more quickly, they must be kept in a humid environment for a certain time. Let's look at the process of soaking and germinating seeds before sowing in the ground:
| Procedure | What is it for? | What's the point |
| Soaking the seeds | It is necessary for the speedy emergence of seedlings and disinfection of seeds. | To soak, take a piece of cotton cloth and place it in a not very deep plate, pour purified water at room temperature and place tomato seeds on the cloth. Cover the grains with another piece of clean cloth so that the entire layer of cloth and its contents are in the water. Place the plate with the seeds in a warm place. The option of soaking in sawdust is possible. |
| Germination | Makes it possible to select the strongest shoots for planting in the ground. | During the germination of tomato seeds, make sure that the cloth is always damp and add a little water. At the same time, the presence of a large amount of water is not allowed when the seeds simply float on the surface. In this case, they will simply deteriorate and rot. To make the grains germinate faster, you can add special agents to the water that stimulate plant growth. |
A tomato seed is ready to be planted in the ground when the length of the sprout and the size of the seed itself are the same.
As you can see, soaking and germination are two procedures that are closely related to each other. After the beginnings of shoots have appeared, you can plant the sprouted grains in previously prepared soil and containers.
Why collect your own tomato seeds?
The low quality of purchased seeds is the reason why more and more gardeners are switching to their own seeds
Most often, purchased seeds germinate very poorly and not amicably (probably everyone has experienced this), and the plants are quite far behind in growth compared to those obtained from their own seeds.
Most often, purchased seeds germinate very poorly and not amicably (probably everyone has experienced this), and the plants are quite far behind in growth from those obtained from their own seeds
But it’s no secret that strong seedlings are the key to a bountiful harvest. In addition to poor germination, seed producers sin by over-grading, and as a result, a novice gardener gets a completely different result than what is depicted on a colorful bag of seeds.
Many gardeners collect seeds themselves, thus saving nerves and money, because next year they will be absolutely sure of the result
Therefore, many gardeners collect the seeds themselves, thus saving nerves and money, because next year they will be absolutely sure of the result - excellent tomatoes will grow from their seeds.
Just don’t collect seeds from plants grown from F1 hybrids
Just don’t collect seeds from plants grown from F1 hybrids (see the article F1 tomatoes - what does F1 mean in the name of the variety?), you won’t be able to get any predictable harvest from these plants.
To collect seeds, select the most beautiful tomatoes from the strongest bushes
This is necessary in order to get tomatoes with the best set of genes next year, this is exactly how selection took place over the centuries - people collected seeds only from the largest and most delicious plant fruits.
This is exactly how selection took place over the centuries - people collected seeds only from the largest and most delicious fruits of plants.
Ripe the tomato on the windowsill until it becomes completely soft (just leave it on the windowsill - it will ripen on its own). To get easy access to the seeds, cut the tomato in half, so that the top, which attaches the tomato to the branch, is on one side, and the bottom is on the other. Scoop out the seeds with a spoon into a bowl. Don't forget to sign the variety!
How to collect your tomato seeds?
In order to get your tomato seeds, you will have to work a little.
The seeds inside the tomato are stored in the seed coat, which contains inhibitors, substances that slow down the development of the seeds and prevent them from germinating inside the fruit.
The seeds inside the tomato are stored in the seed coat, which contains inhibitors, substances that slow down the development of the seeds and prevent them from germinating inside the fruit. In nature, after ripening, the tomato fruit rots and decomposes, and the seeds, no longer restrained by inhibitors, germinate.
In nature, after ripening, the tomato fruit rots and decomposes, and the seeds, no longer restrained by inhibitors, germinate
In order to collect your tomato seeds, you need to artificially speed up this process.
Tomato seeds must go through a fermentation process
Fermentation helps separate the seeds from the pulp and destroy any remaining inhibitors that prevent germination.
Fermentation helps separate the seeds from the pulp and destroy any remaining inhibitors that prevent germination.
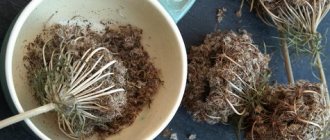
Place the seeds in a small jar, add a little water so the seeds float freely, and cover the jar with gauze (this will prevent flies). After 2-4 days, fermentation will be completed, and the mixture itself will look and smell not very pleasant (most likely a film of mold will even grow on its surface) - this is normal.
When the fermentation process is complete, the seeds will settle to the bottom
You should not leave the seeds in this state for longer - they may begin to germinate.
Good seeds will sink to the bottom, but empty ones will float to the surface
Remove the layer of mold, add water and shake the jar a little - this will make it easy to drain all excess, because good seeds will settle to the bottom, and empty ones will float. Then place the seeds in a colander and rinse well under running water.
The final stage is drying the seeds
Place the seeds on a saucer or cling film and place in a warm, dry place where they can dry completely.
Do not use paper for drying - the seeds may dry to it, and subsequently it will be quite difficult to separate them
Do not use paper for drying - the seeds may dry to it, and subsequently it will be quite difficult to separate them. The seeds can be stirred every few days so that they do not stick together and dry evenly. Do not heat the seeds with heat sources to help them dry out faster.
Seed storage
Use envelopes or paper bags that allow air to pass through.
Use envelopes or paper bags that allow air to pass through
Seeds should be stored in a cool, dry place. Don't forget to write the year you started storing and the variety.
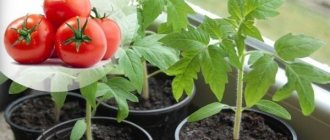
How to properly plant tomatoes for seedlings: step-by-step instructions
The timing of planting tomato seeds for seedlings without picking is late (late spring). In this case, they are sown in separate containers, each seed in its own peat or plastic cup.
If you plan to plant seedlings, then all the seeds are sown in one common container with soil in February. At the same time, be sure to mark the rows with different varieties so as not to get confused in the future. The harvest with both methods is obtained simultaneously, since in the first case the seeds are sown later.
Sowing in a common container
- A small layer of drainage is poured into the prepared and disinfected box. This can be either fine gravel, expanded clay or broken ceramic shards. The selected soil is poured over the drainage layer and watered well until completely soaked. It is advisable to fill containers 2-3 days before the intended sowing.
- In the disinfected soil, grooves are made at a distance of 3 cm and a depth of up to 1 cm.
- The sprouted seeds are placed in the recesses, keeping a distance of 1–2 cm between them.
- The seeds are sprinkled with a layer of soil up to 1 cm on top.
- Cover with glass or plastic wrap and place the container in a warm place. Until the first seedling loops appear, lighting does not matter.
In separate containers (without picking)
Those who do not like to pick up seedlings like to sow in separate cups. They must have drainage holes.
Germination of tomato seed
First of all, you need to select suitable seed material . Regardless of whether the seeds were purchased in a store, bought “from hand” or prepared for storage on their own, some batches will be the most viable, while others may contain a high percentage of weakened and even so-called “empty”. To check this, they are tested for germination, live ones are selected and calibrated (evaluated by size and appearance).
Then the seeds are processed: disinfected, hardened and fortified, after which they proceed directly to germination. To do this, you can use cloth, gauze or, for example, cotton pads. Some vegetable growers use paper napkins.
Reference. Factory-produced seeds that are turquoise, blue or green have already undergone all the necessary preparation and do not require additional processing.
The damp seed lining is placed in a plastic container or covered with polyethylene and left in a well-heated room for several days, usually 3-4. The appearance of small sprouts means the seeds are ready for planting.