Advantages and disadvantages of the method
The method of growing tomatoes in buckets has been used since 1947-1950. At this time, buckets without a bottom were used as containers. Then the method was undeservedly forgotten and only 10 years ago it again became popular among amateur vegetable growers. The harvest obtained by this method is no worse than when cultivating plants in the usual way. The technology has many advantages compared to the traditional method of agricultural technology.
- The soil in the bucket heats up quickly, which speeds up the growth of tomatoes. In metal containers and black containers this process goes even faster.
- Water and fertilizers are not wasted, the plant receives them completely.
- Diseases from the soil cannot harm tomatoes.
- The plantings are portable; if there is a threat of frost, they can be removed to a heated room.
- No need to waste time weeding.
- The stems of the bushes are strong and thick, and the fruits are larger than those of plants grown in beds.
- The main advantage is that the fruits ripen 2-3 weeks earlier.
There are very few disadvantages. The technology requires at the initial stage more labor than the usual method of growing crops; the soil in buckets has to be changed annually.
How to care for plantings
Caring for plantings in a bucket does not differ from the agricultural practices of plants planted in an open ridge. The greenhouse with buckets placed in it must be regularly ventilated.
Seedlings should be watered under the root system in moderation. In a bucket, the liquid does not spread, as in the beds, which contributes to its even distribution.
The advantage of this landing
Important! When watering, water should not fall on the stem part and foliage.
The limit of permissible soil temperature is considered to be 30°C. If the weather is too hot, the planting containers can be placed in a shady shelter.
What varieties of tomatoes can be grown in buckets
You can grow tomatoes of any type in buckets: low-growing and tall.
For outdoor cultivation, varieties with a compact root system and not too spreading bushes are most suitable. The use of early ripening varieties will make it possible to obtain a harvest 3 weeks ahead of schedule. You can take cherry tomatoes.
If you plan to put a bucket in a greenhouse, then indeterminate (tall) varieties such as Yantarevsky, Egyptian Giant, Giant Novikova or Miracle of the Earth are suitable for planting. This will allow you to get a large harvest from 1 square meter.
Advantages and description of the method of growing tomatoes in a barrel
What are the advantages
What are the advantages of doing growing tomatoes in buckets or in a barrel is not at all a secret or secret
If you watched a video on this topic or a photo, you noticed that this method of growing will not take up much space in your garden. The diameter of the occupied area is approximately one meter, the height of the occupied space will be approximately one and a half meters
For tomato harvests to be fruitful, you need to be well prepared. And it is not at all necessary to look at photos or videos with lessons on caring for tomatoes, since all the necessary information can be read in this article and all you need to do is remember the information and put it into practice.
A prerequisite for a good harvest is timely and good watering of the plants.
Watering will be more convenient when using hoses with a metal tip. If you lower it deep into the ground, it will be most effective.
Description of the method
To install tomato bombs in your garden, you can use both metal and wooden barrels or buckets turned upside down. The description of the method does not represent any specifics. You can use different varieties of tomatoes, including early ripening, high yield, low foliage, which will withstand dense planting, and even those that do not need to be tied up, because they grow, as they say, upside down.
Scheme of a barrel for growing tomatoes upside down
The basis of this method is that you take an old metal barrel or bucket and place it upside down with fifteen to twenty holes punched in it or in it. The approximate diameter of the outer side of the barrel is from forty to sixty centimeters. You can also make such a container out of wood. You can take a tub made of wood, its size should be about a meter by meter and the same height, and install it upside down. Due to the fact that the container will not have a closed bottom, it will be easier for worms to get through and excess liquid and moisture will not stagnate.
For good ripening of the plant and a prolific harvest of tomatoes, which are planted upside down, the soil in the barrel must be filled with humus. You can plant different varieties of tomatoes, but it is advisable to use low-growing ones with this method.
How to care
How to care for plants if you decide to grow tomatoes in buckets or barrels in your garden? Here it is important to adhere to at least the most basic recommendations so that your harvest is no worse than what you expected, or even better than what you looked at in the video. Approximately at the beginning of the last spring month, plant one tomato seedling in the center of your barrel
Its planting depth is sufficient at five centimeters. Cover the top with plastic wrap so that the plant does not die from the cold at night. From all the prepared seedlings, select the strongest shoot of the seedling. Tear off its lower leaves, after two or three hours, cover it with soil to a height of about ten centimeters. After a certain period of time, the process will grow, and then repeat the previous operation. And do this procedure until your barrel is completely filled with the soil mixture. This will tentatively be at the beginning of summer. Then you don’t have to cover the barrel or bucket with film anymore.
Approximately at the beginning of the last spring month, plant one tomato seedling in the center of your barrel. Its planting depth is sufficient at five centimeters. Cover the top with plastic wrap so that the plant does not die from the cold at night. From all the prepared seedlings, select the strongest shoot of the seedling. Tear off its lower leaves, after two or three hours, cover it with soil to a height of about ten centimeters. After a certain period of time, the process will grow, and then repeat the previous operation. And do this procedure until your barrel is completely filled with the soil mixture. This will tentatively be at the beginning of summer. Then you don’t have to cover the barrel or bucket with film.
Some tips:
- There is no need to stepchild from the very beginning of summer. You should get as many bunches of tomatoes as possible.
- The humidity of the mixture inside the container should be maintained at sixty to seventy percent.
- From mid-summer, you need to feed your plants with nutrients once every two to three weeks.
Video “How to grow early tomatoes”
The recording shows an unusual way of growing tomatoes.
plodovie.ru
What buckets can I use?
To grow tomatoes, use buckets of any shape with a volume of at least 10 liters so that the plant has a sufficient feeding area. We use crumpled, broken buckets with chipped enamel, no handles, leaking buckets, wooden bath tubs for water that are out of order.
It is better to use metal containers, since plastic does not like temperature changes and can withstand 1-2 seasons, and the tubs can dry out and fall apart. It is necessary to make a sufficient number of holes in the bottom for good drainage of excess water during watering.
Interesting Facts
Also, to grow tomatoes in this way, you need to know the following information:
- The leakier the bucket, the better. This applies to those buckets that are buried in the soil. Thus, the roots of the tomato can penetrate through the holes into the soil and extract moisture.
- The high yield of tomatoes in buckets is also explained by the fact that the root system is close to the walls of the bucket, which warms up very quickly in the sun. And as you know, the yield of tomatoes directly depends on heat.
- Metal containers warm up faster and are also more durable and durable. Experienced gardeners advise using them for growing tomatoes.
Preparing buckets for planting tomatoes
Buckets begin to be prepared for spring planting of tomatoes in the fall, from the end of October, beginning of November. The following activities must be carried out.
- Make holes in the bottom to prevent water from stagnating.
- Buckets should be washed thoroughly, especially if they previously contained cement or paint.
- Expanded clay or small stones are poured onto the bottom in a layer of 2-3 cm as drainage.
- Pour in the soil mixture and mix thoroughly.
- Water with warm water, but not boiling water, and leave in the greenhouse until spring.
- In winter, snow is regularly poured into buckets on top so that by spring the soil is well saturated with melt water.
What is the advantage of planting tomatoes in buckets, what are the nuances of caring for them using this method - see this in the video.
How to grow a tomato plant in an upside down bucket
This growing method was invented by gardeners from Europe. In our country, this technique has been simplified, but it has not become less effective.
Gardeners who have already used this method claim that its use has a positive effect on productivity and also helps to save usable space in a small summer cottage. A hanging container can be placed in a place not suitable for planting. In addition, tomatoes grown in buckets can serve as a decorative element in a summer cottage.
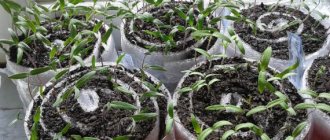
Growing seedlings
To grow seedlings, choose large seeds without black spots and mechanical damage. First, they are disinfected in a medium-pink solution of potassium permanganate for 15 minutes, then soaked in water for 1-2 days until they swell, wrapped in a cloth or gauze.
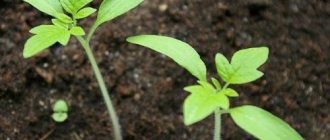
Sow the seeds in seedling boxes or pots to a depth of no more than 2 cm and place in a warm place until shoots emerge. As soon as the first shoots appear above the ground, the seedlings are moved to a well-lit place.
The best temperature for growing seedlings is 18-21°C during the day, 15-17°C at night. At higher temperatures, the stem may stretch.
Picking (transplanting) is carried out when the tomato has 2 true leaves. The stem is buried in the soil to the lower cotyledon leaves. Fertilizing is done on the 10th, 20th day after emergence and a week before planting in a permanent place. By the time of planting in a permanent place, the plant should have from 7 to 12 leaves.
Seed preparation
Before sowing, the seeds must be carefully sorted, leaving only large and undamaged ones. You can purchase such seeds in a specialized store or prepare them yourself. To do this, several large and ripe tomatoes are left in the fall. Last year's seeds are best suited for growing seedlings.
Attention! If you use purchased seeds, pay attention to the expiration date. The older the seed material, the worse the seedlings will germinate.
Self-prepared seeds should be thoroughly heated with a lamp. The seeds are also pickled with a solution of potassium permanganate. Purchased seeds are most often already processed.
How to plant tomatoes in buckets
In buckets, the earth thaws and warms up earlier than in the beds, therefore, if it is possible to bring the buckets into a warm room during frosts, you can start planting seedlings earlier than in the beds; if this is not possible, then the procedure is carried out in the standard time frame .
For temperate climates, this is the beginning - mid-May for plants that will be grown in greenhouses, and the end of May - early June for open ground.
For planting, choose a warm day so that the soil in the buckets warms up better and begin replanting the tomatoes.
- Make a hole 15 cm deep in the middle of each bucket.
- The pits are shed with a very warm (50-60°C) solution of potassium permanganate, diluted at the rate of 1 g per 10 liters.
- After 10 minutes, seedlings are planted in the holes. Half an hour before this, the sprouts are watered generously. Plant 1 tomato bush in 1 bucket.
- The stem is buried in the soil up to the lower leaves, so the plant will form more roots and it will get food for itself faster. The soil around the stem is lightly compacted.
- The soil in the bucket is carefully watered with warm water (30-36°C) so that a crust does not form. If it is not very hot outside, then the next watering is done only after a week, simultaneously with fine loosening of the soil.
Growing technology
You can grow tomatoes in both metal and plastic buckets with a volume of at least 10 liters. You can take old, deformed containers. It must be remembered that the black and dark brown color of the container will heat up more strongly in the sun, which will have a bad effect on the plant. Therefore, buckets of this color need to be wrapped in light-colored material.
Numerous holes are made at the bottom of the prepared container. Excess moisture will escape from the holes made. One sprout is planted in each bucket.
In the last days of October, a mixture of humus and wood ash is poured into a bucket and watered. The ideal option would be to take the land where cucumber beds used to grow.
Buckets are placed in neat rows in a greenhouse or dug into the ground in a garden plot. It is recommended to ensure that there is always snow in the buckets throughout the winter. It saturates the soil well.
Snow melts in buckets much faster than in beds. In addition, the earth warms up faster, so seedlings can be planted much earlier.
Some gardeners come up with other ways to grow tomatoes in buckets in a greenhouse. Growing tomatoes with the root system up is popular. To do this, select a bucket, make a hole at the base through which the seedling is pulled. The roots are covered with earth and compacted.
Read also: Apple tree Antonovka Dessert - reviews about the variety, description, photos
This method allows you not to resort to weeding and loosening during cultivation. The bucket can be hung anywhere, thus saving space, which is always in short supply.
Caring for tomatoes in a permanent place: greenhouse or open ground
Caring for seedlings in a permanent place is almost no different from standard activities when planting tomatoes in the usual way.
- Plants need to be watered abundantly, but not too often, especially in wet weather. It is necessary to ensure that the top layer of soil does not dry out and a crust does not form on it. Watering is done at the root.
- Immediately after watering, the soil is carefully loosened to improve the access of oxygen to the soil. At the same time, emerging weeds are removed.
- If tomatoes are grown in a greenhouse, it must be ventilated regularly. The optimal temperature for tomatoes during the day is 21-25°C, at night 16-19°C, humidity 62-65%.
- Many varieties need to be pinched in time, leaving “stumps” 2-3 cm high.
During the growing season, 3 root feedings are carried out:
- 10 days after transplanting the sprouts into buckets. In 10 liters of water, dilute 0.5 liters of liquid mullein and 1 tbsp. l. nitrophoska. Water at the rate of 1 liter per bush.
- The second is carried out after another 10-12 days. 1 tbsp. l. complex fertilizer and 1 tsp. potassium sulfate is diluted in 10 liters of water. 1 liter of liquid is poured under 1 plant.
- The third feeding is done 14-16 days after the second. 2 tbsp. l. wood ash and 1 tbsp. l. superphosphate is diluted in 10 liters of water. Pour 1.5 liters under the plant.
- It is difficult to do a complete hilling of bushes in buckets, so it is necessary to at least partially carry out this procedure.
- The garter is done no earlier than 10-15 days after planting in a permanent place. For indeterminate varieties earlier than for determinate bushes.
- When tomatoes are affected by late blight (signs are brown spots on leaves and fruits), the plants are first fed with potassium and phosphorus fertilizers, then treated with Bordeaux mixture, and a week later with a solution consisting of 200 g of garlic minced through a meat grinder, 3 g of potassium permanganate and 1 tbsp. l. liquid soap diluted in 10 liters of water.
The bucket method of growing tomatoes is one of the best alternative ways to cultivate tomatoes. It allows you to get juicy, fleshy fruits with thick skin that are not prone to cracking. It has proven itself when used both in greenhouses and in open ground, and the crop ripens 2-3 weeks earlier than usual.
Plant care
Caring for tomatoes planted in buckets is easier and requires less time; the basic care processes are the same as for tomatoes in regular beds:
- Watering. Carry out every 2-3 days, but do not flood the soil; water only at the root or (if the buckets are buried in the ground) near the container.
- Fertilizer and top dressing. The main dose of organic matter and mineral fertilizers is applied before planting seedlings, fertilizing is done 1-2 times a month, increased up to 3 times during the period of active fruiting.
- Weed removal and loosening. The simplest job, since there are practically no weeds in the buckets. It will be more difficult to loosen the soil when the bush grows significantly. You will need to remove the lower leaves and tie up the decaying branches around the circumference, at least for the duration of loosening.
- Removing stepchildren. It is carried out in the same way as during a normal landing. They are removed without allowing them to grow more than 5 cm. In varieties that do not require the removal of stepsons, this work is completely eliminated.
- Prevention from diseases and pests is carried out identically to ordinary beds, in early spring - after planting seedlings, before and after flowering.
Easy to care for during hot or rainy days, plants in buckets can be easily moved under a shed or into a greenhouse.