Vegetable growing » Garlic
0
2083
Article rating
Kira Stoletova
Many summer residents grow such a well-known seasoning as garlic in their gardens. At the same time, you can plant it with seeds and cloves. Growing garlic from bulbs, or seeds, is not known to everyone. This is one of the main ways to obtain a large garlic crop, grown for the purpose of propagating the garlic variety.
Rules for growing garlic from bulbs
Planting material: preparation and storage
Many people are interested not only in when to collect puffed garlic, but also in how to properly store it. After all, the quality of the future harvest depends on proper collection and storage.
It is recommended to prepare planting material when arrowheads appear on garlic bulbs. It is not recommended to harvest the plant earlier, since only 5–10 teeth will form on it. This number of cloves is not enough to obtain a good harvest. When the arrows appear, the number of teeth being formed increases to 50–70 pieces.
All collected planting material must be properly stored. There are several common methods for storing garlic.
In flour
Some people prefer to store the finished onion in flour. This storage method is used to protect planting material from high humidity. When using this method, add a small layer of flour to the bottom of the saucepan. Then the heads of garlic are placed in it, which are sprinkled with flour on top.
In the ash
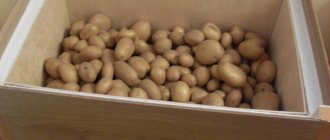
For long-term storage of very small bulbs, you can use ash. To do this, pour a layer of ash 2-4 cm thick into a small box, after which a layer of garlic heads is placed tightly on top. When all the heads are placed in the container, they are re-sprinkled with ash. Bulbs prepared using this method must be stored in a room with a temperature of at least 20 degrees.
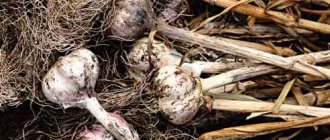
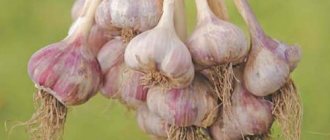
Garlic bulbs - what are they?
Bulbs are small cloves of garlic that form at the very top of the bulb in a translucent box.
They appear in early summer and are often removed by summer residents as unnecessary. These are the vegetative organs of the plant that take part in the reproduction process of garlic. Some gardeners call them seeds. This is not entirely correct from a botanical point of view, since the plant does not bloom. However, this definition is often used among summer residents.
Right time
When the garlic bulbs ripen, they can be planted in the ground. Most often, gardeners do this in the fall or spring. At the same time, experienced people prefer spring planting, since in the fall the soil may be frozen and this will negatively affect the cultivation of garlic. However, sometimes it is not possible to plant a plant in the spring and you have to do it in the autumn. In this case, the beds are covered with dry leaves and branches. To better retain heat in the top layer of soil, the beds are mulched with straw or sawdust.
See also
When do you need to harvest winter garlic in Siberia and the regions? Read
If you decide not to plant the plant until spring, collect all the garlic bulbs, sort them and transfer them to plastic containers in February. When examining the bulbs, you need to pay attention to their condition. Among them there may be empty and small garlic heads, which are better to get rid of, as they will not germinate.
When to plant garlic bulbs
This is the most pressing question for beginning gardeners and not only. The best time for this is in Kuban the last days of October - the first half of November, and in central Russia - the last days of September - the first half of October. But, of course, consider the weather conditions of your region.
Calculate the time so that you have about a month left before the onset of frost. Thus, the bulbs will be able to adapt well to the soil, take root, but not grow. Don't forget about a layer of mulch. In addition to leaves and hay, it can be humus or peat. Snow that falls in winter will act as an additional blanket for garlic, which will protect it from temperature changes, and with the arrival of spring it will become a source of necessary moisture.
To avoid infection of garlic with fusarium, it is highly not recommended to plant it in the place where tomatoes or potatoes previously grew. But peas, beans, spicy perennial herbs, all varieties of cabbage, green manure or pumpkin crops are the most favorable predecessors for it.
Remember that planting garlic bulbs should not be done in soil treated with fresh manure. Loose soil with a neutral pH (6.5–7.5), saturated with nutritional components, is best suited for these purposes.
In general, garlic is an unpretentious crop and grows well with normal care and “standard” preparation of the land for planting. If you want to achieve better results, then take care of preparing the beds in advance.
Land preparation, planting garlic, care:
- In summer, choose a sunny and windless area, which should be kept under black steam before planting garlic (regularly loosen the soil, remove weeds, moisten if necessary).
- About 10 days before sowing the bulbs, fertilize the soil with wood ash, humus, as well as mineral (potassium sulfate) and phosphorus (superphosphate) fertilizers. You can also use straw ash. For 1 m² of land you will need approximately 5-6 kg of humus, 200 g of ash, 50 g of mineral/phosphorus additives.
- Planting garlic bulbs in the fall should be done strictly with the top up - this is an important point! If you plant a bulb with its bottom (roots) up, the plant will be weak, and all your efforts will ultimately not be crowned with success. This technique also works for prong planting. When you deepen the seed into the grooves, do not press too hard with your finger.
- Remember that garlic does not grow well with weeds! Their removal and regular weeding of the beds from the moment the first shoots appear is the key to a good harvest in the future.
- You can start fertilizing garlic from bulbs 4 weeks after the first sprouts appear. For these purposes, ammonium nitrate (ammonium nitrate) or superphosphate is usually used. As a first feeding, 8-10 g per 1 m² of beds will be sufficient. After 15-20 days, the procedure can be repeated, only now with a smaller amount of the same fertilizers (approximately 5 g per 1 m²). The last feeding is carried out in early June. An infusion of ash (150 g per 10 liters of water) is perfect for this purpose. Before watering, it should be mixed thoroughly and distributed evenly over the beds. This amount is just enough for you to water 1 m² of beds.
- I think it’s not worth reminding about regular watering, especially in the hot summer. Moisture should reach the roots; their depth is approximately 30-40 cm.
This is interesting: Growing bracken fern in open ground: how it reproduces and blooms
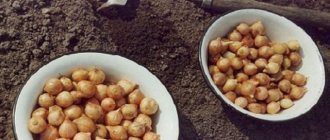
In the fall, the propagation of garlic by bulblets will bear its first fruits - single-toothed bulbs, which will become garlic heads next year. They are planted in the ground this same fall, after they have matured and dried out.
Often the bulbs are left in the ground for the winter, and with the onset of warmth, the crops are thinned to an acceptable density and then cared for as usual. In two years, garlic goes from a small bulb to a full head. However, it often happens that a seedling already in the first year forms a large one-toothed bulb, which is tasty and useful as a two-year onion.
It is important to know that garlic dug out of the ground should not be left in sunlight! It should be dried only in a dry and shaded place so that the heads do not “glass” and deteriorate. After the husks of the heads have dried, the garlic is tied into bunches and hung in a dry, dark room.
Garlic can be obtained from bulbs in another way; this option makes subsequent plant care easier. You will have to stock up on regular newspapers in advance, and when the time comes to plant the bulbs, the already prepared beds will need to be covered with these same newspapers, having first wetted them. For the required layer thickness, two newspapers laid on top of one another will be sufficient. Next, you will need to make small holes in the newspapers for planting each bulb. When all the beds are filled, spread a thin layer of soil evenly over the newspaper protection to prevent the wind from blowing away the newspapers. In this way, a kind of barrier will be created for weeds - they simply will not be able to break through the paper in the spring, and young plants will have more strength for harmonious development. Well, when the weeds finally cope with the protective layer, the garlic will be much stronger and not a single weed will be able to clog it.
Soil preparation
Having figured out when to remove garlic bulbs from the garden bed, you can begin preparing the soil. First you need to figure out where it is best to plant garlic. It is not recommended to plant the plant in an area where potatoes or tomatoes were previously grown. The fact is that the next year after these plants, fusarium spores remain in the soil, which lead to the death of garlic. Also, bulbs cannot be planted in beds where onions have been grown for several years before.
The best choice for planting a vegetable would be an area where cabbage or legumes were previously grown.
Having chosen the most suitable area, you can start fertilizing it. The garlic plant does not like an excess of organic fertilizers and therefore you should not add a lot of chicken droppings or manure to the soil. This will lead to deformation of the cloves and shoots.
If the soil has neutral acidity, then 5–7 kg of humus is used to fertilize a square meter of land. If necessary, add 50 grams of superphosphate and 40 grams of calcium to the soil. In an area with a high acidity level, additional lime is added in the amount of 400 grams per square meter.
After fertilizing the soil, you can learn more about the methods of planting garlic.
Differences between winter and spring garlic
Today it is customary to grow garlic using two technologies - winter and spring. The winter variety will have large cloves, while the spring variety will have much smaller cloves. The taste characteristics of the grown crop may also vary, while the gardener can choose both spicy varieties and juicy sweet garlic. Spring garlic is planted exclusively with cloves, whereas winter garlic can be propagated by seed bulbs.
Related article:
How to achieve a high yield of garlic
Garlic bulbs
The most common technology today is to grow garlic with cloves, but in this case you can get a harvest only the next year, whereas, having planted bulbs, you can dig up ripe, tasty bulbs literally 8-9 months after planting. When using aerial bulbs, caring for plantings is greatly simplified, since plants are better resistant to various infectious diseases.
Pre-winter planting of bulbs
To get a good harvest of garlic, you need to familiarize yourself with the peculiarities of planting this vegetable.
Before planting garlic bulbs, you will have to disinfect them with a manganese solution. To do this, small and large bulbs are placed in a container with manganese for 20–30 minutes. After this, the planting material is washed with warm water and dried.
Having prepared the garlic heads for planting, they prepare the site. To do this, the bed is divided into 2-3 rows with a width of about 70-80 cm. The distance between the rows is not very large - 20-30 cm from each other. Before planting, we provide moisture in the ground, which is very important for the rapid germination of seedlings. To do this, each row is thoroughly watered with warm and settled water.
See also
Types and uses of herbicides for garlic against weedsRead
Prepared garlic bulbs are planted only after watering all rows. During planting, garlic heads are carefully laid out on the bottom of the rows. The distance between each aerial bulb should be at least 5 cm. When all the bulbs are planted, they are covered with a thin layer of soil and carefully compacted with a plank. To retain moisture, the beds are sprinkled with a layer of peat 2–3 cm thick.
Proper watering and fertilizing
Watering and fertilizing garlic
The frequency of watering the beds will directly depend on the climate in the region. On hot days, plants will require moisture almost every 2-3 days, and in rainy summers, garlic may not be watered at all. Experienced gardeners recommend watering the beds twice a week in the hottest weather at the rate of one bucket of water per square meter of bed. A month before harvest, watering the plants should be completely stopped.
Related article:
Planting garlic in the fall: tips for a rich harvest
It will be impossible to get a good harvest without timely application of fertilizers. Winter garlic is fed in the spring with diluted slurry, adding a small amount of potassium fertilizer to such organic matter. In summer, you can use urea or potassium chloride. Also in specialized stores you can find mineral compositions intended for onions and garlic; the use of such fertilizers can significantly simplify the care of plantings.
Care
When the garlic bulbs are planted and ready to grow, you need to take care of their care.
Watering
To keep the head, roots, stem and leaves of the plant strong, you need to water it periodically. For irrigation, it is recommended to use cool well or tap water, which must settle before use.
You can moisten the soil with a regular bucket or a hose with a special water gun. Watering is carried out carefully so that the liquid does not get on the leaves of the plant. This can cause the garlic to turn yellow and dry out.
Top dressing
To protect the crop from diseases and pests, you need to take care of the plant’s immunity. This is precisely why plants are fertilized. For the first time, such a procedure is carried out a month after the emergence of seedlings. During fertilization, each square meter of area is treated with 20 grams of superphosphate and nitrate.
Next time fertilizers are added after two weeks. In this case, the amount of added superphosphate with saltpeter is reduced by 2–3 times.
Weeding
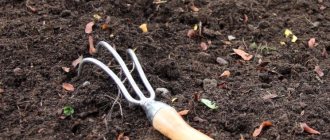
When growing garlic, the soil is periodically loosened. Experienced vegetable growers advise doing this three times a month. This procedure is carried out to improve the supply of oxygen to the upper layers of the soil after heavy rains.
Preparing seeds for planting
In order to test the described method, you must first properly grow and prepare the bulbs, which will later serve as a source of garlic seeds. The whole process begins with planting it.
You should immediately determine which garlic seeds will be collected from. The best option is to select large heads that should be planted in the soil and mark them from a number of others. When the garlic begins to produce arrows, they should be left on the selected 10-15 plants; on the remaining bushes, the seeds with arrows are cut off so that all the strength and nutrients are sent to the bulbs.
Garlic arrows are twisted into spirals and left until completely straightened. When they finally straighten up, the garlic should be dug out of the soil along with the fruit, carefully so as not to scatter the bulbs. The entire plant with all its parts, without cutting or cleaning, is taken to the attic or closet in a dark room, tied into one bundle and hung on a hook for 4 weeks.
While the garlic is waiting for its term, the beneficial substances that accumulate in the feathers during photosynthesis begin to flow into the head of the garlic and into the bulbs themselves. The seed pods begin to increase in volume, and when the stem dries out, giving up all the moisture, it is time to separate the bulblets from the base using a knife or scissors.
When it’s time for the bulbs in the attic to ripen, they become fragile and can crumble when removed from the stem, so you need to wrap them in gauze covers for the entire ripening period.
Harvest
Harvesting garlic from the air is carried out in August, when the stems of the plant begin to turn yellow and dry out. However, sometimes the timing of harvesting garlic bulbs may be different. It all depends on when the plant was planted.
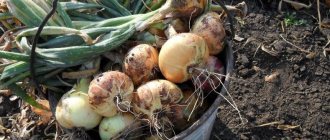
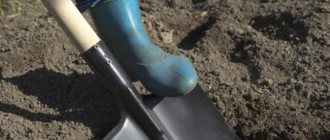
When collecting garlic heads, the plant is carefully dug out of the soil with a shovel, cleared of soil and dried in the sun. During drying, the heads are periodically turned over for better drying.
Many people are interested in when to trim the stems of garlic bulbs. This should be done after they are completely dry. In this case, the stems must be cut along with the husk.
How to collect seeds correctly?
The quality level of the obtained seed depends on compliance with the collection technology. It is necessary to observe the timing of seed collection and correctly determine maturity.
Deadlines
August is the month of harvesting the aerial bulbs of winter garlic. The tops begin to dry out and turn yellow. It's time to collect the seeds. The garlic is dug up and the shoots with the seeds are cut off. They can be dried together with the boxes, forming original brooms from the cut material. The seed heads are covered with gauze so that the seeds do not spill out after the fruit cracks.
How to determine maturity
Garlic shoots are ready for cutting when the tops turn yellow. Subsequently, the fruit-box with bulbs should open, breaking the plant film - the main sign that the seeds have time to ripen. By the peculiar cracking of the seed fruit, you can tell that the bulbs are ready for harvesting.
See also
When to dig garlic in Russia, harvest time depending on region and variety
Read
Inventory
To collect seed material, prepare the following equipment in advance:
- gloves;
- pruner;
- paper napkins.
You can remove the arrows with a sharp knife. When drying seeds using the method of hanging brooms from flower-bearing arrows, a paper base is not needed; the seeds are dried under natural ventilation conditions.
Air cutting technology
When cutting the shoots with pruning shears, leave a distance of 15 centimeters from the seed head along the stem. It is necessary to cut the stems carefully so that the bulbs do not fall off.
To prevent ripe seeds from spilling out of a ripe box, gardeners resort to a trick: they put a nylon stocking on the seed head or tie it with gauze.
If the seeds are ripe, the bulbs are easily separated from the head and end up in a protective cover that must be removed. Next, the seed material is calibrated and prepared for storage.
Garlic at home on the windowsill
Today, many people are interested in the possibility of growing garlic at home. Naturally, it is just as possible to grow a crop on a windowsill as on a plot. You just need to create the necessary conditions that will be comfortable for the growth of garlic. To grow garlic at home, you should ensure a comfortable room temperature - no less than 18 and no more than 20 degrees Celsius. The lighting on the windowsill should be good, and the garlic should be watered in a timely manner. Ventilating the room is also an important part when growing crops on a windowsill.
If you follow all the rules for preparing planting material, fertilizing the soil and choosing a planting site, as well as timely watering of the plant, the crop will delight summer residents with its abundant harvest of large garlic.
4.5 Rating 4.50 (4 Votes)
- Back
- Forward
Timing for harvesting bulbs
Bulbs are collected from the strongest, most selected specimens of garlic plants. At first glance, such garlic stands out among its neighbors in the garden with its thick, powerful stem and stately appearance.
The preparation of bulbs begins as soon as the film on individual plants begins to burst, fixing them in the inflorescence. If you are late with cleaning, all the bulbs will simply fall off.
To avoid this, the inflorescences are cut off along with most of the arrows, collected in a bouquet and hung in a ventilated room. The bulbs remain in this form for about a month until the stems dry completely . This allows nutrient reserves from the stems and leaves to move into the bulbs.
How to choose a place on the site to plant garlic for the winter
Garlic, which is grown from bulbs, loves light loamy soil consisting of sand and clay or sandy loam soil. The most optimal predecessors in this area include cabbage, pumpkin crops, legumes and various greens. The planting site must be dry and have access to the sun.
The most unsuccessful predecessors for garlic, which is planted for the winter, are onions and potatoes. Garlic can become infected from them with diseases such as fusarium and nematode.
As soon as the previous crops have been harvested, soil preparation for garlic begins immediately. Fertilizers are applied per 1 m2 of loamy soil, including 10 liters of overripe compost, to which 1 tbsp is added. l. phosphate and potassium sulfate. You can also add 1/2 cup of ground lime. After fertilizers have been applied to the soil, it should be leveled with a rake and the soil should be slightly compacted.
Secrets of growing garlic culture
The heads of winter garlic have a very simple structure. There is a rod in the middle, surrounded by up to 10 teeth. The fruits of this type of vegetable are stored for up to 5 months, after which they dry out. How to grow garlic from bulbs largely depends on the method chosen. In the first option, the bulbs are planted for the winter. In the middle zone, due to severe cold and freezing of the ground, a large number of seeds die.
To renew the variety of winter garlic, the bulbs are sent to the soil in the spring, then in February they are sorted out, soft and empty bulbs are thrown away, healthy ones are put in the refrigerator or taken to the cellar, placed in boxes with straw.