Vegetable growing » Garlic
1
2110
Article rating
Kira Stoletova
The key to a rich harvest is the correct choice of planting site and careful preparation of the bed for garlic. Let's look at how to prepare a bed for garlic for planting in the fall.
Preparing a bed for garlic
Determining the landing site
Garlic is a soil- and sun-demanding crop, so a garden bed for it should be set up in the most comfortable and level part of the plot. The plant does not like excess moisture; it should not be planted in low-lying and shaded areas.
There should be no melted snow on the future garlic bed: moisture destroys the sprouts. If the site is located on a hill, the wind will blow snow off the ground, and the crop is in danger of freezing.
If the site is completely located in a lowland, the beds for winter garlic are made high and reinforced on the sides with boards or slate: this allows the soil to warm up better and makes it less wet.
The future garden bed for garlic should be located away from the paths.
Garlic neighbors in the garden: joint planting of garlic with vegetables
Growing garlic in the garden is beneficial for many crops. Vigorous crops emit aromatic oils and biologically active substances that inhibit the development of putrefactive bacteria. The plant is a natural antiseptic and insecticide. Garden plantings are less affected by harmful insects.
If there is little space in the garden, you can combine plantings of different crops.
- Next to the garlic or alternating rows with each other, you can plant strawberries and cucumbers.
- By planting the plant between plantings of salad species, arugula, dill, carrots, you can protect them from the invasion of flies that destroy the green mass.
- Planting near roses, gladioli, and tulips repels aphids from flower bushes.
Interesting! Garlic grass acts as a natural bioregulator in the garden. The bitter aroma repels harmful insects, biological substances create an immune barrier against putrefactive diseases.
The bitter vegetable is placed in the middle of plantings of gooseberries, raspberries, and currants. It repels parasites such as spider mites, leaf rollers, and bark beetles. But some summer residents are against such plantings, since the bushes can block the sun from the garlic.
Garlic is not planted after tomatoes and potatoes, but nightshade vegetables are very popular when the bitter crop grows nearby. The pungent garlic aroma repels the Colorado potato beetle.
It is not recommended to plant garlic next to onions, as these are similar crops that can become infected with the same diseases. Legumes grow more slowly next to root crops; joint planting is undesirable.
Crop rotation
Changing the beds
The vegetable grows poorly for 2 years in a row in one place: the crop tends to deplete the soil. The periods between plantings in one place should not be less than 4-5 years.
When planting garlic, take into account what crop grew before. Bad predecessors are:
This is explained by the fact that crops have common diseases and are affected by the same pests; such crops tend to greatly deplete the soil.
Crops after which it is recommended to plant winter varieties are:
- cereals;
- legumes;
- zucchini and cucumbers;
- pumpkin;
- pepper;
- eggplant;
- early varieties of cabbage;
- radishes and summer radishes;
- leafy greens;
- perennial herbs;
- berry pickers
A feature of these crops is their short growing season; the soil has time to recover after harvesting.
Important for the success of the harvest is the selection of future neighbors of the spicy vegetable. Culture gets along well with:
- beans;
- cabbage;
- parsnip;
- tomatoes;
- leafy greens.
The proximity of beets, radishes, carrots and spinach has a bad effect on the growth of winter varieties.
Choosing a suitable place
They plant garlic where the sun shines brightly and the snow melts early in the spring. This means we are looking for an open place. Accordingly, a shady area, as well as low places that collect melt water in the spring, are not suitable for us. But if the whole area is like this, you need to prepare high beds. This is the most important point - to provide the garlic with light and the absence of excess moisture. Remember that garlic requires a minimum of six hours of light per day to thrive.
The place for garlic should not be on a slope or in a lowland, but it should not be too high either.
If the plot is large, a separate bed is allocated for garlic. If there is little space, it can be grown together with strawberries - these two crops get along well with each other. Garlic also grows well next to carrots, beets and lettuce. Garlic in this case acts as a protector of these crops.
The place for planting garlic should also not be too high - in winter, the wind blows snow away from such areas, bringing with it the threat of freezing.
The rule of crop rotation applies to garlic, like to all other crops: it cannot be grown for several seasons in a row in the same place. Otherwise, many harmful microorganisms and insects will accumulate in the soil, for which this crop is best suited. Then a decrease in harvest volume and quality will be guaranteed. As a result of scientific research, it was found that at least three years should pass between growing garlic in one place.
Good predecessors for garlic are cucumbers, cabbage (both white and cauliflower) and legumes, so in the chosen place you should first grow them first, and then garlic. But keep in mind that the garlic predecessor must be harvested no later than the end of July so that there is enough time to prepare the site. It is completely undesirable to grow garlic where potatoes or onions grew before.
Light, sandy loam soil is considered the best for garlic. If the site has heavy soil that retains moisture well, it is time to add additives in the form of sand or expanded clay for better aeration.
If the site is under quarantine due to infection with a stem nematode, planting garlic is strictly prohibited.
Photo gallery of predecessors and neighboring plants for garlic
Cabbage as a precursor to garlic
Salad is like a neighbor for garlic
Cucumber as a precursor to garlic
Carrots are like a neighbor for garlic
Peas as a precursor to garlic
Strawberries are like a neighbor for garlic
Soil structure
Good garlic in loose soil
The best soil for garlic is considered to be light, loose loamy and sandy loam soils and chernozems. Heavy loamy soils are not suitable for crops: they retain moisture and reduce crop yields. The acidity of the soil should be neutral.
Preparing a bed for garlic in the fall for winter varieties must necessarily include improving the soil structure. If the soil is loamy, adding sand and peat will help: a bucket for each square meter of land. Sandy soil is improved by adding peat (a bucket per 1 sq. m.) and loam (2 buckets per 1 sq. m.). A bucket of sand and loam per 1 sq. m of plot should be added to peat soils to improve their structure.
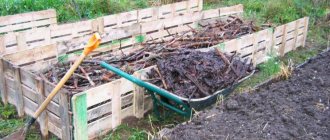
You can fertilize a garlic bed in the fall with a universal improver. Compost or humus will do. It is strictly prohibited to add fresh manure to the soil when preparing a bed for garlic: it is a source of weed seeds and negatively affects the crop. Additionally, to reduce soil acidity and improve it, add:
- wood ash (half a liter jar per 1 sq.m. area);
- chalk - 250 g per 1 sq. m;
- potassium salt - 20 g per 1 sq. m.
Organic fertilizers do not need to be added additionally if the soil has already been fertilized before planting the previous crop. Nitrogen fertilizers needed for the formation of leaf mass are not used in the fall: during the winter they are washed out of the soil.
Soil fertilization
How to treat the soil before planting garlic? The day before, you can use mixtures that you prepare yourself. Ready-made formulations are sold in stores.
We offer several recipes using which you can prepare useful mixtures for fertilizing the soil. All fertilizers are applied immediately before planting.
- Potassium salt - 25 g, granulated superphosphate - 30 g and humus - 5 kg are mixed.
- Simple superphosphate - 20 grams, potassium salt - 15 g, slaked lime - 1 cup, add to a bucket of organic fertilizer. Mix thoroughly.
- One glass of slaked lime is mixed with a bucket of horse manure, a tablespoon of superphosphate and nitrophosk (12 g) are added.
All of these mixtures are designed to treat 1 square meter of soil, ready for sowing winter garlic.
To plant garlic before winter, the soil must be fertilized.
- For loamy and sandy soil, use superphosphate, dolomite flour, and nitrophoska. For sandy ones you can use peat.
- Peat is added to clay soil, and a little loamy soil is added to peat soil.
Formation of the site
Preparing the right bed for garlic in the fall begins a few days after harvesting the vegetables. The selected location is thoroughly cleared of weeds and their roots, and the required amount of soil improvement components and manure are added.
The earth is carefully dug up to a depth of 20-25 cm. The width of the autumn garlic bed should not be more than a meter, the height should be 20-25 cm. If necessary, its edges should be reinforced with boards. The dug area is covered with film and left for several weeks.
During this time, the soil will be compacted and its structure will improve. A vegetable planted in such soil will not go deep down and will form a large head. If there is no rain, water the dug up soil: then the soil will settle better.
What kind of manure to apply under garlic
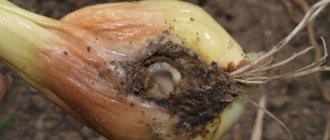
Can fresh manure be used as fertilizer for garlic? Definitely not. The amount of nitrogen substances in the fresh fraction is extremely high, so the cloves may not germinate because they will be loose. The root system of a newly rooted vegetable is delicate; a large amount of ammonia will simply burn them.
Under the crop, you can add compost with the addition of ash, phosphorites, and humus that is two years old. Even in this case, you need to be careful not to exceed the dosage. The substance is dissolved in a bucket of water - 1 liter and the soil is watered with this solution in the fall.
Soil disinfection
10-15 days before planting, the soil is treated with antifungal compounds. Typically, a solution of copper sulfate is used for this at the rate of 10 g per 2 liters of hot water. The diluted vitriol is added with cold water to 10 liters. For a garlic bed of 5 square meters. I need 2 buckets of this solution.
Instead of vitriol solution, use:
- strong dark pink solution of potassium permanganate;
- Bordeaux mixture at the rate of 100 g per 10 liters of water;
- store-bought preparations Fitosporin (anti-flexion);
- disinfecting compounds Acrobat, Radomil.
Antiseptic soil treatment is an effective prevention of fungal and viral diseases of the crop. The cultivated soil is covered with a film, which is removed only before planting the cloves.
Preparatory activities
The question of how to prepare a bed for garlic before winter is especially relevant in regions with a variable climate, when frosts can begin much earlier than they should. In such cases, work can begin in late August, one month before the cold snap. When growing garlic in central Russia, planting is recommended in the second half of September - early October, and in the southern regions - in early November.
When preparing the soil for planting garlic, special attention should be paid to the composition of the soil. The bed is fertilized with rotted vegetation (1 bucket), wood ash (2 cups), chalk (250 g), and superphosphate (in accordance with the manufacturer's instructions). This amount of useful components is calculated for 1 sq.m. land. The digging depth should be 20 cm in order to maximally saturate the soil with nutrients.
Considering the many nuances of cultivating a spicy crop, it is especially difficult for novice gardeners who do not know how to prepare a bed for winter garlic. It is ideal to form a bed of the following dimensions: height 25 cm, width 100 cm. It is not advisable to plant garlic immediately after digging the soil. Because after it settles, the cloves will be too deep, which will have an extremely negative impact on their growth and development. You can speed up the process of land subsidence by irrigation, performing the procedure 2-3 times.
Preparing the land for planting garlic before winter also involves disinfecting the beds using special means:
- fungicides such as Topsin - M, Fitosporin, which are highly effective against fungal infections;
- antiseptic insecticides (Ridomil Gold, Acrobat), distinguished by excellent disinfecting properties and the ability to work together with other agrochemicals.
Beginners often have the question of how to prepare a bed for garlic before winter using potassium permanganate, copper sulfate and Bordeaux mixture. The process of preparing the working fluid is quite simple; you need to know the dosage of the product used:
- A solution of potassium permanganate consists of 1 g of powder and 1 liter of warm water. The liquid should have a bright crimson color.
- Copper sulfate is diluted at the rate of 40 g per 10 liters of water.
- A mixture of potassium permanganate (1 g), copper sulfate (1 g) and boric acid (1 g) is dissolved in 1 liter of water.
- Bordeaux mixture is used taking into account 100 g of the drug per 10 liters of water.
Such thorough preparation of the soil for winter garlic will protect the plants throughout the entire growing season.
Green bed
This method allows you to get an excellent harvest without dressing the soil; it is suitable for regions where vegetables are planted in September-October. To properly prepare a bed for garlic for planting in the fall using this method, you must:
- choose a location and form a site in early August;
- apply organic and mineral fertilizers after 7-10 days according to the usual scheme;
- mark the soil for planting after 5-7 days, sow a mixture of peas and oats parallel to the furrows so that the distance between the rows does not exceed 30 cm;
- plant cloves or single cloves in the inter-row spaces in due time.
During the planting period, formed shoots of green manure will be visible. They will protect the rooted plant at the beginning of winter, and in the spring the green mass will become an additional fertilizer for the sprouts of the spicy vegetable. With this technology for forming a planting area, additional disinfection is not required.
Who doesn’t dream of a rich harvest on their plot? It rarely happens that a gardener has almost no effort to do this. Often only fruitful work leads us to the expected result. And if a gardener has set himself the goal of growing garlic, he should take care of this in the fall. If you do everything right, you will get a good harvest in mid-summer.
Let's look at what it means to prepare a bed for garlic in the fall.
Spring activities and feeding for growing garlic
Fertilizing garlic continues as soon as the snow melts. Sprouts are one of the first to appear in the beds. Over the entire season, you need to apply fertilizer three times for garlic.
The first feeding is urea. 3 tablespoons are diluted in 3 liters of water and distributed over 1 square. m. This causes the growth of leaves and shoots. Spring garlic, which is planted in the spring, is also fertilized with urea. Instead of urea, you can use humus diluted with water 1/10.
The second feeding is carried out 2 weeks after the first. This time complex mixtures containing nitrogen, potassium and phosphorus are used. The fertilizer is diluted according to the instructions. From organic matter, rotted manure with the addition of superphosphate in liquid form is suitable.
The third feeding is the last. It is carried out during the period of pouring the bulb. Metabolic processes at this moment should take place intensively. The preservation of vegetables in winter will depend on this. Phosphorus and potassium fertilizers are used - organic or mineral. Among the minerals, potassium salt is suitable as a fertilizer for garlic and superphosphate.
Of the organic ones, it is most advisable to water the bed with an ash solution.
You need to prepare the liquid in advance, since the substance is infused for a week before being applied under the roots. The ash contains a large number of microelements, namely iron, sulfur, iodine, boron, zinc. These fertilizers support the plant’s immunity, accumulate in tissues, and then release beneficial substances into the human body.
Additional measures in feeding garlic are foliar spraying of leaves. They are carried out if signs of chlorosis or disease appear on the leaves. Garlic is usually affected by several diseases at once - bacterial and fungal.
This means that the plant's immunity is reduced due to insufficient nutrition. Black, green, white mold, bacteriosis, fusarium, viral diseases - mosaic and yellow dwarfism.
If storage conditions are violated, fungal spores or bacteria can multiply due to incomplete drying of the bulbs or high humidity. Diseases are transmitted by garden pests that live on onions and garlic, so when aphids appear, you need to use chemicals or folk remedies.
Preparing land and beds for autumn planting of garlic
The basic conditions for an abundant and high-quality garlic harvest are the correct choice of location and adherence to agricultural technology in preparing the beds and soil . Before you prepare the soil, you need to choose a place for the future bed and determine the acidity of the soil. This is important to understand whether additional soil preparation is needed before planting.
Determining the landing site
The ideal option for a bed of winter garlic is a sunny plot of the garden , preferably on a hill, so that spring meltwater does not flood the crop. The correct location of the bed is in the north-south direction.
Attention! An important point is the fertility of the soil and its acidity level. Garlic is planted only after certain crops.
If you plant a crop without knowing this rule , you may end up with a small, weak and diseased harvest.
Selection of predecessors
You need to think in advance about how to prepare the soil for planting garlic in the fall. An important role is played by what kind of neighbors the garlic bed should have. The best predecessors are cucumbers and zucchini. But vegetables - garlic and onions do not go well with each other. Although the vegetable with its smell repels pests of garden and vegetable crops, raspberries and grapes do not tolerate such proximity. Vegetable crops inhibit the development of the root system of berry plants.
Tomatoes and cucumbers can withstand proximity to aromatic plants. Vegetables, along with zucchini and beans, will supply the soil with nutrients. But for carrots, the pungent smell of the plant will repel the pest - the onion fly, but the crop will not grow well next to the carrot beds.
A bed for garlic before winter should be planned in advance, and its predecessors should be taken care of as early as possible.
Planting green manure - oats, peas, white mustard - will help make the soil nutritious. These plants are planted in the spring in the area where they plan to plant the plant in the fall.
In mid-August, the planted crops are harvested. The soil after green manure will be filled with the elements necessary for plant growth.
A mixture of oats, peas and mustard is planted along the bed in the fall. By October, the seedlings will have grown, and their stems will be covered by vegetable plantings. During the winter, green manure will retain the snow in the garden bed and protect the seedlings from frost.
In spring, rotten parts of plants will become an excellent organic fertilizer.
Fertilizers during planting
Before the onset of winter, the planted seeds must take root . For this they need phosphorus and potassium. Tilling the land before planting a crop involves adding fertilizer while digging.
Use compost, humus or mineral mixtures:
- wood ash diluted with water at the rate of 1 liter of substance per bucket of water;
- phosphate rock (used no more than once every 3 years);
- solution of superphosphate with water (the mixture is prepared according to the instructions on the label).
It is allowed to apply mineral fertilizers simultaneously with compost . To better saturate the soil with nutrients, it is better to use fertilizers in liquid form.
What kind of manure to apply under garlic
You should not use fresh humus for garlic , as the ammonia it contains is dangerous for the developing root system. It is better to add compost in combination with wood ash, phosphorites or two-year-old humus. But even here it is important to maintain proportions so as not to cause harm. 1 liter of the complex mixture is diluted in a bucket of water and distributed over 2 square meters. m beds.
Mineral fertilizers for garlic
When choosing mineral fertilizers, it is important that they do not exceed the nitrogen ratio . Superphosphate contains 8% nitrogen substances, so it can be used.
The following complex mixtures are also used:
- "Nitroammophoska";
- two-component mixtures with a predominance of potassium and phosphorus;
- "Azofoska" winter type.
It is better to fertilize the soil under garlic with a liquid mixture.
Fertilizers
Digging of the bed is carried out to the depth of planting of garlic. The optimal dimensions will be one meter wide, twenty centimeters high. After removing the roots of weeds from the garden bed, the soil is loosened. After two weeks, they are spilled with a disinfectant solution of copper sulfate. The ground covered with film will settle. The missing elements are added to it. How to fertilize the soil for garlic in the fall? For fertilizing, the soil needs superphosphate. It is mixed with humus and added along with digging or loosening the area.
It is useful to use boric acid (10 grams), potassium permanganate (3 grams), iron sulfate (2 grams) as a top dressing, dissolving the substances in a bucket of water.
Fertilizers are applied to the garlic in the fall so that the vegetable meets spring with an optimal set of nutrition. Then the seedlings will come out early after winter and will be strong.
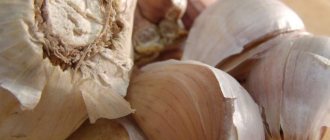
How to prepare garlic for planting in the fall
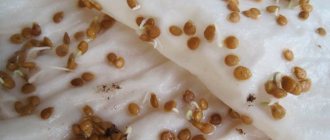
Winter garlic reproduces in three ways: seeds, cloves and bulbs. Only tines are suitable for autumn planting. Over the winter, the planting material takes root, and by July large heads grow.
Seed preparation algorithm:
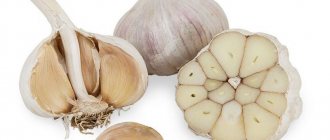
- Calibration From the available winter garlic, the largest dried heads that are not affected by rot and other diseases are selected.
- Selection of teeth. Carefully separate each head of garlic into cloves, choosing only the largest ones for planting. If there is little planting material, the existing teeth are sorted by size. Subsequently, they will also need to be planted - in groups. This is necessary for uniform germination. If the onion has 3 or 4 cloves, even if they are the largest, it is better to leave such a head for food. Such pathology indicates the degeneration of culture. Also, you should not leave affected teeth for planting.
- Preparing the cloves . The bottom of each tooth is removed for rooting. This must be done as carefully as possible so as not to damage the shell of the clove, immediately before the next stage of preparation.
- Seed treatment . A week before the intended planting, the prepared teeth are soaked for 24 hours in a weak solution of potassium permanganate. Ash liquor or copper sulfate is also used for this purpose.
Preparation of seed material
Preparation of cloves and bulblets is another important point that must be observed. First, calibration is carried out. The healthiest and strongest specimens that are not susceptible to disease are selected. The bottom of each clove must be removed so that it does not interfere with the plant’s roots. Having selected the bulbs by size, it is worth forming separate groups of them.
About a week before planting, the winter variety of garlic should be soaked in a weak solution of potassium permanganate for a day. It is effective to use a solution of copper sulfate or ash liquor. Pre-soaking will kill fungal spores that may contaminate the garlic.
You may be interested in: At what depth to plant garlic before winter, secrets of planting garlic
Planting winter garlic
The time for planting garlic depends on the depth to which the cloves are placed in the soil . The deadlines are quite flexible, the main thing is to have time to do everything 40 days before the onset of the first frost. This period is quite enough for the garlic to take root and then successfully withstand the winter cold. If you plant a crop earlier, it may germinate before frost and the future harvest will be spoiled.
First, prepare a bed for garlic for winter . Planting locations for crops are marked on the site. Furrows are made, the depth of which depends on the planting of the crop. This is approximately 5-6 or 13-15 cm. The distance between the furrows should not exceed 20 cm, and from the sides of the bed - 5 cm. A small layer of a mixture of ash, potassium salt and superphosphate with coarse sand is poured into the furrows. Then the bed is watered with a slightly pink solution of potassium permanganate.
Planting winter garlic to a depth of 10-15 cm
In the middle zone, where winter conditions are more severe, garlic is planted to a depth of 10-15 cm . This depth allows the crop to grow a good root system in order to safely withstand the cold. The cloves are placed in the ground with the sharp part at the top at a distance of 10-15 cm from each other, slightly deeper into the ground.
Advice. When planting, you can lay the teeth on the side. There is an opinion that garlic will overwinter better this way.
1-2 weeks after planting, humus or peat no more than 2 cm thick is added to the garden bed.
Planting garlic before winter to a depth of 3-5 cm
This method is practiced in the southern regions of the country . This depth will be enough for the garlic to take root and survive the winter cold. Planting material is placed in the grooves with the bottom down, slightly deepening each clove. The distance between the cloves is 12-15 cm.
Further steps for both landing options are identical . Bury the beds with rotted compost. The peculiarity is that simply filling in the furrows and leveling the bed is not enough. It is necessary to create a dense layer of soil, since loose soil will quickly be washed away by precipitation. Buried beds should be compacted slightly.
In the northern regions and middle zone, mulching of beds is mandatory . This procedure is necessary to warm the crop and further fertilize the soil. The mulch layer is approximately 10 cm. Ideal for this purpose are pine needles, peat, leaves, humus, wood ash, a mixture of soil with sawdust or dry manure, in general, any plant debris.
Reference. In the southern regions it is not necessary to mulch the beds.
The last stage is warming winter garlic . This is done at sub-zero temperatures. Snow is considered the best “blanket” for winter crops. If the area is well-ventilated, you can put temporary fences around the perimeter of the bed to prevent the snow from being blown away by the wind. Cover the beds with spruce branches, spunbond or dry branches.
Preparing the soil for planting garlic in the fall
Choosing a landing site
The correct choice of place for planting garlic will ensure that the gardener has a good harvest. When choosing a place for a garden bed, you need to take into account that the garden bed should be well illuminated by the sun's rays. Shading of beds by trees and buildings is not allowed. In addition, there should not be excess moisture in the soil, so a place in the lowlands will not be suitable for garlic.
Video: A month before planting garlic. Soil preparation, fertilizer and planting material. Season 2019-2021
Video: Autumn planting of garlic from “A” to “Z”. All the subtleties of autumn planting.
Garlic grows well on clay soil with neutral or low acidity, fertilized with rotted organic residues. You can correctly determine the acidity of the soil using vinegar. You need to pour a little vinegar onto a handful of soil from the proposed garden bed. If bubbles appear on the soil surface, this indicates that the soil acidity is normal. The absence of this reaction indicates that the soil acidity is increased. Acidity can be normalized using lime or chalk.
Good precursors for garlic are:
- cucumber;
- eggplant;
- early potatoes;
- zucchini;
- pepper;
- tomatoes;
- pumpkin.
Unfavorable precursors for garlic are:
- radish;
- turnip;
- late potatoes.
It is also important to consider the type of vegetables that will be adjacent to the garlic bed, since not all are well suited. Having a carrot bed next door will negatively affect the harvest. It is not recommended to plant garlic in its former location. Re-planting in the same place will be possible no earlier than three years later. This is due to the fact that as a result of constant cultivation in one place, fungal spores accumulate in the soil, as well as insects that infect new plants.
Soil disinfection
In the fall, when digging up the soil, it is necessary to take preventive measures to disinfect it. For these purposes, you can use the following tools:
- 5% solution of potassium permanganate. Dilute 5 grams of manganese in 10 liters of water. The color of the solution should be bright crimson;
- Copper sulfate solution. For 10 liters of water you need to add 40 grams of vitriol. Prepare the amount of solution at the rate of 1000 ml. per 1 sq. meter;
- Bordeaux mixture solution. For ten liters of water add 100 grams of copper sulfate and 120 grams of lime. Consumption 1000 ml. per 1 sq. meter;
- A solution of manganese, boric acid and copper sulfate (add 1 gram of each substance to 1000 ml of water).
- To kill fungal spores accumulated in the soil, it needs to be shed with tinctures of calendula and yarrow. After watering, the bed must be covered with polyethylene, which is removed immediately when planting garlic.
Soil preparation
The quality and yield of winter garlic depends on proper soil preparation and compliance with planting deadlines. The time to prepare the soil for winter garlic begins in late August - early September. The bed must meet these parameters:
- width - 100 cm;
- height - 15-25 cm.
Having chosen a place for a garden bed, you need to decide on the type of soil and, if necessary, improve it:
- in clay soil you need to add 1 bucket of peat and 1 bucket of sand per 1 sq. meter;
- sand and clay soil are added to peat soil;
- add 2 buckets of clay soil and 1 bucket of peat per 1 square meter to sandy soil. meter.
Next, preparing the land for garlic can be done in two ways:
Method 1. At the site of the proposed bed, it is necessary to spread humus. It is not recommended to use fresh mullein, as it contains large quantities of infectious agents and weed seeds. Then the soil is dug up, and all the weed roots are removed from the ground. Having leveled the soil with a rake, pour it with a solution of copper sulfate to prevent infection with fungal diseases, cover with film and leave until the garlic is planted. During this period of time the earth will have time to settle.
Important! It is recommended to plant garlic in settled soil. When the earth shrinks, the cloves may end up too deep, which will contribute to their rotting.
Method 2. You can prepare the soil without using copper sulfate. To do this, in mid-August they apply fertilizer, dig up the bed and, after the soil has settled well, sow white mustard or peas mixed with oats. Sowing must be done in rows. There should be a distance of at least 40 cm between the rows. At the time of planting the garlic, the sown seeds will already sprout. Garlic is planted between them. This technology will help retain snow in the garden at the beginning of winter.
Soil fertilization
Before planting garlic, you need to fertilize the soil. To do this, use both ready-made mixtures of fertilizers and those prepared independently. To prepare the fertilizer you will need:
- manure - 1 bucket;
- double superphosphate - 1 tablespoon;
- nitrophoska - 12 g;
- slaked lime - 250 gr.
The mass of this mixture is calculated for 1 square. meter of soil.
Useful tips
To get a high-quality harvest, follow all recommendations . Beginning summer residents often make basic mistakes, due to which they ultimately do not get the expected result.
Common mistakes:
- The location of the bed is below. Due to excess moisture, the heads will rot.
- Planting time is one of the key points. The crop should be planted when the nights have already become cold and the days remain warm.
- Insufficient insulation. If the garden bed is not covered with enough snow in winter, the garlic will freeze.
- The shoots must be removed, otherwise all the nutrients will not remain in the head, but will go into the air bulbs.
- In spring and summer, do not forget about watering and fertilizing.
Is it possible to plant garlic in wet beds?
Before deepening the seed clove into the hole, the hole is moistened abundantly. For drainage, it is recommended to add 1 tbsp. spoon sand under each clove of garlic. This way you can protect the roots of the plant from rot.
Sometimes during sowing there are prolonged autumn rains, and the soil cannot dry out for a long time. In order not to miss the sowing period, grooves are made to drain water along the rows of garlic. The beds are made on a hill; moisture should not remain on them.
The secret to a good garlic harvest is proper preparation of the bed for planting the winter variety. Beginning gardeners often make mistakes in growing vegetables. Compliance with the rules of agricultural technology, which are described in the article, will help improve your skills and get ripe large fruits.
We choose between winter and spring garlic.
Before you start the preparatory work, decide what kind of garlic you will plant: winter or spring. There is no fundamental difference in taste between them (winter garlic is more pungent, but the taste of spring garlic will be softer), they differ only in the size and number of cloves, as well as the timing of planting.
Winter garlic is planted in the fall, and in the spring it is one of the first to sprout in the garden. The head consists of large segments, the number of which can be from 4 to 12 pieces. But the cloves of spring garlic are smaller and there can be 20-25 of them in one head around the stem. Winter garlic is less suitable for long-term storage, but spring garlic is remarkably preserved for several months. The ideal option would be to plant both types of garlic to determine which one you like best, so next we will discuss how to prepare a place for winter garlic; using the same principle, you can plant spring garlic in the spring, if the need arises.
Determination of soil acidity
Planting winter garlic in the fall begins with planning:
- amount of fertilizers;
- at what depth to plant a winter type of plant;
- selection of predecessors;
- adding compost to pre-treat the beds.
But without determining the acidity of the soil, planting work cannot be carried out. For garlic, the norm is a neutral value from 5.5 to 7.0.
Acidic soils with a pH of 4.0 to 5.0 have a rusty tint, and the water accumulated in the lowlands is covered with an iridescent film on top. In areas with acidic soil, plantain, horsetail, and mint grow well.
On slightly acidic ones - chamomile, coltsfoot, wood lice. Nettle prefers neutral soil. And for garlic it is most suitable.
Acidity is reduced by adding dolomite flour or slaked lime to the soil. You can increase the level with wood ash.
See also
Description of the winter garlic variety Gribovsky, features of cultivation and careRead
Site selection and soil preparation.
Like the vast majority of garden crops, garlic prefers a sunny place, so the bed should be located in an open space, and not along a fence or in the shade of trees. Also, you should not place the bed in a low area, since melting snow in the spring can lead to excessive moisture in the soil and cause rotting of the planting material.
Garlic is also not original in its requirements for soil acidity - it grows well in neutral soil or in soil with low acidity. In dense and acidic soils, it is difficult for garlic to absorb nutrients; in this case, no fertilizers will help, the plant will grow very slowly and you will not get a good harvest.
Site selection and processing
Everyone who plans to grow winter garlic begins to cultivate the planting site at the end of summer. Soil preparation should be done 2-3 weeks before the first batch is planted. Garlic should be planted no later than 1 month before the onset of the first frost.
The time should be calculated as accurately as possible. After all, cloves planted early will have time to sprout, which will die during frosts. And if you are late with planting, the plant will not be able to take root in the soil and the harvest will not be as rich as we would like.
You can choose a place in 2 ways. A bed that previously grew zucchini, cabbage, cucumbers, tomatoes, and pumpkin is ideal for garlic. After harvesting the last harvest of these vegetables, you can prepare the freed area for growing hot root vegetables. Such soil will partially meet the requirements that must be met in order to get a good harvest of garlic in the spring.
It will be necessary to additionally feed the soil and treat it against pests. But it is better to avoid areas previously allocated for onions and potatoes, since these plants can transmit various diseases to young shoots through the soil. The land after these crops can be used for garlic no earlier than 3-4 years later.
If the bed where you plan to plant winter garlic is created from scratch, you will have to spend a little more time on arrangement. This plant thrives in a dry and well-lit place. If possible, it is better to set up a garlic plantation on a hill, which in the spring will be warmed by the first rays of the sun, which will accelerate the growth of seedlings.
How to prepare planting material and plant correctly.
Now that you have completed all the prep work in the garden bed, you can start preparing the garlic cloves that you plan to plant. You can plant not only garlic cloves, but also the bulbs that form on the shoot after flowering.
For planting, select the strongest cloves that have no signs of disease or mechanical damage; the future harvest depends on the quality of the planting material. Carefully cut off the bottom of all the teeth; it will only hinder the growth of the crop. It is desirable that all the cloves be approximately the same size, but if it is not possible to select the same planting material, then sort it by size and plant it that way.
Then, about seven days before planting, you need to start disinfecting the garlic cloves; to do this, you need to prepare a weak solution of manganese, dip the cloves in it and leave for a day. In addition to potassium permanganate disinfection, you can use a solution of copper sulfate or a solution of wood ash. At the end of the preventive treatment, the cloves should be dried.
Now that everything is ready, it's time to remove the cover from the beds and plant the garlic. Make furrows in the bed about 10-12 cm deep at a distance of 30-35 cm from each other. Pour sand into the bottom of the furrows, carefully pour in and lay out the garlic cloves (the sharp part should be facing up) at intervals of ten centimeters. Then fill the furrows and mulch the surface. As mulch, you can use compost, pine litter and spruce branches, fallen dry leaves, sawdust or straw. The main thing is that in the spring, do not forget to remove the mulch in a timely manner so that the garlic begins to grow.
If when planting you do not use garlic cloves, but bulbs, then the depth of the furrow should be about 5 cm, otherwise the process is no different (wet sand at the bottom of the furrow and mulching on top).
Scheme for planting winter garlic in open ground
Having completed all the preparatory activities listed above, you can begin planting. It is recommended to plant garlic before winter according to the following scheme:
Step 1: Make planting holes (pits) or grooves.
Here's how to make holes correctly:
- For this you can use, for example, a small spatula.
- The distance between the holes is 10 centimeters from each other.
- The distance between the rows is 20-30 cm. In this case, the rows must be placed strictly parallel to each other. To make everything even, you can pull the rope and make rows along it.
- It is also important to know what depth to plant the cloves. The optimal depth of the hole is approximately 8-10 cm.
Instead of holes, you can make planting grooves . The distance between them and the depth of the groove is the same as that of the holes (i.e. the depth is 8-10 cm, and the distance between the grooves is 20-25 cm).
Advice! If you have not previously prepared the bed and soil, and you have heavy soil on your site, then it is recommended to put sand or light compost at the bottom of the hole or furrow (to create a cushion). If you do not prepare the soil or do not make a cushion, then due to the dense soil during the growth process, the clove may rise on the roots closer to the surface of the earth.
Step 2: Plant the cloves in the holes or grooves.
Advice! To protect garlic from pests and nematodes, it is recommended to place a small handful of tobacco dust at the bottom of the hole or groove.
Planting must be done strictly with the bottom down . At the same time there is no need to press the teeth in , otherwise the soil underneath will become compacted, and they will take longer and more difficult to take root.
The distance between the cloves is 10 centimeters from each other (you must initially make holes with such a gap, so the information is relevant for those who plant in grooves).
Important! It is necessary to plant winter garlic at the optimal depth, because if planted too close to the surface of the ground, the cloves can easily freeze, and if too deep, they can rot.
Step 3: Cover the cloves with soil.
Planting material in holes or furrows should be filled with fertile soil.
Advice! If, again, you have not prepared the bed and you have dense, heavy soil, then you need to fill the holes or furrows with heavy soil as well. In this case, the planting material will not rise up, the root system will develop normally. In addition, moisture will not easily penetrate light and fertile soil, accumulating around the clove above heavy soil.
Step 4: We water.
In addition to ordinary water, you can water the bed with winter garlic with a solution of the Fitosporin-M fungicide to prevent fungal diseases.
Step 5: Mulch the planting site.
It is necessary to use fallen leaves, peat, and humus as mulching material. The height of the layer is approximately 10 centimeters.
Forming a bed correctly
The best dimensions for a garden bed will be a meter wide and 15 - 20 cm high . After its creation, the soil is left alone for two weeks - during this time it will have time to subside. If you neglect this rule and plant garlic cloves in the garden bed, then when the soil shrinks, they will go too deep and will not receive enough oxygen. This will slow down the process of rooting in the fall and germination in the spring, which will negatively affect the harvest. If there is little rainfall in September, then you can water the bed a couple of times to help the soil settle.
Copper sulfate is recommended for the prevention of fungal diseases
It is recommended to carry out the prevention of fungal diseases in the created beds. The land is treated: spilled with a solution of copper sulfate and covered with film until planting . A solution of copper sulfate is made as follows: a tablespoon of copper sulfate is dissolved in one to two liters of hot water, and then the resulting solution is diluted with cold water to 10 liters. This volume is enough for 1.5 - 2 square meters. m.
There is another option for a solution based on copper sulfate for soil treatment. First, the steps are repeated as in the first case - one spoon of copper sulfate is dissolved in one to two liters of hot water. Take a second container, fill it with one or two liters of cold water, and dissolve a tablespoon of baking soda and a tablespoon of ammonia in them (we are talking about alcohol from a hardware store, pharmaceutical ammonia is taken in the amount of one and a half spoons). The resulting solutions are mixed and diluted with cold water to a volume of 10 liters. The calculation for watering is the same: 10 liters per 1.5 - 2 square meters. m.