Why is processing needed?
Garlic is a crop that reproduces vegetatively. The new formed plant will fully receive from the mother a set of all available qualities and properties. Diseases will also pass on to him. They appear most clearly in the spring. It is necessary to treat the garlic well before planting for the winter in order to eliminate as much as possible the fungal spores that infect the plant. Timely prevention will contribute to obtaining a high-quality harvest.
The influence of existing hereditary diseases on the quality of winter prepared material was studied in detail at the All-Russian Plant Institute. Possessing expert information, gardeners have the opportunity to promptly combat diseases that affect plants. Thanks to this, the yield increases and its quality improves.
How to properly plant garlic cloves per head in beds
- Planting depth.
It is recommended to plant at such a depth that the layer of soil above the top of the clove is about 2 cm. This is on average 5-6 cm. The cloves are laid out in grooves or holes vertically on soft soil, bottom down, without pressing.
- Landing distance.
The distance between plants in a row should be at least 8-12 cm.
- Landing scheme.
For ease of caring for garlic, the beds should not be wide; 4-5 rows should be placed on them with a distance of 20-25 cm. The aisles between the beds should be from 50 to 70 cm. Depending on the processing method, garlic can be planted in different patterns, but prevent thickening.
Reasons for damage
If the garlic was not processed before planting before winter, then there is a high probability that most of the harvest will be spoiled. Vegetables often rot due to infection by pathogenic microorganisms. A common disease is garlic rot. It affects areas located in the central zone of the country. Pre-treatment of planting material solves this problem. If planting is done in the spring, it is additionally necessary to thoroughly disinfect the soil before the planned planting. This significantly reduces the risk of developing diseases of the planted crop.
The cause of spoilage is often improper treatment of selected planting material with disinfectants. By mistake, you can significantly exceed the required concentration of the substances used. This may burn selected tines. If not enough disinfectant is used, cleaning will not be complete. The result can also be damage to the crop.
Note! You should know exactly what to soak the root crop heads in before planting, and for how long. Failure to comply with existing requirements may destroy planting material.
Watering and fertilizing
After proper planting, you should start loosening the soil a few centimeters. Watering is carried out in the spring and stops with the onset of autumn. The volume of water will depend on weather conditions. If the summer turns out to be rainy, the amount of water should be reduced. On average, 12 liters are consumed. in the ratio of 1 time in 10 days.
Fertilizing can be combined with watering. It is carried out in several stages:
- When leaves appear on the crop, it is necessary to add urea through a watering can during watering. Consumption is approximately 3 liters. per 1 square meter.
- After two weeks you can proceed to the next stage. To do this, the drug “Agricola” is diluted in a bucket of water with the addition of nitroammophoska. Consumption is 5 l. per square meter.
- In order to support the formation of the bulb of this spice, a third stage is needed. It is usually held in mid-June. To do this, superphosphate is diluted in a bucket of water in the amount of 2 tbsp. Watering is carried out in a ratio of 5 liters. per square meter.
How to prepare garlic for planting in the fall
Winter garlic is suitable for autumn planting. Spring crops are not used during this period. Experienced gardeners name the characteristic differences between the two types:
- Only winter crops have an old arrow;
- the arrangement of cloves in several tiers is typical for a spring crop. The winter variety often has only one layer; in rare cases, the second layer may contain a pair of small cloves;
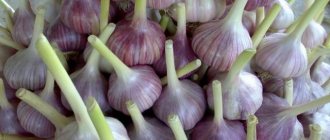
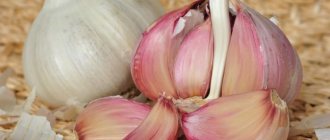
- The winter root vegetable differs in the color of its skin - it is purple.
If you plant a spring variety in winter, it will freeze and there will be no expected shoots in the spring. The preparation of winter varieties has a clear algorithm and is carried out in the established sequence.
Head selection
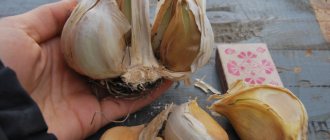
Not all planting material is suitable for winter planting. When selecting, gardeners carefully examine each head, evaluating them according to several indicators:
- head size. The new crop will inherit the parameters of the mother plant, so small heads are not selected for planting;
- weight of cloves. Ideally, the mass of the cloves should be approximately the same. Thanks to this, you can expect that all the teeth of the future harvest will be even;
- appearance. The planting material should not show signs of disease or have a loose texture. The disease may be visible on one tooth, but this already indicates that the entire head is affected;
- The thickness of the peel is assessed. In a healthy plant, it fits tightly to the edible part.
Selection and preparation of cloves
Individual cloves are selected for planting. It is better that they are the same size and shape. Separating the head is not always quick. Soaking it in water for a couple of minutes helps make the task easier. This helps soften the top skin. When dividing, you need to be careful not to injure the covering of the planting material.
Additionally, each clove should be inspected during the process. This will eliminate the risk of contracting the disease in the future. It is necessary to inspect the bottom. If there are no signs of roots on it, then such planting material will not germinate in the spring. When preparing a solution for soaking, you should add a couple of potassium manganese crystals to water at a temperature of 20-25 degrees. The water should be light pink. You can keep the heads in the solution for up to 30 minutes, no longer.
Do I need to peel winter garlic before planting in the garden?
Experienced gardeners strongly advise against cleaning planting material. The peel present on the cloves is a natural protection against pests and diseases. It should not be removed. If you ignore this point and clean the cloves, you can further injure the root base. As a result, the planting material will be spoiled, and in the spring you should not wait for seedlings in the garden.
Soil preparation and insulation
At the end of summer, summer residents prepare beds for winter planting. In order for the soil to be ready for plants planted before winter, it is treated with lime. This is done 30–35 days before autumn work.
To do this, lime (2 cups) is slaked in water and 1 cup of dolomite flour is added to the solution. The proportion is taken per 1 square meter. After which the area is covered with film. You can water the selected bed with salt water, where the white substance is dissolved in a proportion of 3 tablespoons per 10 liters of cold water.
To prepare the soil for winter “work,” add 10 liters of organic matter, 1 tablespoon of superphosphate and 1 tablespoon of potassium sulfate per 1 square meter. Garlic is usually planted 1.5-2 months before the onset of the first frosts and winter cold.
When choosing a site for planting bulbous plants, they give preference to flat surfaces without ravines and hills.
Despite the fact that the alium variety chosen for planting in the fall is a winter crop, experts still recommend insulating the garlic beds. To do this, the method of mulching or “wrapping” the planting area with fallen leaves, straw or bark is used.
It is important to remove the natural insulation in time with the onset of spring, before the first greenery appears in the garden bed. Since this is fraught with overheating of the cloves located in the ground.
How to treat garlic before planting before winter
You can process garlic before planting before winter in different ways. Each processing method allows for disinfection of planting material, which will further protect it from the effects of pathogens and other pests.
Ash liquor
This is the simplest, but very effective method to protect crops from roundworms. It requires thoroughly mixing wood ash in ordinary water. Over time, solid dust particles will begin to settle to the bottom of the container. The solution will be enriched with potassium and calcium hydroxides, which have a pronounced alkaline reaction. Such a solution negatively affects the life activity of nematodes hiding in the heads.
Potassium permanganate (potassium permanganate)
Potassium permanganate is the most common processing method. It destroys pathogenic microflora, suppresses the development of fungi, and nourishes seedlings with potassium, which has a beneficial effect on the further development of the crop. Potassium permanganate is not dangerous to humans, but it is better to work with it wearing rubber gloves. Solutions that are too concentrated may leave residue and damage the skin.
Copper sulfate
Among the many fungicides, copper sulfate is considered one of the most common. Its popularity is due to its pronounced disinfectant properties. Soaking the cloves in a solution of copper sulfate helps to destroy any harmful microorganisms that may affect the product. To prepare the solution you need:
- mix thoroughly (until completely dissolved) 5 g of crystals in 1 liter of water;
- immerse the heads in the solution for 10 minutes;
- After soaking, you need to dry the product naturally.
Using this solution, many gardeners process and then plant not only garlic, but also other crops.
Note!
Copper sulfate, which remains on the surface after drying the garlic, will protect it from any diseases.
Phytosporin solution
Fitosporin-M is often used to treat garlic before planting in the fall. This solution has a wide spectrum of action, protecting plants from almost all diseases. For processing you will need water (+25-30 degrees) with a volume of 1 liter. You need to dissolve the powder in it and place the garlic in the liquid for half an hour. If the solution is weakly concentrated, then the planting material can be soaked for an hour. Afterwards, the solution must be diluted with water 1:10 and used to treat the holes where the root crops will be planted.
Fungicide "Maxim"
Used to disinfect any root crops. Helps fight the development of various diseases in plants. It features the most simple method of application, which is indicated in the instructions. Can be used for cultivating soil, garlic and other planting materials.
Table salt
Any housewife must have table salt in her kitchen. It can be used not only in cooking, but also for disinfection and storage of various products. To process garlic you will need a concentrated saline solution (1 liter of water, 2 tablespoons of salt). To enhance the effect, you can add 1 tsp. regular baking soda. The solution must be thoroughly mixed until the crystals dissolve. The mixture disinfects the surface, softens the cloves and the salt penetrates inside, destroying all bacteria and fungus. Soaking will take 15 to 30 minutes. Afterwards, be sure to dry the root crop naturally and you can begin planting.
Reasons for needing the procedure
When starting planting, many farmers doubt the need for dressing. Of course, you can do without preliminary measures, but then the risk of crop loss increases. Even the most expensive and stable hybrid will die under unfavorable conditions. Soaking cloves in solutions prevents damage to such ailments as:
- mosaic;
- rot;
- penicillosis.
Pathogenic bacteria overwinter well in the soil, destroying winter beds. Spring varieties die from various infections. Diseases spread quickly, and it is very difficult to save affected specimens. The only way out for a lazy farmer is to completely uproot all plantings, and then disinfect the soil for a long time .
An incorrect procedure can also spoil the raw materials before sowing. A high concentration of the chemical will burn the heads, while a low concentration will not clean enough. It is important to accurately select the timing of agricultural work, otherwise the seeds will germinate before planting.
Before you begin pre-planting treatment of garlic, you must carefully inspect the seed. To get a rich harvest of spices, it is important not to skimp on using the best cloves as raw materials. They prefer heads that have a lot of seeds inside. Specimens consisting of two or three pieces degenerate and are therefore not suitable for cultivation.
Carefully inspect each tooth for defects. Danger signs include stains and sores, mold and damage. Even minor flaws will cause crop destruction. The bottom of good material is uniform gray in color, clean and without injuries. If there is a lot of defects in one onion, then it is thrown away. All raw materials are calibrated in size and shape.
The heads are disassembled into individual elements immediately before agricultural work, otherwise the seeds will dry out and the formation of roots will worsen. The internal protective scales are not removed. If the material was soaked in a warm solution, then it is necessary to start planting. Plants at elevated temperatures wake up and begin to actively develop.
Soil preparation
It is imperative to disinfect the soil before planting garlic for the winter. If you plant even properly prepared planting material in contaminated soil, you may not expect a good and healthy harvest. The soil must be free from pests and disinfected from fungal infections. Gardeners do not recommend planting garlic in the same area for two years in a row. A bed that has recently been fertilized with manure is not suitable. There is a scientific explanation for this:
- during the growth process, the above-ground part will be better formed rather than the bulb;
- formed heads in such an area are loose and are poorly stored;
- Such a crop has a high risk of infection with fungal diseases.
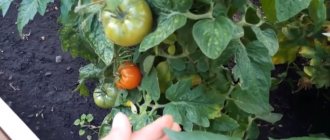
It is best to plant garlic in beds where cucumbers and tomatoes, pumpkin or cabbage have recently been grown. The area must be well lit. It is better that it is in the east or west direction. You should not plant garlic in lowlands, as moisture will accumulate there and the crop may rot.
Soil preparation should be done in the fall. This process includes several stages:
- the soil should be dug up and weeds should be carefully removed;
- during the digging process, add compost; if the soil is acidic, add ash;
- water the fertilized area with a fungicidal solution. It is better to use a ready-made soil disinfectant. It is added according to the instructions. The drug protects the soil from possible infections, improves the quality of the crop, and helps increase its quantity.
Planting garlic in spring
The technique for preparing garlic for planting in the spring is identical to that described above. There is a small "but". The spring variety needs to be irrigated until July. During the period of active plant development. The frequency of watering is reduced when the first leaves emerge. In August, watering must be stopped completely.
To increase the yield of spring planting you need:
Loosen the beds after each watering. This creates oxygen access to the plant.
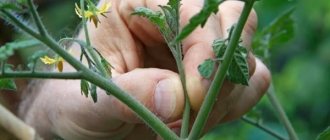
At the beginning of the last month of summer, it is necessary to build a knot from the regrown leaves. Thus, the nutrition of the leaves is inhibited and all the growth energy in the summer will go into the fruit.
Planting garlic crop in spring in open ground
The seeding period follows from March to April. If these minimum requirements are not met, the harvest will be far from what the gardener expected. Dig the beds to a depth of eight centimeters. The distance between the beds is up to twenty-five centimeters.
Proper nutrition of garlic crop
Garlic seedlings really love additional nutrition , and with a large harvest they will say “thank you” to the gardener.
- Primary feeding of spring garlic (spring) occurs after the first leaves have finally formed (approximately the beginning of the summer period). Bird waste and herbal decoctions and infusions will work well. It is strictly prohibited to use manure as feed.
- The next stage of replenishment occurs in approximately 14-20 days. Here you can use mineral supplements.
- Phosphorus- or potassium-containing fertilizers should be added already when the first cloves are formed.
Reviews
Elena
Before planting, I always process the garlic. To do this, they use my grandmother’s home method, since I see no point in buying any products, because ordinary salt also effectively destroys all bacteria. The harvest is always good, and no diseases are ever observed on the garlic. The teeth grow large, healthy and beautiful.
Andrey
Over the past 10 years, I have been using copper sulfate before planting garlic. In addition to processing the garlic itself, I also add it little by little to the ground. After such disinfection, garlic never gets sick. I also use copper sulfate to disinfect areas with tomatoes. The solution is sprayed onto plants and soil. As a result, no insects threaten my harvest.
Natalia
I've never processed garlic before. But in the last couple of years, diseases have begun to develop on it. I used different methods for disinfection, but the most effective, it seems to me, was only a solution with potassium permanganate. It copes well with microbes that parasitize root crops and is an excellent fertilizer. This treatment did not affect the taste of garlic in any way.
Protection from pests and diseases
Alium, like most cultivated plants, is susceptible to attacks by pests and diseases. Among the insects that love garlic, the most notable ones are the bulb fly and the onion borer, as well as thrips and the stem bulb nematode.
Among the diseases, the plant with a pungent taste is attacked by various types of rot and fungi. Particularly noticeable are powdery mildew, black mold and black neck rot.
Sprouted garlic must be treated against pests and diseases. To do this, they use either drugs purchased in specialized stores, or they use folk remedies. One of the popular ways to combat “garlic troubles” is a solution of copper sulfate and liquid soap.
The liquid is prepared in compliance with the proportions, namely, for 10 liters of water take 1 teaspoon of copper sulfate and 1 tablespoon of soap. The ingredients are mixed, and the resulting liquid is sprayed onto the green feather leaves.
Landing
In order for garlic to be processed well before planting in the fall, the soil must be fertilized with compost or fertilizer applied. To do this, use potassium sulfate in a ratio of 1 tbsp. l. for 2 l. water per square meter. For those who cannot carry out crop rotation. The soil is disinfected with 1 tbsp. l. copper sulfate per 5 l. water per square meter.
When all activities have been completed correctly, you can begin planting. It is important to focus on the weather conditions of your region. If you plant too early, unwanted greenery may appear, which will still die if it freezes. If planted late, the cloves will not have time to form a root system, and then the spice will die.
When planting cloves, under no circumstances should they be pressed into the ground, otherwise their bottom will be damaged. It is more prudent to make holes, add humus there and lay out the cloves. Then sprinkle with earth. It is important to maintain an interval of 20 centimeters between planting rows.
After planting, you will need mulch to cover the crop for the winter and protect it from the cold. To do this, they use leaves and straw, and in the spring they remove it so that the earth warms up.