An excellent variety among large tomatoes is Ursa Major. Its refreshing taste with a slight sourness will wonderfully diversify the summer menu.
| Height | Landing location | Ripening time | Fruit color | Fruit size | Origin | Fruit shape |
| Tall | Greenhouse, Open ground | Early ripening | Pink | Large | Variety | Flat-round |
Description and characteristics of the variety
“Ursa Major” has been in the state register of the Russian Federation since 2013. This variety has successfully passed all tests and is recommended for cultivation in any region. Plants develop equally well both in greenhouses and in open ground, in temporary shelters and greenhouses, that is, the variety is considered universal.
On a note! The “Big Bear” variety was bred by breeders: V.G. Kachainik, I.M. Afonina, N.V. Nastenko.
Description of the plant and fruits
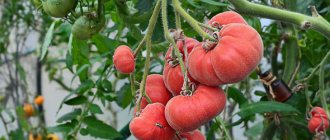
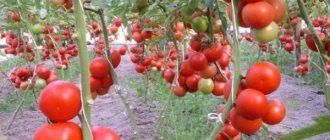
- Tomato bushes are very tall, indeterminate (with an unlimited period of stem growth). In greenhouse conditions, the bushes grow up to two meters, in open beds up to 120-150 cm. You can stop the growth by pinching the central shoot.
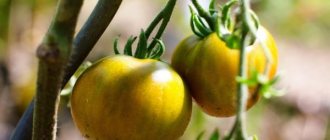
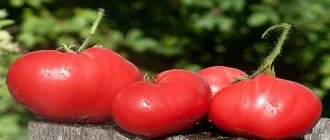
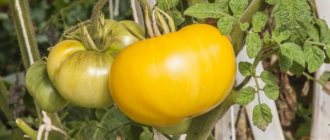
- Unripe tomatoes are pale green in color. When ripe, the fruits are soft pink, the shade is even and rich. There is no dark green spot at the base.
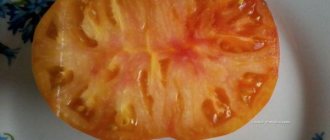
- If you cut a ripe tomato in half, you will see dense pink flesh and a small amount of seeds inside. Fruits usually have more than six chambers.
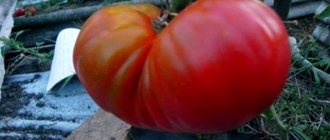
- Seed producers indicate that the average weight of Ursa Major fruits ranges from 210 to 260 g. But it has been experimentally established that tomatoes often grow much larger, up to 500 g or even more.
- The shape of the tomatoes is flat-round. There is a faint ribbing along the perimeter.
Productivity
Provided that tomatoes are properly cared for, favorable growing conditions are maintained, and agricultural practices are followed, up to 15 kg of tomatoes can be obtained from each square meter of bed area.
Ripening time
In greenhouse conditions, tomatoes of the Ursa Major variety begin to ripen evenly after 100-110 days, counting from the day of emergence. That is, tomatoes are picked from the bush already in July.
If plants are grown in open ground, the timing of fruit ripeness increases slightly. Thus, the variety belongs to both early and mid-early species. It all depends on the growing conditions.
Planting in open ground
The rules for landing the Big Dipper are simple:
- 3-4 bushes are planted per 1 m2.
- The holes are made at a distance of 50 cm in a checkerboard pattern.
- Add a handful of wood ash and the same amount of humus to each hole, pour it well with water so that the roots of the seedling are immersed in water.
- Having covered it with earth, press it down well to form a small depression, and water it again generously. Water should remain in the hole.
- The variety does not like thickening. Therefore, stepchildren pinch the entire growing season. Otherwise, yields will fall and the risk of disease will increase.
- When pruning, 2 branches are formed from the trunk. The bushes are carefully secured to supports and thick twine is used.
- During flowering and fruit formation, plants are sprayed with the Ovary stimulator.
- For feeding, fertilizers containing phosphorus and potassium are used.
They are valued for their high yield, beautiful appearance of the fruit, and delicate taste. The sweetish-tasting variety is equally good in salads, appetizers and hot dishes.
Due to their particularly large size, the fruits are not used whole for canning. But tomato juice with pulp from the Ursa Major fruit is thick and tasty. It is prepared for the winter and stored at home.
offers a new product - the Ursa Major tomato. The variety has been tested and approved for cultivation in any region of the Russian Federation, in the state register since 2013. According to the type of cultivation, the variety is universal - greenhouse, open ground, temporary shelters.
Two months have passed since the seeds were planted. The weather was warm outside. The soil in the garden has warmed up. The time has come for planting in open ground/greenhouse. For this, holes are made in the ground.
- At the bottom of each hole, it is advisable to add a teaspoon of complex mineral fertility granules.
- The seedling bush is transplanted using the transshipment method - together with a lump of the estate, so as not to damage the root system. It is not forbidden to simply cut plastic cups. If the seedlings were grown in peat pots, the bushes are planted en masse with a pot. Peat will serve as additional fertilizer.
- The seedling bush is pressed into the ground by one third and sprinkled with earth. This is necessary for the development of additional roots. After replanting, it is important to apply plenty of warm water so that the bush takes root better. From this point on, retreat is carried out as for an ordinary bush: watering, removing weeds, applying fertilizing, spraying against possible diseases.
The mulch layer must be at least 7 cm. Mulching between rows will help get rid of weeds and keep the soil loose. Use straw or sawdust as mulch. Fertilizers are applied with abundant watering. To feed tomatoes, organic matter and complex mineral preparations are used.
With proper care and formation of bushes into two stems, the Big Bear variety will delight you with very large pink fruits weighing up to 0.5 kg. From the fruits you can collect seeds for cultivation in subsequent years.
Important subtleties of growing Ursa Major tomatoes
To grow a healthy and rich harvest, it is necessary to comply with a number of growing conditions:
- be sure to pick the seedlings;
- do not plant more than four bushes on one square meter of beds. And the optimal quantity is 3 bushes per 1 m3;
- pluck out the shoots during the entire growing season of tomatoes. This variety is extremely sensitive to lack of light and does not tolerate shading;
- form a bush into two stems. When formed into one stem, yield indicators decrease;
- long bushes must be tied to strong, rigid trellises, otherwise they will droop and break;
- maintain optimal temperature conditions, soil and air humidity, since adult plants are most sensitive to uncomfortable environmental conditions and react to them by reducing yield;
- Apply fertilizers containing phosphorus and potassium to the soil. During the flowering period, treat the bushes with the preparation “Ovary”.
These subtleties of cultivation can be attributed to the minor disadvantages of the culture. Mature plants should not be left without attention. The variety is suitable for those gardeners who visit their plot more than three times a week and are ready to take good care of their tomatoes.
All the cultivation efforts, of course, pay off:
- a large number of tomatoes collected from the garden beds;
- beautiful pink fruits with thin skin (excellent presentation), not prone to cracking;
- pleasant delicate taste of tomatoes. The fruits are fleshy and literally melt in your mouth;
- good keeping quality of fruits and the ability to transport them.
On a note! Seedlings, unlike adult plants, are not so demanding on growing conditions, which is also a big plus and an argument “FOR” growing these wonderful large tomatoes.
How to grow tomato seedlings "Big Dipper"
Step 1. Preparing seeds and soil
You can grow seedlings in a purchased substrate or a mixture of garden soil and humus. The second option is preferable, because the seedlings should immediately get used to the soil in which they will grow in the future. We sift the soil for seedlings and remove the stones from it. It is advisable to steam the soil in advance by steaming or in the oven. On the day when the seeds are planted, we moisten the soil well.
We do not prepare purchased seeds for planting.
Important! You should not plant exactly as many seeds as can fit in the beds or greenhouse. It is better to make a reserve in case some of the plants die during sudden severe frosts or other emergency situations. Make one or two “reserve snails” that will remain at home on the window during the period when the main number of roots will be planted in the ground.
Step 2. Preparing the tools and materials necessary for growing seedlings
- Stationery erasers. Sold in sets. Or stationery/painting tape.
- Medical shoe covers or food film in rolls.
- Multi-layer toilet paper.
- Sharp knife.
- Cutting board.
- Tweezers.
- Permanent marker with water to sign “snail”.
- Underlay for Plenex floor coverings. The thickness of the substrate is strictly 2 mm. The backing should not be foil.
We fasten the roll of backing with tape in two or three places so that it does not fray. The roll must be cut into strips, the width of which is equal to or slightly less than the width of the toilet paper roll. We put a mark on the substrate and cut with a large sharp kitchen knife (not scissors). In the future, small uneven edges can be trimmed.
Step 3. Planting seeds “in the snail”
Align the edge of the cut backing with the edge of the toilet paper roll. Place on a cutting board and roll out to about 30 cm.
Important! At this stage, we do not cut the backing to length. We will do this when we have planted all the seeds. In one “snail” you can grow several varieties of tomatoes at once, if you separate them with a “limiter” in the form of a plastic disposable knife with the signature of the variety. But it is better not to grow too many varieties in one roll to avoid confusion. Optimally 1-2 varieties in one “snail”.
How to calculate the length of the “snail” in advance? It's simple. Seeds on the substrate will be placed at intervals of, for example, 10 cm and with a distance of 5 cm from the edges. That is, to calculate the length, we simply multiply the interval between seeds by the number of seeds and add 10 cm.
We moisten toilet paper generously from a spray bottle (or syringe) with a solution of the drug “Epin” at the rate of 3 drops per 0.5 liter of warm water. We lay out the seeds of the Ursa Major tomatoes with tweezers at intervals of at least 2 cm and no more than 10 cm and at a distance of 0.5-1 cm from the edge of the substrate. Twist the “snail”.
We cut off the excess part of the backing and secure the roll with a piece of tape. We put the “snail” in a regular plastic bag, tie it at the top, place all the “snails” in a box and put it in a warm place.
After 3 days we check the condition of the seeds. We remove the rolls from the bags and unfold them. The seeds should “hatch”.
Cover the sprouted seeds with a 1-2 cm layer of soil and roll up the “snail” again. We secure the roll. Place it vertically and sprinkle it generously with soil.
We spray the “snail” with a solution of the drug “Fitosporin-M” from a spray bottle and cover it with a garbage bag or cling film, which we remove after the sprouts appear.
Place the snails with the planted seeds in a box or any other suitable container and cover with film until shoots emerge.
Before green sprouts appear, you need to ventilate the “snails” by removing the film for 15-20 minutes daily.
Step 4. Caring for seedlings
Care consists of periodically watering the “snails” with a syringe. Do not over-moisten the soil or over-dry it.
You may be interested in: Dates for planting tomato seedlings in open ground and greenhouses according to the garden calendar Favorable days for planting tomatoes for seedlings in 2021 according to the lunar sowing calendar Favorable days for picking tomatoes in 2021 after germination: timing of picking tomato seedlings in the table by day
Step 5. Picking tomatoes into diapers
It is necessary to pick seedlings. If this is not done, the sprouts will begin to stretch.
We take our “snail”, remove the fixing rubber bands from it, place the bundle horizontally on a table covered with newspapers or film. We bend the edge of the “snail”.
Important! You shouldn’t unroll the entire “snail” at once. Perhaps you are physically unable or do not want to pick the entire volume of tomatoes at once, you want to take a break from work, etc.
We take a “diaper”, that is, an ordinary transparent cellophane food bag (packaging) measuring 22x32 cm. We put it on the table or, if it’s more convenient, for distribution.
Important! You should not use paper or newspapers as a “diaper”. They quickly get wet and lose their shape.
Pour one tablespoon of soil onto the “diaper” (in the middle). We extract the first sprout from the “snail” and, together with a lump of earth, transfer it to the “diaper”. Pour another tablespoon (or a little less) of soil on top of the root and lightly press the soil with your hand. The soil should cover the stem up to the cotyledon leaves.
If the soil is too dry and crumbles, then spray it generously with water from a spray bottle, and only after that put the sprout on the “diaper”. If the tomato roots are too long, their lower ends can be slightly bent. You should not pinch or pick off the roots of tomatoes.
Important! During the picking process, we discard weak sprouts that are lagging in growth.
On a note! Tomatoes are a crop that tolerates picking and transplanting well.
We begin to “swaddle” the sprout:
- we wrap the left free end of the bag, covering the lump of earth;
- we bend the bottom edge of the bag (you can first tuck the bottom edge, then the free ends of the bag to the right and left of the clod of earth);
- We wrap the remaining end of the bag around, forming a neat package;
- We secure the “diaper” with a rubber band and place it vertically in a regular fruit box or other similar container with a low side. We pre-place a two-centimeter layer of wet sawdust on the bottom of the box;
- We place the bundles in the container tightly next to each other.
On a note! If the seedlings are large, then we do not tuck the bottom edge of the “diaper”. Simply add two handfuls of soil, place the sprout, add another handful of soil, and then wrap the bag tightly. In this case, the bottom will be open.
When all the seedlings have been picked, the box should be removed to a warm, bright place.
You can add soil to the “diaper” as the seedlings grow. To do this, unfold the bag, add a little soil, and then roll the “diaper” back and put it in the box.
On a note! There is no need to rush into picking. It is better to do it a little later, when the sprouts have three leaves.
For hardening, seedlings can be placed in a polycarbonate greenhouse or loggia for several minutes, gradually increasing the time to several hours. If the air temperature is below +15°C, it is better to cover the sprouts with any covering material.
Transplanting seedlings to the garden bed
We dig holes in the beds at intervals of 50 cm and arrange them in a checkerboard pattern.
Pour a handful of ash and the same amount of humus into each hole, mix the fertilizers with the soil, and then pour half a bucket of water into the hole.
We take the seedling out of the “diaper”, place it in the hole, sprinkle it with earth, compacting it. Water the plant again with water.
Advice! If the tomatoes will be grown in open ground, then for better adaptation of the newly planted seedlings, we place arcs over the plants and stretch black covering material. After 4 days the covering can be removed.
Video - Growing tomatoes. Agronomist Advice
Reviews
Alexander Petrovich, 62 years old, Samara Last year I tried to grow Mishka Clubfoot at my dacha. I bought seedlings at the market, ready-made. I planted it in open ground, since I don’t have a greenhouse. Immediately after planting, mold appeared, but it was quickly dealt with, and the weather improved - it became warm and sunny. I fertilized the tomatoes three or four times throughout the summer, using humus and superphosphate. The bushes turned out to be tall, there were a lot of ovaries. But not all the tomatoes managed to ripen (we live in the Moscow region). However, I collected the entire harvest and put it in the pantry - within a week the tomatoes turned red and became very sweet.
Alekseeva Z., Tomsk I believe that the Mishka Kosolapy variety is suitable only for professional gardeners, as well as for those who have their own greenhouse. In my case, I was unlucky: I didn’t even grow seedlings from the purchased seeds of this tomato. At first, the seeds did not hatch at all, then the seedlings did not germinate at all, and eventually mold appeared and gradually destroyed all the tomatoes. So, we never got to enjoy the delicious fruits!
Sources
- https://DachaMechty.ru/tomat/uhod/bolshaya-medveditsa.html
- https://repka.online/ovoshhi/tomaty/rannespelyie/bolshaya-medveditsa.html
- https://MoeFermerstvo.ru/tomat/uhod/bolshaya-medveditsa
- https://fermilon.ru/sad-i-ogorod/ovoshhi/tomat-mishka-kosolapyj-otzyvy.html
[collapse]